Martin Hall originally did this Extra Credit video to teach how Nick Faldo hit a draw that would hold its flight against a stiff wind on the links. I'm going to use it to help those of you struggling to control your clubface.
At around the 1:20 mark Martin demonstrates the drill. He uses his trailing hand to hold his lead elbow against the side of his chest at impact and during the finish. I've written about this "flying lead elbow" problem before. If your lead elbow moves away from your body at impact, you can get a chicken wing move... and that's bad for clubface control. It's why a number of you can't draw the ball.
Obviously, Martin's drill will help you develop a draw if you don't have one now.
But it may be less obvious why this 'chicken wing' can also interfere with any effort to hit a fade, especially if you've seen Jordan Spieth using just such a move to create a fade. Those of you paying attention may have also noticed, however, that Spieth has a tendency to hit out-of-control banana balls as well... and that also comes from that chicken wing maneuver.
Here's why: When your lead elbow starts moving away from your side, it doesn't always move the same amount. That's a problem, people. For example, if it moves toward the ball a bit more than usual, you'll get more of an in-to-out swing than you expect... and if you're hitting a fade, you'll end up with a push-fade that can head out-of-bounds. It can also cause you to leave the clubface more open than you planned, which can create the same result.
By the same token, if your lead elbow doesn't move out as much, you might get too much forearm rotation and VOILA! instant duck-hook. If you were expecting your little fade, you get the classic double-cross. Neither of these is good for your score.
If, however, you keep your lead elbow close to your side all the way through your downswing, you create a more consistent rotation that happens in the big muscles of your lead shoulder. Unlike the smaller muscles in your wrist and forearm, you get far less variation with your shoulder movement, and that minimizes the range of variation in your clubface position.
Martin's drill can help you, regardless of whether you struggle with a hook or a slice. Give it a try and you'll see what I mean.

Showing posts with label shot shapes. Show all posts
Showing posts with label shot shapes. Show all posts
Sunday, July 29, 2018

Tuesday, June 26, 2018
Bubba Watson on Swing Thoughts (Video)
Golfing World did this video a couple of years back, with Bubba passing on some of his thoughts on how he approaches the game. As usual, I'll be focusing on one specific thought from the video.
Starting around the 1:40 mark, Bubba talks about how he practices. No long practice sessions; he likes short sessions, 15 minutes or so, and he works on what needs working on. His example? Suppose his ball isn't cutting the way he wants. He goes out for maybe ten minutes and figures out why it isn't. Then he tries to overcome the problem.
Let me suggest a way to try Bubba's approach. The vast majority of weekend golfers have trouble hitting a draw, so let's use that as an example. (If you're problem is a fade, just use the same methodology but adjust accordingly.)
Let's ignore setup fundamentals and such for the time being. To make the ball draw, you have to hit the ball from slightly inside -- that means you have a slight in-to-out swing path -- and you want the clubface either square to your target or slightly closed (the latter will create a bigger curve). As long as you make an in-to-out swing and have the clubface square or closed, the ball is gonna draw.
Now, go out on the range and try to make an in-to-out swing that hits the ball with a closed clubface. I don't care whether you swing along your footline or not; I don't care if your stance is open, square or closed; I don't care how your swing looks. Forget what your instructor told you about the 'proper' way to swing. All I want you to do is find a way -- ANY WAY -- to make that ball draw. Start with a half- or three-quarter swing if you want, then stretch it out to a full swing. Find out how YOU can make the ball draw, learn how that swing feels, and then work till you can repeat that swing.
As Bubba says in the video, all that matters is how you score. Don't worry about how your swing looks; just get the results. This is what it means to "own your swing." And over time, as you keep using it and getting better with it, you'll gain more distance and control as it becomes second nature to you.
In a lot of ways, THAT is Bubba's secret that no one understands. It's not about having people applaud your swing; it's about learning to control the golf ball. Let them laugh, if that's what they want to do.
Trust me: They won't laugh for long after you start kicking their asses on the course.
Starting around the 1:40 mark, Bubba talks about how he practices. No long practice sessions; he likes short sessions, 15 minutes or so, and he works on what needs working on. His example? Suppose his ball isn't cutting the way he wants. He goes out for maybe ten minutes and figures out why it isn't. Then he tries to overcome the problem.
Let me suggest a way to try Bubba's approach. The vast majority of weekend golfers have trouble hitting a draw, so let's use that as an example. (If you're problem is a fade, just use the same methodology but adjust accordingly.)
Let's ignore setup fundamentals and such for the time being. To make the ball draw, you have to hit the ball from slightly inside -- that means you have a slight in-to-out swing path -- and you want the clubface either square to your target or slightly closed (the latter will create a bigger curve). As long as you make an in-to-out swing and have the clubface square or closed, the ball is gonna draw.
Now, go out on the range and try to make an in-to-out swing that hits the ball with a closed clubface. I don't care whether you swing along your footline or not; I don't care if your stance is open, square or closed; I don't care how your swing looks. Forget what your instructor told you about the 'proper' way to swing. All I want you to do is find a way -- ANY WAY -- to make that ball draw. Start with a half- or three-quarter swing if you want, then stretch it out to a full swing. Find out how YOU can make the ball draw, learn how that swing feels, and then work till you can repeat that swing.
As Bubba says in the video, all that matters is how you score. Don't worry about how your swing looks; just get the results. This is what it means to "own your swing." And over time, as you keep using it and getting better with it, you'll gain more distance and control as it becomes second nature to you.
In a lot of ways, THAT is Bubba's secret that no one understands. It's not about having people applaud your swing; it's about learning to control the golf ball. Let them laugh, if that's what they want to do.
Trust me: They won't laugh for long after you start kicking their asses on the course.
Sunday, June 3, 2018
Johnny Miller on Trevino's Signature Move (Video)
Yes, I'm on a "tip trip" this week because I don't have any other topic that has grabbed me. So today I'm posting an old Golfweek video featuring Johnny Miller talking about Lee Trevino's signature move.
Miller says that what made Trevino's swing unique was the way he "chased" the clubhead down his aimline, keeping the clubface moving toward his target longer than most players.
But what I want to focus on is how Trevino finished his shots, because it can help you hit a low-trajectory fade. For many of you, this is the "go-to" shot you're looking for when you need help hitting the fairway. Johnny demonstrates this around the 2:00 minute mark in the video.
The key is that, when he finishes his shot, he has shortened the swing slightly and the shaft is leaning toward his target line, almost parallel to his spine. That's a simple concept and, although it may take you a bit of practice to master, it can be a very useful go-to shot when the landing area is tight.
This isn't the kind of shot you're going to hit a super long distance. Go-to shots rarely are. But this is something you can hit with any club in the bag, from almost any lie, and get a playable result. Having a shot like that in your repertoire is a great strategy move that can really save you some strokes.
Miller says that what made Trevino's swing unique was the way he "chased" the clubhead down his aimline, keeping the clubface moving toward his target longer than most players.
But what I want to focus on is how Trevino finished his shots, because it can help you hit a low-trajectory fade. For many of you, this is the "go-to" shot you're looking for when you need help hitting the fairway. Johnny demonstrates this around the 2:00 minute mark in the video.
The key is that, when he finishes his shot, he has shortened the swing slightly and the shaft is leaning toward his target line, almost parallel to his spine. That's a simple concept and, although it may take you a bit of practice to master, it can be a very useful go-to shot when the landing area is tight.
This isn't the kind of shot you're going to hit a super long distance. Go-to shots rarely are. But this is something you can hit with any club in the bag, from almost any lie, and get a playable result. Having a shot like that in your repertoire is a great strategy move that can really save you some strokes.
Saturday, May 26, 2018
Ged Walters on Hitting a Draw (Video)
Golf Monthly's Ged Walters did this cool video on hitting a draw. Why is it so cool? Because he's hitting irons off the fairway, not drivers off the tee! And to make it even better, he's hitting from a hanging lie, which makes the shot even tougher.
The fundamental things he teaches here are not new or unique, but his presentation is one of the simplest I've seen. Let me point out a couple of things he says.
First of all, I like how he distinguishes between a draw and a hook. It's not about how big the curve is, but about whether the ball is getting closer to the target or farther away at the end. A draw curves out and and finishes "on target" -- that means it's still moving toward the target when it stops. A hook curves around too much, so that it moves past the target and keeps moving away from it. A hook is out of control. That's a good way to think about it.
He likens the way you strike the ball with the club to the way a footballer kicks the ball. (For my American readers, we'd call it soccer.) The kicker strikes the ball with the inside of his foot; the inside of his foot is facing the target while his foot is moving out to the right (you lefties would be moving to the left).
And playing off a hanging lie? You just exaggerate this action. A very simple explanation.
If there's one key technical thought I'd like you to remember, it's that you position the ball just slightly back of center in your stance. You want to come at the ball slightly from the inside with your swing -- that's the footballer analogy again -- and moving the ball back slightly encourages that, without having to make a huge change to your swing. You might even want to stand slightly farther from the ball, simply because that will help you hit from the inside more easily, without a lot of conscious thought.
Walters has -- in my opinion -- done a real service to weekend players with this explanation of how to play a draw off the turf with an iron. So spend a little time with this video. It'll be well worth your time.
The fundamental things he teaches here are not new or unique, but his presentation is one of the simplest I've seen. Let me point out a couple of things he says.
First of all, I like how he distinguishes between a draw and a hook. It's not about how big the curve is, but about whether the ball is getting closer to the target or farther away at the end. A draw curves out and and finishes "on target" -- that means it's still moving toward the target when it stops. A hook curves around too much, so that it moves past the target and keeps moving away from it. A hook is out of control. That's a good way to think about it.
He likens the way you strike the ball with the club to the way a footballer kicks the ball. (For my American readers, we'd call it soccer.) The kicker strikes the ball with the inside of his foot; the inside of his foot is facing the target while his foot is moving out to the right (you lefties would be moving to the left).
And playing off a hanging lie? You just exaggerate this action. A very simple explanation.
If there's one key technical thought I'd like you to remember, it's that you position the ball just slightly back of center in your stance. You want to come at the ball slightly from the inside with your swing -- that's the footballer analogy again -- and moving the ball back slightly encourages that, without having to make a huge change to your swing. You might even want to stand slightly farther from the ball, simply because that will help you hit from the inside more easily, without a lot of conscious thought.
Walters has -- in my opinion -- done a real service to weekend players with this explanation of how to play a draw off the turf with an iron. So spend a little time with this video. It'll be well worth your time.
Saturday, April 28, 2018
Kyle Morris on the "Go-To" Shot (Video)
GCA coach Kyle Morris posted this video on how to develop a "go-to" shot, which he defines as a shot that starts one way, curves back and never over-curves. If you draw a line toward your target, a go-to shot will start to one side and curve back toward that line but never cross it.
The drill is simple. You set up an obstacle of some sort -- he uses an alignment stick -- about eight paces ahead of you. Then you try to start the ball to one side and get it to curve back WITHOUT crossing to the other side of the stick.
This is a great drill because it helps you think less about mechanics and more about the shot shape, to think less about how your swing the club and more about hitting the ball where you're looking.
Learning to feel how the shot should move can take your game to a different level. And this drill is about getting results when your popcorn is all burnt. That's when you need it most!
The drill is simple. You set up an obstacle of some sort -- he uses an alignment stick -- about eight paces ahead of you. Then you try to start the ball to one side and get it to curve back WITHOUT crossing to the other side of the stick.
This is a great drill because it helps you think less about mechanics and more about the shot shape, to think less about how your swing the club and more about hitting the ball where you're looking.
Learning to feel how the shot should move can take your game to a different level. And this drill is about getting results when your popcorn is all burnt. That's when you need it most!
Thursday, April 19, 2018
Countering a Push-Slice
Last week I did a post about Patrick Reed's driver swings. One of those swings was something Patrick calls a "slinger hook," which is just another name for a push-hook. That's when the ball starts on an in-to-out path -- that is, the clubhead swings out across your aimline -- and the ball then curves back across the aimline. It's a like a giant half-circle that swings around your body. If you aim correctly, the ball curves back toward the target.
In the comments I promised Phil I'd do a post about push-slices, those nasty shots that start out on an in-to-out path BUT continue to curve AWAY from you, rather than around you. The result is that no matter what you do, that ball ain't never gonna land near the target! For a righthander the ball ends up in the weeds on the right side of the course; for lefties, it's deep in the left rough.
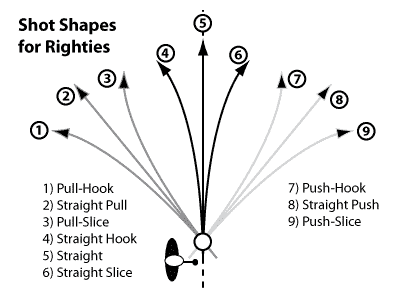
The image below this paragraph shows the nine potential shot shapes you can hit if you're a rightie. Number 7 is Patrick's slinger hook, number 9 is the push-slice.
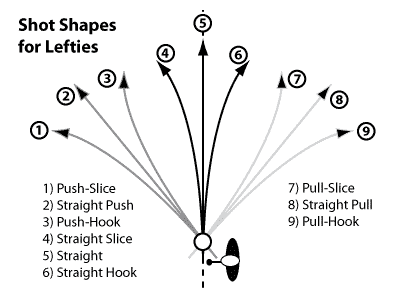
And the image below this paragraph shows the nine potential shot shapes you can hit if you're a leftie. In this case, number 3 is the slinger hook, number 1 is the push-slice.
Now, the difference between the slinger hook which Patrick uses to great effect, and the push-slice which nobody gets any good out of, is the clubface angle.
The most obvious fix would be to take a stronger grip at address, and if you're doing everything else correctly during your swing, that would likely fix it. Too many players have other problems to say that for sure, though.
In the comments I promised Phil I'd do a post about push-slices, those nasty shots that start out on an in-to-out path BUT continue to curve AWAY from you, rather than around you. The result is that no matter what you do, that ball ain't never gonna land near the target! For a righthander the ball ends up in the weeds on the right side of the course; for lefties, it's deep in the left rough.
The image below this paragraph shows the nine potential shot shapes you can hit if you're a rightie. Number 7 is Patrick's slinger hook, number 9 is the push-slice.
And the image below this paragraph shows the nine potential shot shapes you can hit if you're a leftie. In this case, number 3 is the slinger hook, number 1 is the push-slice.
Now, the difference between the slinger hook which Patrick uses to great effect, and the push-slice which nobody gets any good out of, is the clubface angle.
- In the slinger hook, the face is CLOSED relative to the path.
- In the push-slice, the face is OPEN relative to the path.
The most obvious fix would be to take a stronger grip at address, and if you're doing everything else correctly during your swing, that would likely fix it. Too many players have other problems to say that for sure, though.
- Believe it or not, something as simple as standing too far from the ball can cause you to push-slice. It creates an overly dramatic in-to-out swing that delays your clubface from closing on time.
- Likewise, you can have your ball teed up too far back in your stance. You won't have enough time to square the clubface before it reaches the ball.
- Some players slide their hips too far forward (toward the target) during their downswing, causing them to lean backwards at impact. That square clubface you had at address is now open because you tilted your shoulders back and opened them. But players with overactive hands sometimes flip the club and create a HUGE slinger hook that goes deep into the opposite trees. this is sometimes called "getting stuck."
- You have no doubt heard that good players reroute the club on the way down and flatten their swing plane. That does happen for many players. But one problem instructors sometimes overlook is that you can flatten your club plane too much -- called "laying it off" -- and open the clubface on the way down. If you make a strong hip drive on the way down, you can end up lifting your trailing elbow while your hands drop down. I know about this problem firsthand; it took me months to track it down, and during that time I hit the ball both ways -- push-slices and pull-hooks. It's a nasty problem!
- And you can simply swing your arms out too far from your body during your downswing. Specifically, your lead arm gets farther from your body than it was at address.
- If you're standing too far from the ball, just stand a little closer.
- If the ball is too far back in your stance, move it a little more forward.
- If you slide too far forward, think "down" instead of "slide" to start your downswing. The basketball drill is a great way to work on this. I periodically remind folks of this drill. You can find the basketball drill in this post.
- If you flatten your swing too much as you start down, the basketball drill is also good for this one. Since it eliminates some of the forward slide, it also redirects your leg drive more "into the ground."
- And if you're swinging too much in-to-out, you can use the old "glove under lead arm" drill. There are a number of similar drills, all of them concerned with connection. Some use a glove or towel held under your lead arm during your swing. And here's a post with a video of Ben Hogan's connection drill, which teaches connection with both arms.
Thursday, April 12, 2018
Reed's Driver Swings Revisited (Video)
I posted this video in a post last week and promised I'd get back to it. So let's do it!
First, here again is the video of Patrick's three different driver swings.
Now let's look at the keys to each swing separately.
If you don't have a natural draw, you probably won't need the extremes Patrick uses. Make sure the clubface is aimed at the flag, that you're aimed farther left than you normally would (that's farther right for you lefties) and then just try to hold the face square or slightly open during impact. You may not need the helicopter finish at all. A little practice on the range should tell you how much you need to exaggerate the address position and moves.
As you can tell, none of these swings is particularly difficult to understand. The guiding key here is that, whatever your natural shot shape is, it's the other shot shape that you'll need to exaggerate. Natural drawers of the ball, you'll want to focus on Patrick's technique. But you natural slicers, you'll want to focus more on my suggestions, simply because you don't naturally create such a dramatic release of the club at impact.
One other thing: Don't try to learn them all at once. Pick one of them, work on it until you can play it with some degree of consistency, and then you can try learning another of the swings. Adding one dependable shot shape to your repertoire is better than adding three undependable accidents waiting to happen.
First, here again is the video of Patrick's three different driver swings.
Now let's look at the keys to each swing separately.
- The slinger draw is a huge low hook. Patrick says he aims WAAAAAY right -- as much as 30 yards! --and really twists his forearms as he hits the ball. Yes, that will work... but it can be a bit tricky for some of you. Let me offer another method that some of you might find easier and a bit more consistent.
- The high bomb is a high, long draw. Patrick moves it forward, tees it high and swings hard, again with that hard release you get by twisting your forearms.
- Finally, the butter cut is the fade with the Palmer-style helicopter finish. Patrick aims the clubface at the flag and makes sure his swing path -- which means his stance -- is aimed way left. He also tries to hold the clubface open, which means he tries to keep the toe of the driver pointed more to the right (left for you lefties) as long as possible. The helicopter finish isn't as dramatic in the video because he's indoors and not swinging as hard as he does on the course.
If you don't have a natural draw, you probably won't need the extremes Patrick uses. Make sure the clubface is aimed at the flag, that you're aimed farther left than you normally would (that's farther right for you lefties) and then just try to hold the face square or slightly open during impact. You may not need the helicopter finish at all. A little practice on the range should tell you how much you need to exaggerate the address position and moves.
As you can tell, none of these swings is particularly difficult to understand. The guiding key here is that, whatever your natural shot shape is, it's the other shot shape that you'll need to exaggerate. Natural drawers of the ball, you'll want to focus on Patrick's technique. But you natural slicers, you'll want to focus more on my suggestions, simply because you don't naturally create such a dramatic release of the club at impact.
One other thing: Don't try to learn them all at once. Pick one of them, work on it until you can play it with some degree of consistency, and then you can try learning another of the swings. Adding one dependable shot shape to your repertoire is better than adding three undependable accidents waiting to happen.
Sunday, April 8, 2018
Patrick Reed's Three Driver Swings (Video)
This Golf Digest video shows three different driver swings that Patrick Reed uses. You'll note that Patrick uses his hands A LOT, but then again he almost always draws the ball.
The key here are the words almost always. This video shows how he hits his slinger draw (a huge low hook), the high bomb (a high, long draw) and the butter cut.
You may wonder why I'm posting this today, since most of us would rather watch the Masters instead of reading instruction material... and since I'm not going to go into detail about the swings until a later time. The reason is simple.
No doubt you heard analysts talking yesterday about Patrick's Palmer-like helicopter finish when hitting a fade, and most of them said this must be something new. But this video clearly shows a helicopter finish to the butter cut... and this video is a year old!
So it appears that his improved fairway percentage this weekend is the result of club changes and practice, not some elaborate new mechanical technique. Patrick is simply "dancing with the one that brung him," and his dance partner came ready to boogie!
The key here are the words almost always. This video shows how he hits his slinger draw (a huge low hook), the high bomb (a high, long draw) and the butter cut.
You may wonder why I'm posting this today, since most of us would rather watch the Masters instead of reading instruction material... and since I'm not going to go into detail about the swings until a later time. The reason is simple.
No doubt you heard analysts talking yesterday about Patrick's Palmer-like helicopter finish when hitting a fade, and most of them said this must be something new. But this video clearly shows a helicopter finish to the butter cut... and this video is a year old!
So it appears that his improved fairway percentage this weekend is the result of club changes and practice, not some elaborate new mechanical technique. Patrick is simply "dancing with the one that brung him," and his dance partner came ready to boogie!
Saturday, March 31, 2018
Raymond Floyd on Feeling the Target
With all the talk about mental mistakes at the LPGA and PGA Tour events on Friday, I thought it might be worthwhile to look at what Raymond Floyd had to say about the mental game. In his book The Elements of Scoring he has an entire chapter called Let Your Mind Feel the Target that deals with this topic.
Obviously I can't quote an entire chapter! But there are a couple of things he says that I think you could use immediately in your own golf games.
To begin with, he says that we may have the wrong idea about what it means to "play with feel." While it does involve what you feel with your hands to some degree, Floyd says he thinks you use your eyes to play with feel. Things like recognizing shot shapes, improvising swings in tough situations, and such are based on things you see, not things you can touch. He believes this is why so many pros have begun using mental coaches —you need to get out of your own way and give your mind more freedom, more trust to make the right decisions.
Then he says this about what we commonly call "target golf":
And I'm not even sure he's talking about visualization here. I haven't thrown any spears that I can remember, but I have thrown baseballs and discs and hit a few tennis shots and made a few free throws on a basketball court. I can't say that I actually visualize those actions. Rather, I identify my target and anything that might be in the way that I have to avoid, and then I just think about hitting my target. There must be some visualizing in there — I'm seeing things I have to avoid, after all — but it's not a conscious act. I just notice them.
I suspect that's part of why so many of us have trouble with target golf. We try to see lines curving through the sky and other things like that. But that may have the same effect as too many words. Perhaps we just need to "see and do." That certainly sounds like what Floyd is suggesting.
Here's an idea: Next time you need to play a shot — say, a low shot — just try swinging the club at an imaginary ball and imagine the ball coming off the face low when you swing. I bet your hands and arms will adjust to create the shot. If you then try to duplicate that shot without an undue amount of thought, you might pull it off. Maybe not the first time, because learning to play by feel comes from practice. But you might be more successful than you expect.
No lines curving through space, no elaborate body positioning. Just pretend you're Bubba. Playing that game on the range might teach you some new things about shotmaking.
Obviously I can't quote an entire chapter! But there are a couple of things he says that I think you could use immediately in your own golf games.
To begin with, he says that we may have the wrong idea about what it means to "play with feel." While it does involve what you feel with your hands to some degree, Floyd says he thinks you use your eyes to play with feel. Things like recognizing shot shapes, improvising swings in tough situations, and such are based on things you see, not things you can touch. He believes this is why so many pros have begun using mental coaches —you need to get out of your own way and give your mind more freedom, more trust to make the right decisions.
Then he says this about what we commonly call "target golf":
As a scorer, your goal on the course should be to just play golf. Even though golf is a slow game that allows plenty of time to think, from the moment you begin your pre-shot routine, you want a clear mind that is thinking only of the simple task at hand, which is to hit the ball to the target. In this state, the body is relaxed, and the focus is strictly on where — not how — you want to hit the ball. Imagine a very hungry caveman throwing a spear at his prey. I seriously doubt he had any thoughts about his release point or how high to carry his right elbow. I'll bet he was thinkingNote what he says: "I'm not saying golf should be played with a blank mind. Far from it." Clearing your mind isn't about playing thoughtless golf. But instead of filling your mind with lots and lots of words about how you should do this and how you should do that, you want to fill your mind with a clear picture of what you're trying to do.
LET YOUR MIND FEEL THE TARGET
about precisely where he had to throw that spear. If he wasn't "out of his own way," he didn't eat.
I'm not saying golf should be played with a blank mind. Far from it. But rather than having many scattered thoughts, you should have one very focused one. A scorer has control of what he chooses to think of on the golf course. He knows that to a large extent, he is only as good as his thoughts. [p141-142]
And I'm not even sure he's talking about visualization here. I haven't thrown any spears that I can remember, but I have thrown baseballs and discs and hit a few tennis shots and made a few free throws on a basketball court. I can't say that I actually visualize those actions. Rather, I identify my target and anything that might be in the way that I have to avoid, and then I just think about hitting my target. There must be some visualizing in there — I'm seeing things I have to avoid, after all — but it's not a conscious act. I just notice them.
I suspect that's part of why so many of us have trouble with target golf. We try to see lines curving through the sky and other things like that. But that may have the same effect as too many words. Perhaps we just need to "see and do." That certainly sounds like what Floyd is suggesting.
Here's an idea: Next time you need to play a shot — say, a low shot — just try swinging the club at an imaginary ball and imagine the ball coming off the face low when you swing. I bet your hands and arms will adjust to create the shot. If you then try to duplicate that shot without an undue amount of thought, you might pull it off. Maybe not the first time, because learning to play by feel comes from practice. But you might be more successful than you expect.
No lines curving through space, no elaborate body positioning. Just pretend you're Bubba. Playing that game on the range might teach you some new things about shotmaking.
Thursday, December 28, 2017
Harry Vardon on Playing the Pulled Shot
I chose today's quote for a bit of fun. Harry Vardon is a legend, of course, and his book The Complete Golfer -- a combination of instruction, memoir and opinion from 1905 -- is available in several digital versions for free at Project Gutenberg.

So many of us struggle to play a draw -- what Vardon called "the pulled shot." Here's his basic instruction on how to do it, from Chapter VIII of his book. After you read this quote, be sure to study the photo beneath it; there's a diagram complete with measurements showing exactly where Vardon placed his feet to play this shot with driver and brassie (a 2-wood). You can use this stroke with modern 3-woods as well. Just bear in mind that modern shafts are a bit longer than the ones Vardon used, so you may need to stand an inch or two farther from the ball.

So why am I quoting such an unorthodox approach to drawing the ball? Because even the pros use unorthodox methods when creating a "go-to shot" that they can produce consistently under pressure. Vardon's approach just might be what you're looking for.
So many of us struggle to play a draw -- what Vardon called "the pulled shot." Here's his basic instruction on how to do it, from Chapter VIII of his book. After you read this quote, be sure to study the photo beneath it; there's a diagram complete with measurements showing exactly where Vardon placed his feet to play this shot with driver and brassie (a 2-wood). You can use this stroke with modern 3-woods as well. Just bear in mind that modern shafts are a bit longer than the ones Vardon used, so you may need to stand an inch or two farther from the ball.
Now there is the pulled ball to consider; for there are times when the making of such a shot is eminently desirable. Resort to a slice may be unsatisfactory, or it may be entirely impossible, and one important factor in this question is that the pulled ball is always much longer than the other, in fact it has always so much length in it that many players in driving in the ordinary way from the tee, and desiring only to go straight down the course, systematically play for a pull and make allowances for it in their direction. Now examine Plate XVII [the photo below] and the accompanying diagram illustrating the stance for the pull, and see how very materially it differs from those which were adopted for the ordinary drive and that in which a slice was asked for. We have moved right round to the front of the ball. The right heel is on the B line and the toe 4 inches away from it, while the left toe is no less than 21½ inches from this line, and therefore so much in front of the ball. At the same time the line of the stance shows that the player is turned slightly away from the direction in which he proposes to play, the left toe being now only 26½ inches away from the A line, while the right toe is 32 inches distant from it. The obvious result of this stance is that the handle of the club is in front of the ball, and this circumstance must be accentuated by the hands being held even slightly more forward than for an ordinary drive. Now they are held forward in front of the head of the club. In the grip there is another point of difference. It is necessary that in the making of this stroke the right hand should do more work than the left, and therefore the club should be held rather more loosely by the left hand than by its partner. The latter will duly take advantage of this slackness, and will get in just the little extra work that is wanted of it. In the upward swing carry the club head just along the line which it would take for an ordinary drive. The result of all this arrangement, and particularly of the slackness of the left hand and comparative tightness of the right, is that there is a tendency in the downward swing for the face of the club to turn over to some extent, that is, for the top edge of it to be overlapping the bottom edge. This is exactly what is wanted, for, in fact, it is quite necessary that at the moment of impact the right hand should be beginning to turn over in this manner, and if the stroke is to be a success the golfer must see that it does so, but the movement must be made quite smoothly and naturally, for anything in the nature of a jab, such as is common when too desperate efforts are made to turn over an unwilling club, would certainly prove fatal. It follows from what has been happening all the way through, that at the finish of the stroke the right hand, which has matters pretty well its own way, has assumed final ascendancy and is well above the left.Check out the diagram in the photo below. The ball is played much farther back in the stance than modern instructors would recommend, but Vardon -- an average-sized man between 5'9" and 5'10" tall -- was considered a long hitter in his day.
So why am I quoting such an unorthodox approach to drawing the ball? Because even the pros use unorthodox methods when creating a "go-to shot" that they can produce consistently under pressure. Vardon's approach just might be what you're looking for.
Friday, November 10, 2017
Bernhard Langer on Shaping Shots (Videos)
Why wouldn't you want to copy Bernhard Langer's swing? This clip is from early 2015, and Bernhard is explaining how he hits draws and fades.
I hope you paid attention to his lower body movement. While instructors focus on how he opens his hips on the way down, Bernhard doesn't lunge forward the way you might expect. In this next video from late 2015, Bernhard talks about how he focuses on NOT sliding forward.
And in this down-the-line shot from earlier this year, you can see how effective he has become at keeping his lower body quiet.
In fact, I've been amazed at how many similarities there are between Bernhard's swing and Shanshan Feng's swing. You might want to go back to my Feng post earlier this week and compare the two.
As for Bernhard's swing, you'll get plenty of chances to watch it this weekend. The Charles Schwab Cup Championship coverage starts today on GC at 4pm ET.
I hope you paid attention to his lower body movement. While instructors focus on how he opens his hips on the way down, Bernhard doesn't lunge forward the way you might expect. In this next video from late 2015, Bernhard talks about how he focuses on NOT sliding forward.
And in this down-the-line shot from earlier this year, you can see how effective he has become at keeping his lower body quiet.
In fact, I've been amazed at how many similarities there are between Bernhard's swing and Shanshan Feng's swing. You might want to go back to my Feng post earlier this week and compare the two.
As for Bernhard's swing, you'll get plenty of chances to watch it this weekend. The Charles Schwab Cup Championship coverage starts today on GC at 4pm ET.
Saturday, September 9, 2017
Mike Davis on Downhill Lies (Video)
GCA teacher Mike David did a short segment on how to play off a downhill lie that I found very helpful. Of course, I'm going to try and simplify it a bit.
Davis lists five primary keys to making a good shot from a downhill lie:
Numbers 1, 2 and 5 can be made a bit simpler by combining them and studying the video. When you tilt your torso, you're trying to get your shoulders more in line with the slope. But if we widen our stance and set up with our weight already on our downhill side, we can effectively get these three correct by simply placing our head directly vertical over our lead foot and then moving it ever so slightly to the uphill side. That's simply a balance thing -- we don't want to lose our balance and fall down the hill when we swing! Widening our stance and setting our head almost over our downhill foot automatically creates a spine angle suitable for the slope.
To get the ball position correct (key #3), let's use the address position we just created. Instead of trying to create a line perpendicular to the slope -- we've already created several angles in our address -- let's just place the ball vertically below our UPHILL EAR. If you look at the video, you'll see that's roughly where the ball is... and you can find that place during a practice session simply by dropping a ball held beside your uphill ear and watching to see where it lands.
Finally, instead of trying to change our swing speed (key #4) let's just think of this swing as a big pitch shot. That will keep us from swinging too hard or too long, and we can just make a normal swing from about shoulder height.
Those three keys should help you duplicate the Davis setup from this video without getting too caught up in the angles you're trying to create. Addressing the ball on a downhill slope affects both your balance and your vision, so you might as well make it as simple as you can. This way, you can use gravity to help you create a consistent address position.
All you need is a little time on a slope practicing your setup. You won't need to hit balls at first -- just get familiar with the setup. As Davis says, learning to predict your distance comes with practice.
Davis lists five primary keys to making a good shot from a downhill lie:
- Tilt your torso with the slope
- Widen your stance
- Ball position is a bit tricky -- imagine a line rising perpendicular from the ground to the downhill side of your face and put the ball there
- Swing easier
- No weight shift -- set up with weight on downhill leg
Numbers 1, 2 and 5 can be made a bit simpler by combining them and studying the video. When you tilt your torso, you're trying to get your shoulders more in line with the slope. But if we widen our stance and set up with our weight already on our downhill side, we can effectively get these three correct by simply placing our head directly vertical over our lead foot and then moving it ever so slightly to the uphill side. That's simply a balance thing -- we don't want to lose our balance and fall down the hill when we swing! Widening our stance and setting our head almost over our downhill foot automatically creates a spine angle suitable for the slope.
To get the ball position correct (key #3), let's use the address position we just created. Instead of trying to create a line perpendicular to the slope -- we've already created several angles in our address -- let's just place the ball vertically below our UPHILL EAR. If you look at the video, you'll see that's roughly where the ball is... and you can find that place during a practice session simply by dropping a ball held beside your uphill ear and watching to see where it lands.
Finally, instead of trying to change our swing speed (key #4) let's just think of this swing as a big pitch shot. That will keep us from swinging too hard or too long, and we can just make a normal swing from about shoulder height.
Those three keys should help you duplicate the Davis setup from this video without getting too caught up in the angles you're trying to create. Addressing the ball on a downhill slope affects both your balance and your vision, so you might as well make it as simple as you can. This way, you can use gravity to help you create a consistent address position.
All you need is a little time on a slope practicing your setup. You won't need to hit balls at first -- just get familiar with the setup. As Davis says, learning to predict your distance comes with practice.
Friday, July 28, 2017
Tom Watson on Driving in Crosswinds
The reason I'm posting this article's link is because Tom earned it. After the first round of the Senior Open Championship, you may have seen that Tom was T13 at +1, which isn't bad for a 67-year-old. However, if you didn't watch the coverage, you probably don't know that Tom got the bad side of the draw. They had a lot of wind during the afternoon, but Tom's morning wave played in 40mph winds and sideways rain. When he finished, he was T5 and only two shots back.
Yes, when Tom Watson tells you how to drive it lower in crosswinds, he knows what he's talking about!
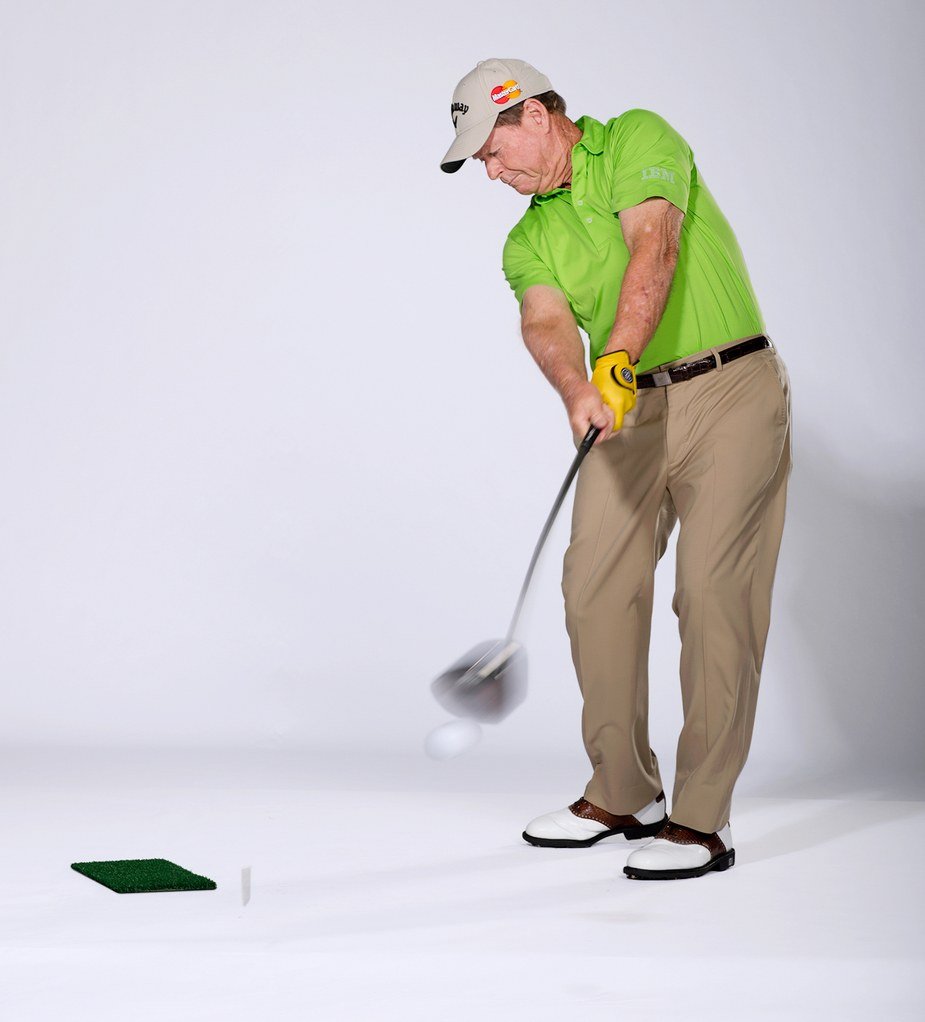
Tom says that you don't want to drive the ball lower in winds unless (1) the ball is going to run a long way or (2) you're in crosswinds. Here's the summary of what he says you should do.
No, really -- you NEED to read the article! Why wouldn't you listen to the master of links golf?
Yes, when Tom Watson tells you how to drive it lower in crosswinds, he knows what he's talking about!
Tom says that you don't want to drive the ball lower in winds unless (1) the ball is going to run a long way or (2) you're in crosswinds. Here's the summary of what he says you should do.
- Tee the ball a half-inch lower and grip down on the club about an inch.
- Shorten your backswing.
- Make sure you're swinging level to the ground when you hit the ball.
No, really -- you NEED to read the article! Why wouldn't you listen to the master of links golf?
Wednesday, July 19, 2017
Bobby Jones on Correcting a Hook or Slice
I was rereading in my copy of Bobby Jones on Golf and found a very interesting suggestion on how to correct a hook or a slice. Remember when you read this that Jones was righthanded, so you lefties will need to reverse the advice.
In the section I read, Jones notes that slices are usually caused by swinging out-to-in and hitting the outside of the ball -- what most of us call "cutting across" the ball. Likewise, hooks are usually caused by swinging from in-to-out and hitting the inside of the ball. And, simply enough, he says that the cure for either problem is to do the opposite, although he also notes that most players tend to make the same mistake over and over, only worse.
Check out this simple solution Jones used when he was having a problem hooking or slicing:
But if you think about it, this advice makes perfect sense.
If you have been hitting a slice, it's likely that you have been cutting across the ball and hitting the outside of it. If you try to swing through the ball toward the place where the ball keeps landing, you'll swing from in-to-out and hit the inside of the ball!
Likewise, if you have been hitting a hook, it's likely that you have been swinging too much in-to-out and hitting the inside of the ball. If you try to swing through the ball toward the place where the ball keeps landing, you'll swing from out-to-in and hit the outside of the ball.
Granted, you could be making some other mistake that creates your hook or slice. But this is a very simple, very visual way to attack the problem. And it's such a simple thing to do, you might want to try it and see if it straightens out your wayward shots.
In the section I read, Jones notes that slices are usually caused by swinging out-to-in and hitting the outside of the ball -- what most of us call "cutting across" the ball. Likewise, hooks are usually caused by swinging from in-to-out and hitting the inside of the ball. And, simply enough, he says that the cure for either problem is to do the opposite, although he also notes that most players tend to make the same mistake over and over, only worse.
Check out this simple solution Jones used when he was having a problem hooking or slicing:
When I have been bothered by hooking, I have always found it helpful to pick out a spot on the left side of the fairway, and to try to swing my left hand through the ball, toward the spot. It is a curious fact that the simplest remedy for slicing or hooking is to try deliberately to hit the ball toward the spot where the slice or the hook usually lands; for, if one tries to neutralize a hook by shoving the shot out to the right, or to correct a slice by pulling the ball over to the left, the only thing accomplished is an exaggeration of the fault sought to be avoided. [p. 141, emphasis mine]Did you get that? Try to swing your lead hand (and the grip of the club, obviously) on an imaginary line that goes through the ball and toward the spot where the ball has been landing. Sounds counter-intuitive, doesn't it?
But if you think about it, this advice makes perfect sense.
If you have been hitting a slice, it's likely that you have been cutting across the ball and hitting the outside of it. If you try to swing through the ball toward the place where the ball keeps landing, you'll swing from in-to-out and hit the inside of the ball!
Likewise, if you have been hitting a hook, it's likely that you have been swinging too much in-to-out and hitting the inside of the ball. If you try to swing through the ball toward the place where the ball keeps landing, you'll swing from out-to-in and hit the outside of the ball.
Granted, you could be making some other mistake that creates your hook or slice. But this is a very simple, very visual way to attack the problem. And it's such a simple thing to do, you might want to try it and see if it straightens out your wayward shots.
Friday, June 2, 2017
Kevin Kisner's Move for a Draw
Kevin Kisner's swing coach John Tillery has a brief article over at Golf Digest about a move Kisner uses to create a draw.
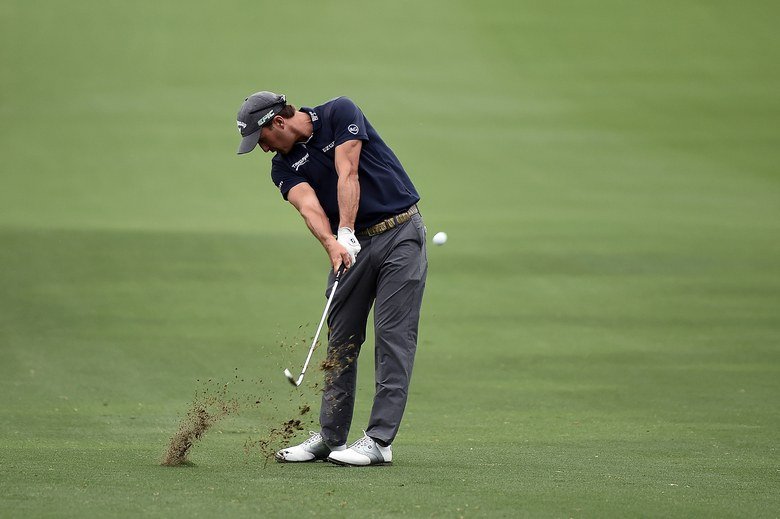
The article interested me because I suspect it may sound a bit misleading to some of you. Tillery describes the move this way:
In my drill, I designed it to keep your arms closer together as well, and to feel as if your wrists were cocking straight up. They don't really do that during your backswing, but I want you to FEEL as if they are. For most of you, that will be enough to get the feel Tillery is trying to create.
And both drills -- if you try to keep your elbows closer together throughout the swing, as shown in the photo above -- it will force you to keep turning your shoulders all the way to your finish, which will also help you square the clubface at impact.
The difference between our drills is just a matter of degree. Both of our drills exaggerate the feeling of a squared clubface. If you're having trouble squaring your clubface, just choose the drill that provides the amount of exaggeration you need to get the results you want.
The article interested me because I suspect it may sound a bit misleading to some of you. Tillery describes the move this way:
Instead of doing something dramatic to re-route your swing, try a simpler maneuver to get started off on the right track. "Take a page out of Kevin's book," says Tillery, who also works with Scott Brown, William McGirt and Brandt Snedeker, among other tour players. "Keep your arms closer together and your right palm facing down in the takeaway. Now you're ready--and incentivized--to get onto your front foot, and on your way to hitting draws."If you look at the picture, you'll see it looks conspicuously like my oft-recommended one-piece takeaway drill. Consider the key points of the move:
- Keep your arms closer together. If you do this, you'll be forced to keep your arms straighter on the way back, which prevents you from swinging too much to the inside during your backswing.
- Keep your trailing palm facing down (toward the ground) in the takeaway. Think about this, folks. If you actually do this, you'll be seriously weakening your grip on the way back. If you successfully maintain this position, you'll cup your wrist at the top of your backswing and perhaps hit the ground with the toe of the club.
In my drill, I designed it to keep your arms closer together as well, and to feel as if your wrists were cocking straight up. They don't really do that during your backswing, but I want you to FEEL as if they are. For most of you, that will be enough to get the feel Tillery is trying to create.
And both drills -- if you try to keep your elbows closer together throughout the swing, as shown in the photo above -- it will force you to keep turning your shoulders all the way to your finish, which will also help you square the clubface at impact.
The difference between our drills is just a matter of degree. Both of our drills exaggerate the feeling of a squared clubface. If you're having trouble squaring your clubface, just choose the drill that provides the amount of exaggeration you need to get the results you want.
Sunday, April 23, 2017
This Drill May Have an Important Side Effect! (Video)
This is one of the Night School videos from School of Golf. Martin and Blair demonstrated a drill Martin got from the late Mo Norman... but it may help you in a way Martin didn't mention!
Here's the deal: Martin says it should help your balance, and that's true.
He also says it should help your swing plane. I'll admit I'm not as interested about that, except as it helps your balance. After all, if you take the club back properly (one-piece takeaway, anyone?) then you should come down properly.
But what caught my attention was the stance. Usually this kind of drill is done with the weight on the lead foot, and the trailing foot is drawn back and "unweighted." But this drill is the exact opposite! Your weight is on your trailing foot, and the lead foot is drawn back.
To be honest, my first thought was... won't this teach you a reverse pivot?
Instead -- and perhaps this is because my balance is already pretty good -- I found myself making a swing with no reverse motion at all. But I discovered something else as well.
Martin focuses on how this might help you fight an over-the-top move. But it will also help stop an in-to-out move, which may help a lot of you square up the clubface at impact!
Here's the reason: Both moves are caused because your elbows get too far away from your body -- your trailing arm in the downswing (that exaggerates the over-the-top move) and your lead elbow in the followthrough (that makes many players leave the clubface open). If you keep your lead elbow close to your side until the ball has been hit, the rolling of your lead shoulder will cause the clubface to square up.
Be aware -- and Martin didn't mention this -- if you have a problem with hooking the ball, this drill could exaggerate that problem. So if hooking is a problem for you, you might be better served to make swings with both feet together. Gets the same result for improving your balance without encouraging a hook.
But if you're having trouble squaring the face at impact, you might want to give this drill a try.
Here's the deal: Martin says it should help your balance, and that's true.
He also says it should help your swing plane. I'll admit I'm not as interested about that, except as it helps your balance. After all, if you take the club back properly (one-piece takeaway, anyone?) then you should come down properly.
But what caught my attention was the stance. Usually this kind of drill is done with the weight on the lead foot, and the trailing foot is drawn back and "unweighted." But this drill is the exact opposite! Your weight is on your trailing foot, and the lead foot is drawn back.
To be honest, my first thought was... won't this teach you a reverse pivot?
Instead -- and perhaps this is because my balance is already pretty good -- I found myself making a swing with no reverse motion at all. But I discovered something else as well.
Martin focuses on how this might help you fight an over-the-top move. But it will also help stop an in-to-out move, which may help a lot of you square up the clubface at impact!
Here's the reason: Both moves are caused because your elbows get too far away from your body -- your trailing arm in the downswing (that exaggerates the over-the-top move) and your lead elbow in the followthrough (that makes many players leave the clubface open). If you keep your lead elbow close to your side until the ball has been hit, the rolling of your lead shoulder will cause the clubface to square up.
Be aware -- and Martin didn't mention this -- if you have a problem with hooking the ball, this drill could exaggerate that problem. So if hooking is a problem for you, you might be better served to make swings with both feet together. Gets the same result for improving your balance without encouraging a hook.
But if you're having trouble squaring the face at impact, you might want to give this drill a try.
Tuesday, March 14, 2017
Tom Watson on How to Hit a Draw (Video)
Found a brand new video from Tom Watson at the Golf Digest site on how to hit a draw. Here's the video:
Tom's advice is extremely simple. First you strengthen your grip so you automatically close the face through impact.
Then you control the trajectory this way:
You'll also need a bit of practice to make sure you don't hit the ball fat or thin when you change your shoulder angle. Changing the shoulder angle could change your swing plane if you aren't careful.
But this is yet another method of hitting draws that has been successful for one of the game's legends. If you haven't found a consistent way to draw the ball yet, you might want to give this one a try.
Tom's advice is extremely simple. First you strengthen your grip so you automatically close the face through impact.
Then you control the trajectory this way:
- Raise your lead shoulder and move the ball forward in your stance to hit it high.
- Lower your lead shoulder and move the ball back in your stance to hit it low.
You'll also need a bit of practice to make sure you don't hit the ball fat or thin when you change your shoulder angle. Changing the shoulder angle could change your swing plane if you aren't careful.
But this is yet another method of hitting draws that has been successful for one of the game's legends. If you haven't found a consistent way to draw the ball yet, you might want to give this one a try.
Thursday, March 9, 2017
Tom Stickney on How to Stop Slicing Your Irons (Video)
Golf Magazine has an article called 3 Easy Keys for Sticking Your Irons... but that's not what I'm interested in today. It's not a bad article, but I'm more interested in the video tip that heads the article.
The video is called Irons: Eliminate Your Slice for Good. It's a tip from Golf Magazine Top100 Teacher Tom Stickney. I've embedded it here; you'll probably want to run it full screen.
You've probably heard this tip a hundred times -- keep your upper arm close to your body as you hit the ball. But I want to give you a new thought that might help you make more progress when using this tip.
Stickney says those sliced irons are caused by a disconnect -- your arm separates from your body -- so you want to keep your armpit tight against your body. A common drill for this, which Stickney doesn't mention here, is putting a glove or towel in your armpit and trying to hit the ball before you drop said glove or towel.
But let's look at this a bit closer.
When you hold something in your armpit, you're keeping your entire upper arm against your chest. The key here is keeping your lead elbow close to your side. Your elbow is closer to the club, so keeping your elbow close to your side should actually be easier than holding something in your armpit.
So try this drill: Make some practice swings -- half-swings are fine -- by letting your lead elbow stay close to your body all the way back, even letting it bend. (This is easier if you keep both elbows close against your body and let them both bend. That's an old Hogan drill.) Then let both elbows straighten as you swing the club down toward impact. In order to keep your lead elbow close to your side, you'll need to keep turning your body toward the target after impact and let your lead elbow bend as the club comes up. This will teach you the correct body movement to keep your lead elbow close.
You see, your lead elbow moves away from your body -- it disconnects, as Stickney says -- because you stop turning your body before you actually hit the ball. If you keep turning your upper body and hips -- because they all need to keep moving -- your lead elbow will stay closer to your body and you won't get that huge disconnect.
It shouldn't take you long to get comfortable with this drill. It will probably feel a bit weird if you haven't been turning through impact, but that won't last long. Then you can start making your regular backswing, and letting your lead elbow move closer to your side at impact. Then you can feel as if your lead elbow is bending as you finish, just as you did in the drill.
Soon you'll not only stop slicing your irons, you'll pick up some distance as well. It'll help with your woods also. It's just good technique.
The video is called Irons: Eliminate Your Slice for Good. It's a tip from Golf Magazine Top100 Teacher Tom Stickney. I've embedded it here; you'll probably want to run it full screen.
You've probably heard this tip a hundred times -- keep your upper arm close to your body as you hit the ball. But I want to give you a new thought that might help you make more progress when using this tip.
Stickney says those sliced irons are caused by a disconnect -- your arm separates from your body -- so you want to keep your armpit tight against your body. A common drill for this, which Stickney doesn't mention here, is putting a glove or towel in your armpit and trying to hit the ball before you drop said glove or towel.
But let's look at this a bit closer.
When you hold something in your armpit, you're keeping your entire upper arm against your chest. The key here is keeping your lead elbow close to your side. Your elbow is closer to the club, so keeping your elbow close to your side should actually be easier than holding something in your armpit.
So try this drill: Make some practice swings -- half-swings are fine -- by letting your lead elbow stay close to your body all the way back, even letting it bend. (This is easier if you keep both elbows close against your body and let them both bend. That's an old Hogan drill.) Then let both elbows straighten as you swing the club down toward impact. In order to keep your lead elbow close to your side, you'll need to keep turning your body toward the target after impact and let your lead elbow bend as the club comes up. This will teach you the correct body movement to keep your lead elbow close.
You see, your lead elbow moves away from your body -- it disconnects, as Stickney says -- because you stop turning your body before you actually hit the ball. If you keep turning your upper body and hips -- because they all need to keep moving -- your lead elbow will stay closer to your body and you won't get that huge disconnect.
It shouldn't take you long to get comfortable with this drill. It will probably feel a bit weird if you haven't been turning through impact, but that won't last long. Then you can start making your regular backswing, and letting your lead elbow move closer to your side at impact. Then you can feel as if your lead elbow is bending as you finish, just as you did in the drill.
Soon you'll not only stop slicing your irons, you'll pick up some distance as well. It'll help with your woods also. It's just good technique.
Wednesday, February 1, 2017
Martin Hall on Hips & Grips
Tuesday night I heard something really cool from Martin Hall on School of Golf. It's a very simple tip that can help you deal with pulls and pushes.
The key is to match up your hip speed with your grip.
A simple tip that offers a lot of help.
And don't forget that Tiger tees off in Dubai tonight in primetime (I think coverage starts at 10pm ET, during Golf Central). With so much less rough to contend with, Tiger could potentially make a lot of birdies -- enough to offset the inevitable bogeys -- and make the cut this week.
The key is to match up your hip speed with your grip.
- If you have a strong grip and you keep hitting pulls, you probably aren't moving your lower body fast enough. To hit a reasonably straight shot with a strong grip, you have to turn your hips really fast. That means you try to feel as if your hips are starting the downswing well before the club. (More lag between hips and clubs.)
- But if you have a weak grip and you keep hitting pushes, you are probably moving your hips TOO fast. To hit a reasonably straight shot with a weak grip, you have to turn your hips more slowly. That means you try to feel as if your hips are starting the downswing at the same time as the club. (Hips and club move are more synchronized.)
A simple tip that offers a lot of help.
And don't forget that Tiger tees off in Dubai tonight in primetime (I think coverage starts at 10pm ET, during Golf Central). With so much less rough to contend with, Tiger could potentially make a lot of birdies -- enough to offset the inevitable bogeys -- and make the cut this week.
Wednesday, January 25, 2017
The Wall Slap Drill
I was going to do a post about some of the suggested changes to The Rules of Golf, but that can wait till another day.
A few days back, Jean Luc left a comment on an older post called Inbee Park's Pause. The material in that post had helped him -- he had been having trouble with pushed shots -- but he was looking for some help to eliminate some of the wrist rolling the new movement caused for him. He had seen a new book by Jim Hardy called The Release: Golf's Moment of Truth and was fascinated by one of Hardy's approaches to the release. He wondered if I had any ideas on whether it would work.
I don't usually use my comment responses as the basis of new blog posts but, given Jean Luc's positive response to this one, I felt it might help some of you. Jean Luc says the drill I included in this comment felt a lot like the drill in yesterday's Tommy Fleetwood post, but this one is specifically designed to minimize wrist rotation. The comment also explains why I haven't included many tips from Jim Hardy in my blog, although he's clearly been able to help a lot of golfers.
And at the end, I'll add some thoughts so you can use this drill to learn a draw or a fade.
Here, I'll just let the comment itself explain everything:
------------------------------------------------
Jean Luc, I haven't read Hardy's book. And when I found info on the web about the two releases he talks about in the book (at http://www.tworeleases.com/), it seemed a bit contradictory to me -- for example, I'd say the LOP motion is a swinging motion, not a leverage motion, while the RIT motion can be either, depending on your hand and arm action. With no more explanation than I found there, it's hard for me to make hard and fast statements about what Hardy's doing.
That said, let's see if I can give you some help with what you want to do.
Hardy is somewhat controversial among swing geeks because, although much of his material is very helpful, he makes statements that clearly contradict fact. For example, in this GC video:
http://www.golfchannel.com/media/golf-fix-jim-hardy-talks-one-plane-swing/
he says that Hogan's swing is a one-plane swing. But in Five Lessons Hogan himself says:
But I can tell you that what you picked up from my stuff is a two-plane swing. That's why you can finally create a bit of a looping motion. It's a more natural, more relaxed way to unwind rapidly on your downswing.
But you don't have to use a roll release (or a throw release, for that matter) to use the loop move and still square the clubface at impact. Let me suggest a feel drill for you:
And let me know how it goes. I'm betting that you'll start to get the motion you're looking for. Just remember: You don't have to "throw" the club to get that release. The speed you'll learn to develop with the clubhead will create that motion all on its own.
------------------------------------------------
That "slapping motion" I mentioned in the comment comes when the palm of your hand hits flat against the wall on your downswing. But this helps you learn to square your palm at impact, and therefore to square your clubface at impact. And as I said, you won't have to rotate your forearms to reach the top of swing position or on the way down.
Now, if you want to learn to hit a fade or slice with this move, it's simply a matter of changing your foot position.
Hopefully this will give all of you yet another option for learning how to shape shots the way you want... and you can thank Jean Luc for it. ;-)
A few days back, Jean Luc left a comment on an older post called Inbee Park's Pause. The material in that post had helped him -- he had been having trouble with pushed shots -- but he was looking for some help to eliminate some of the wrist rolling the new movement caused for him. He had seen a new book by Jim Hardy called The Release: Golf's Moment of Truth and was fascinated by one of Hardy's approaches to the release. He wondered if I had any ideas on whether it would work.
I don't usually use my comment responses as the basis of new blog posts but, given Jean Luc's positive response to this one, I felt it might help some of you. Jean Luc says the drill I included in this comment felt a lot like the drill in yesterday's Tommy Fleetwood post, but this one is specifically designed to minimize wrist rotation. The comment also explains why I haven't included many tips from Jim Hardy in my blog, although he's clearly been able to help a lot of golfers.
And at the end, I'll add some thoughts so you can use this drill to learn a draw or a fade.
Here, I'll just let the comment itself explain everything:
------------------------------------------------
Jean Luc, I haven't read Hardy's book. And when I found info on the web about the two releases he talks about in the book (at http://www.tworeleases.com/), it seemed a bit contradictory to me -- for example, I'd say the LOP motion is a swinging motion, not a leverage motion, while the RIT motion can be either, depending on your hand and arm action. With no more explanation than I found there, it's hard for me to make hard and fast statements about what Hardy's doing.
That said, let's see if I can give you some help with what you want to do.
Hardy is somewhat controversial among swing geeks because, although much of his material is very helpful, he makes statements that clearly contradict fact. For example, in this GC video:
http://www.golfchannel.com/media/golf-fix-jim-hardy-talks-one-plane-swing/
he says that Hogan's swing is a one-plane swing. But in Five Lessons Hogan himself says:
On the downswing plane, a golfer swings on a slightly different plane than the backswing. THE PLANE FOR THE DOWNSWING IS LESS STEEPLY INCLINED AND IS ORIENTED WITH THE BALL QUITE DIFFERENTLY FROM THE BACKSWING PLANE. The golfer gets on this second plane -- without thinking he is changing planes -- when he turns his hips back to the left at the start of the downswing. (p87)Hogan says his swing is a two-plane swing in three consecutive sentences, yet Hardy says it's a one-plane swing. So I'm hesitant to get too involved with his theories in this answer.
But I can tell you that what you picked up from my stuff is a two-plane swing. That's why you can finally create a bit of a looping motion. It's a more natural, more relaxed way to unwind rapidly on your downswing.
But you don't have to use a roll release (or a throw release, for that matter) to use the loop move and still square the clubface at impact. Let me suggest a feel drill for you:
- Take your address position without a club. Set the palm of your trail hand square to your target line. An easy way to do this is to set up next to a corner wall in your house, so you can lay your palm flat against the wall. Your trail wrist should be cocked backward just a bit, as if you had just slapped the wall. That should feel pretty normal to you.
- Now take your lead hand and grasp your trail wrist, as if it was the grip of the club. Your trail wrist is still slightly cocked.
- Now "swing" back to the top of your backswing. Don't try to rotate your wrists. With your shoulders turned 90 degrees, your palm will be aimed maybe another 45 degrees farther. Again, this should feel pretty natural.
- Now just "swing" down and, keeping your grip on your trail wrist, slap the wall with your trail hand. (Okay, it won't be much of a slap, but that's the motion.) You won't feel any rotation in your wrists, but you'll have to turn your body all the way through. Jimmy Ballard would call this "releasing your body." And again, it's the natural way to swing. It has the added bonus of creating a natural weight shift when you do it.
And let me know how it goes. I'm betting that you'll start to get the motion you're looking for. Just remember: You don't have to "throw" the club to get that release. The speed you'll learn to develop with the clubhead will create that motion all on its own.
------------------------------------------------
That "slapping motion" I mentioned in the comment comes when the palm of your hand hits flat against the wall on your downswing. But this helps you learn to square your palm at impact, and therefore to square your clubface at impact. And as I said, you won't have to rotate your forearms to reach the top of swing position or on the way down.
Now, if you want to learn to hit a fade or slice with this move, it's simply a matter of changing your foot position.
- For a fade, OPEN your stance slightly when you set up next to the wall. Now you'll get a slight out-to-in move, but your palm will still aim straight ahead when it hits the wall, giving you a slightly open clubface at impact.
- Likewise, for a draw, CLOSE your stance slightly when you set up next to the wall. Now you'll get a slight in-to-out move, but your palm will still aim straight ahead when it hits the wall, giving you a slightly closed clubface at impact.
Hopefully this will give all of you yet another option for learning how to shape shots the way you want... and you can thank Jean Luc for it. ;-)
Subscribe to:
Posts (Atom)