ATTENTION, READERS in the 28 EUROPEAN VAT COUNTRIES: Because of the new VAT law, you probably can't order books direct from my site now. But that's okay -- just go to my Smashwords author page.
You can order PDFs (as well as all the other ebook formats) from there.
Showing posts with label punching basics. Show all posts

Tuesday, January 23, 2018

Dave Pelz on Playing a Punch Shot

Over at the Golf Magazine site they've published a post by Dave Pelz on how to make your punch shot the most dependable trouble shot in your bag.

Dave Pelz shows three positions during punch shot

Dave describes the mechanics very simply:
"...play the ball two inches back of center in your stance and make a half- or three-quarter swing. The overall feeling should be "together and compact," with solid lower-body control."
There's more in the article, of course. Dave goes into considerable detail about how to choose the direction of your punch, which he says is at least as important as the mechanics. The photo above comes from this section of the article, and I should note that the two ball positions are for clarity. The ball in front of his club is his normal ball position while the ball behind the club is his punch position.

Look, it's rare that you get to read such a brief article that contains so much useful information. By all means, drop by the Golf Magazine site and check it out. You'll be glad you did!

Friday, September 2, 2016

Jeff Ritter on Practice Swings (Video)

This is another of Jeff Ritter's Instagram videos, this one about why you keep hitting shots fat. Although he focuses on chips and pitches here, it's just as true with your sand shots and your full swings.


Did you catch that? You may be practicing hitting the ball fat with your practice swings!

Jeff's right, of course. Most players make practice swings just to loosen up, without even thinking about what they're doing, and as a result their practice swings look nothing like their real swings. But that means you're practicing a swing you never intend to use! If you want to improve your contact, you have to start thinking about what you're doing.

So what does Jeff suggest? Simply that you make sure your practice swings duplicate the shot you want to make.
  • Set up beside the ball -- not close enough to accidentally hit it, of course -- and be sure your club is brushing the ground just past the ball.
  • Make sure the bounce of your club is grazing the grass and you're not digging into the ground. Again, decide what you want to do when you actually hit the ball. Digging a bit is okay if that's what you're after, but for most short shots it's not.
And let me add this about practicing your full shots. Make sure that you're following the same procedure. Make sure your practice swing makes contact with the ground so you'll take a small divot in front of the ball. And make sure it's a small divot -- a strip of bacon, not a strip steak, to borrow a popular image.

Jeff uses the phrase a more mindful rehearsal swing. That's what you want to make. Think before you make that practice swing -- make sure you're actually rehearsing the shot you want to make -- and your actual swings will get better.

Wednesday, August 31, 2016

Jeff Ritter on Punch Shots (Video)

Jeff Ritter posted this Instagram on the proper way to hit punch shots. It's very instructive -- and perhaps a bit counter-intuitive.


Jeff gives you three tips:
  1. Make sure you pick a clear path so you get the ball out in one shot. Don't be a hero!
  2. You need to keep the shot low, so put the ball back slightly in your stance and use a lower-lofted club. (I would add that you need to make sure you don't use too little loft. You'll need a little more loft from a deep lie than you would from a bare lie.)
  3. Here's the counter-intuitive part, which is the reason I'm posting this: Take an easier, shorter swing. If you try to make a hard fast swing of any length, the ball will spin more and shoot up higher than you want. See how easily Jeff hits his punch in the video?
I bet this little video saves you a lot of shots from under trees. That last bit about swinging easier should be stressed more often.

Friday, July 24, 2015

ATTENTION: Freebie Lessons Alert!

Okay, this is one of the more unusual freebie lesson plans I've seen done by any magazine, so I HAVE to share it with you.

Golf Magazine has put up a 30-day, 50-lesson plan they say can help you improve all areas of your game. They brought together 5 of their Top100 teachers -- Scott Munroe, Mike Adams, Kellie Stenzel, Mark Hackett and Jon Tattersall -- and they have put together this huge guide that covers everything from driving to iron play to putting to flexibility.

And they've made it available online FOR FREE. This link will put you on the first page of the lesson guide.

The 5 teachers who wrote the golf.com guide

Part of what I try to do on this blog is help you understand enough of the mechanics of various golf swings that you can recognize the difference between what will and what won't help you. It's why I always recommend that you have a filter, a single teacher or player whose techniques work for you -- and you KNOW they work for you -- so you have a framework to help sort things out.

Here is a sterling opportunity for you to put that information to work.

Sure, you may not need all of these drills. And many of them may not work for you. But this is an excellent chance for you to check out some other teachers' ideas and drills, all without spending a penny.

As Bubba would say, you're welcome. ;-)

Thursday, January 15, 2015

Martin Hall's Drill to Chip Like Steve Stricker

Here's a video of Martin Hall and Sara Brown teaching how to chip like Steve Stricker. (Yes, I know he calls it pitching in the video but, as Paul Azinger keeps telling us, pitches use the bounce and chips use the leading edge. This technique uses the leading edge.)

At any rate, Martin's drill uses a tennis sweat band -- the kind that goes around your wrist, not your head.


The idea, of course, is to eliminate the flippy wrist motion that causes you to hit the ball fat and thin. You choke down on the grip a little and the sweatband holds the grip against your forearm so your wrist stays firm throughout the chipping motion.

This isn't a new drill, by the way. Lee Trevino also teaches this drill to help learn proper chipping technique... but he uses thick rubber bands instead of a sweat band. Same principle though.

And the nice thing is that you can use this drill inside, during the winter, when it's too cold to go outside. Just make sure you don't do it on the good carpets since the leading edge of the club will cut through and you'll have to replace them. (And yes, unfortunately, I learned that from firsthand experience so you don't have to.)

And here's the golfchannel.com link in case you can't get the embedded video above to play.

Tuesday, February 11, 2014

Michael Breed on HItting into the Wind

I've posted material on hitting knockdown shots before, but this tip from Michael Breed has some info you don't normally get. He covered this during The Golf Fix on Monday night, and they posted a short version at golfchannel.com:


Let me pick out the extra info Michael has here (and some things he mentioned on the regular show):
  • Michael specifically says you should pick out a club that is either (a) two clubs longer or (b) 20 yards longer than you would normally use. However, he's demonstrating this on the 7th hole at Pebble Beach, a DOWNHILL shot. Note that he says you can go three clubs longer; on the show he actually said the three-club guideline might be better for a downhill shot to further minimize the time the ball spends in the air. That's an important piece of information to have!
  • Note also that not getting enough lower body action or shoulder turn can cause this shot to slice badly. You need to keep your lower body relaxed so it can move normally and help you square up the club face. This is important even on approach shots that you aren't playing into the wind. If you just maintain the connection between your upper arms and your chest (which I've talked about a lot on this blog) you'll make the proper moves automatically.
  • He also mentions using an abbreviated backswing and followthrough to keep the ball down, and this is important when hitting any kind of knockdown shot. On the show he specifically mentioned keeping your hands at shoulder level or below. You can see this in the video as well.
Bear in mind that many of the short game shots you normally hit, even in good weather, are hit with these same techniques. Many short game shots are just knockdown shots. Master this technique and you'll improve your short game as well as your wind game.

Thursday, October 27, 2011

Swinging with Your Chest

Since I took Michael Breed to task a couple of days ago, it's only fair to emphasize something he said that should help just about everybody.

On Monday night's Golf Fix Breed talked about "swinging with your chest." He talks about it periodically, and it's a single image he uses to illustrate several principles I talk about often on this blog.

The basic concept is that your arms stay in roughly the same position relative to your chest throughout your swing that they have at address. Some teachers call this "maintaining the triangle."

One of the things I mention frequently is connection, which simply means the upper part of your arms continue to rest lightly against the side of your chest throughout your backswing and downswing. Note that it's your upper arms, not your elbows. Your trailing arm may come off briefly at the top of your backswing. If it doesn't, your swing may end up being much too flat (that is, like swinging a baseball bat). It doesn't stay off very long though.

A connected swing is the basic idea behind swinging with your chest. Whichever term you choose, doing it makes your swing much easier to repeat because your body helps your arms repeat the same path each time.

Since your upper arms stay lightly against the sides of your chest when you swing with your chest, it helps you make the one-piece takeaway that I talk about until you're all sick of it. :-) Swinging with your chest forces you to coil your upper body and turn your shoulders early in your backswing... and that always makes good things happen!

It also helps keep your lead elbow pointed down at the ground throughout your swing. This helps avoid both leaving the clubface open at impact (which causes a slice) and "chicken-winging" on your finish.

And swinging with your chest also helps you "keep your hands in front of you," which helps you stay on plane better because you don't lean backward on your downswing, which in turn helps you avoid a "reverse pivot." (That's when your weight doesn't move to your lead foot on the downswing.)

While I tend to focus on each of these things separately since players may do some and not others, the "swing with your shoulders" image can be a good one for helping you minimize the number of swing thoughts you have during your swing. So if it helps you, then you can thank Breeder for it. ;-)

Thursday, September 15, 2011

The One-Piece Takeaway is Back!

A couple of weeks ago I did a post called How Will Phil Putt Next? after Phil Mickelson showed up at the Deutsche Bank Championship with a belly putter. Luke left a couple of comments, and the last one included a reference to a YouTube video about -- you guessed it! -- one-piece takeaways.

Why would Luke include that? It's because Paul Wilson, the teacher who made the video, uses a putting motion -- with a regular putter, not a belly putter ;-) -- to demonstrate the proper way to perform a one-piece takeaway. I thought it looked pretty good, so I'm passing it on to all of you:


Paul only focuses on the one-piece takeaway going back about two feet from the ball. As you know, I want you to do it back to waist high. That's because I don't just want you to make a one-piece takeaway, I want you to get your shoulders turned (or "coiled") early in the swing. Good things happen when you turn your shoulders early in the swing. Never forget that!

But Paul's video provides yet another way to get the feeling of starting back "in one piece," which means you'll start your backswing by turning your shoulders first. That's what I want you to do. I know I say it until you're all sick of hearing it, but turning your shoulders early will solve oh so many problems in your swing and increase your power and accuracy as well.

BTW, did I mention that you should start your backswing by turning your shoulders first? ;-)

Thus ends my weekly sermon on the virtues of the one-piece takeaway.

And thanks again to Luke for sending me the link.

Wednesday, September 14, 2011

How a Yardstick Can Help Your Game

If you've breezed through any of the early posts in my Basic Principles of the Game category, you'll find that I have one principle that doesn't change whether you're putting, driving, or any kind of stroke in-between:
The clubface should remain square to the stroke path; the forearms should NOT rotate during the execution of the stroke.
As radical as that may sound, you'll find echoes of it in the works of many teachers who would probably deny teaching it. Hogan, for example, said that your forearms shouldn't consciously rotate during your swing. Another example is Brandel Chamblee, who is only one of the teachers you'll hear on GC telling you that you want your hands under the club at the top of the swing. (Think about it. If your hands are under the club at the top and you gripped the club with a neutral or only slightly strong grip -- as recommended -- your wrists have cocked pretty much straight up. That means you didn't rotate your forearms.)

The legendary teacher Bob Toski used a yardstick to teach how this feels, and it may help some of you who have trouble with twisting your forearms and laying the club off on your backswing. The drill is from Toski's book How to Feel a Real Golf Swing, and it's on pages 24-27 if you want to check out Toski's entire explanation. It helps correct problems from putting the grip too much in either your palms or your fingers. The photos are from this webpage at the U.S. Golf Schools and Travel site showing the drill. I've enlarged the pictures for easier viewing.

All you have to do is take two yardsticks (or one cut in half) and tape them together to stiffen and thicken them up. Toski says to take your grip by laying the sticks against the callouses at the base of your fingers on your lead hand (left hand for righties, right hand for lefties), then curl your fingers around the yardsticks. The sticks will slide up slightly into your palm. You can see this in the picture at right. Your lead thumb will be on top of or just creeping over the side of the yardsticks.

Once you've got your lead hand placed, it's a fairly simple matter to get your trailing hand in place. Note that your trailing thumb WON'T be on top of the yardsticks. Rather, it will hang over onto the target side.

You should try cocking your wrists up and down with this grip. Toski says it will probably feel weaker at address than than you're used to, but will actually feel stronger at impact. And if you've been holding the club too much in your palms, this will increase your wrist cock. That should add power to your swing.

Notice that the yardstick is under the heel of your lead palm. (Look at the top picture again.) This is where a lot of players get messed up with their grips. You want to get the same feeling when you grip your club.

And when you put your trailing hand on the club, the thumb of your lead hand should fit into the lifeline of your trailing hand. When you read this it sounds like your trailing hand will be on top of the club, but when you actually do it, your grip will be slightly strong. And when you swing, at impact it will feel as if you're "slapping" the ball with your trailing palm.

If you try making some swings and cocking your wrists straight up on the way back, it will help you keep the club "on plane." When you bend your trailing elbow during your backswing, that will cause enough "slant" to get the club on plane... but you'll feel as if your hands and forearms are in pretty much the same relative position they were at address. That will make it easier to return them to the ball squarely.

I know it sounds a bit strange, but it makes sense when you actually feel it. 

The yardstick drill can help you develop a better grip with less forearm rotation. And that will help you hit longer, straighter shots.

Wednesday, September 7, 2011

How to Hit That Ball Low

On School of Golf with Martin Hall on GC Tuesday night, he talked about hitting low shots. However, there are different types of low shots. This video by PGA teaching professional Kevin Battersby shows you the difference between hitting a low shot with an iron and with a driver.


Note that with the iron you hit down on the ball, but with the driver (and the ball on a tee) you want to hit up on the ball. We'll come back to this in a second.

One thing that Kevin didn't stress which Martin did is that, when using the iron, you'd like to keep the iron moving parallel to the ground for a while after you hit the ball if possible. This minimizes the lift created by backspin. Kevin hints at this when he talks about hitting the ground well ahead of the ball, but Martin expressed the concept a bit better.

You might wonder why there's a difference between how the irons and woods create a low shot. It's all about the shape of the face. While irons are flat, woods have rounded faces. The side-to-side curve is called bulge, and the top-to-bottom curve is called roll. Those "outward curves" in the face of a wood prevent them from putting as much backspin on the ball as the flat face of an iron does, which is why a hybrid -- which also has a flat face -- tends to hit the ball higher and stop it faster than a fairway wood does.

And that's the "low-down" on how to keep your shots low.

Saturday, August 27, 2011

Hooking Out of Trouble

Ever been stuck behind a tree and the only way out is a hook... but you can't hit a hook? It's a common problem, but today I'm gonna help you.

That's right. Even if you can't hit a hook, this technique should help.

First, let's look at a typical video on how to hit a hook. This one's by PGA pro Jay Golden; we'll use it as a starting point.


I'm sure a lot of you have heard this advice before but have had no luck applying it. That's because you didn't have my help. ;-)

There are two important things to note from this video:
  • Move the ball back slightly in your stance. Some videos advise moving it forward but we want a low shot. If we're stuck in the trees, the lower, the better.
  • Forget the fancy swing path / face angle combinations. Here's the simple version: If you're righthanded, the face should point to the left of your swing path. If you're lefthanded, the face should point to the right of your swing path. Simple enough, right?
The reason you're having trouble hitting a hook is because you're making too long a swing. See how I tagged this post for the chipping, punching, and pitching categories? We're going to make a shorter swing so we can better control the club path.

Here are the steps for hooking your way out of trouble:
  1. First, we want to take a club that will keep the ball low. This will be determined to a large extent by how much rough the ball is in. If the rough is kinda thin, you can take something longer like 5-iron or more. Otherwise, figure on hitting something like a 7- or 8-iron.
  2. Aim the face of the club so it aims past the side of the tree. Remember, if you point the face at the tree, no matter what you do, you'll probably hit it.
  3. Now aim your body. Don't worry about hitting some kind of in-to-out swing; if you could do that easily, you wouldn't need help hooking out of this mess! Instead, set up to make a straight swing that goes farther away from the tree than the face angle. See the diagram below to make sure you've got the idea.
  4. Set up so the ball is halfway back in your stance, or maybe just a bit more if you really need to keep it low.
  5. Now, just make a normal half-swing, a punching motion. Let your wrists cock if you need more power, or play it more like a chip or punch shot if you want to make sure the ball stays low. But don't swing too hard or the ball will jump up higher than you intended! This should feel like you're making a long smooth punch shot straight out of the trouble -- but since you've got the face of the club "closed" relative to that straight path, the ball is going to shoot to the left (the right if you're lefthanded) and hook even more as it goes.
Here's a diagram of the setup:

Diagram of hook setup

As you can see, it's a pretty simple setup. No changing your swing path, no flipping your hands at impact, no long swings where you have lots of time to get out of position. Just place the ball halfway back in your stance and make a smooth half-swing along the dotted line with the clubface aimed so it misses the tree.

Is it going to make you look like a Tour player (pick a tour, any tour)? No.

Is it going to save you a shot? Probably. You'll need to use it a few times to get a good idea of just how low you can hit the ball with this shot, but at least you'll know it's doable. If you run into any trouble using it, just post a comment. The lie will be the biggest variable in this shot.

Most importantly... will it impress your foursome? You betcha! And what's better than that?

Friday, July 29, 2011

Sting That Tee Shot!

Ok, maybe the Women's British Open is the last links tournament we'll see for a while -- at least until the Alfred Dunhill Links Championship in late September -- but that doesn't mean we won't need to hit a low tee shot into the wind sometime soon. Tiger used to do this a lot -- it was called a "stinger" and he usually used a 2-iron for the shot.

We mere mortals use a 3-wood.

Appropriately enough, I've got a video from Irish pro John Kelly teaching how to hit a 3-wood stinger.


Kelly teaches this a bit differently from some teachers, but I chose it because it's a simpler way to get the same results. Let me give you a little extra guidance here.

Tee the ball back in your stance. He says halfway, but it doesn't really look like it, does it? The camera angle is a bit misleading here -- the ball isn't really halfway back, but it's well inside his forward heel. Let's call it "under his left ear." If you're a lefty, that'll be your right ear.

Note that the ball is still teed fairly high. We don't want to hit down on the ball; we still want to sweep the ball from the tee. This will eliminate a lot of the backspin.

Put your weight a bit more on your forward side. Again, we aren't going to hit down on the ball. We put a bit more weight on the forward foot to keep us from moving behind the ball. If we did that, we'd either hit it thin or pop it up when we went under it. Neither results in a good stinger!

Your hands are over the ball at address, not ahead of it. Let me say it again: We aren't going to hit down on the ball. We're delofting the club, which will will help us hit the ball lower.

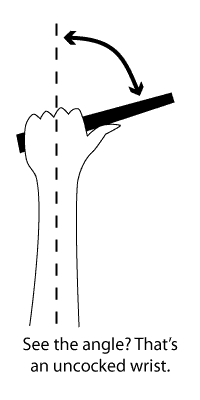
Picture showing what an uncocked wrist looks likeNow I'm going to depart from what Kelly is saying because I don't think it accurately describes what he's doing. (I'm sure he's describing the way it feels, but we need to know what we're doing.)

Go ahead and make your regular one-piece takeaway and a full swing. We want all the clubhead speed we can get. Kelly says he makes his swing less "wide" but then he tells you keep it wide on the downswing. Let's keep this simple, ok? Your backswing will probably feel a bit shorter because of the next key.

Don't cock your wrists... EVER. Some teachers tell you to shorten your swing, but they cock their wrists. If you don't cock your wrists, you don't have to shorten your swing because you won't create as much clubhead speed. You don't have to lock your wrists tight either. Bear in mind that if your hand is straight in line with your wrist -- as if you were throwing a punch -- a club sticking out of your hand will look like it's cocked about 45 to 60 degrees. That's an uncocked position.

The combination of those last two tips -- full backswing with uncocked wrists -- will probably get your hands above your shoulders with the club pointing over your shoulder at an angle BUT NOT parallel to the ground.

Finally, make your downswing. You'll sweep the ball off the tee, then finish somewhere between waist and shoulder height. Your wrists should stay uncocked the whole time. This is the familiar "shorten your followthrough" advice everybody gives you when you hit into the wind.

Relax -- it's much simpler to make the stinger shot than describe it. It's basically just a slight setup change and a "wristless" swing -- a punch shot hit from a tee. The combination of these moves.will launch the ball at a low angle and it will roll a lot when it hits the ground.

Thursday, June 16, 2011

Playing Off Pine Straw (In Case You're Not Phil)

One of the holes at Congressional that's receiving a lot of attention has the greenside slopes closely mown so the ball will roll down into pine straw. (I think it's the 16th.) This is the only raised green on the course, and the pine straw makes it difficult to get the chip close.

Of course, pine straw is an integral part of many golf courses. If you can play off of it, you can really show off to your playing partners. (Or win a Masters, if you're Phil Mickelson.) Fortunately it's not hard to learn how to play it, and I found a couple of videos that cover the shot.

The first one was shot at Pinehurst, which is only about 2 hours from where I live:


And this second one is more of a checklist of things to keep in mind when you have to play off pine straw:


The main points you need to remember are these:
  • You want to hit the ball before you hit the pine straw, so think of this as a chipping motion. Set up so you're sure you'll hit the ball first. Essentially you'll use your short game setup -- ball back in your stance, weight a bit more on your front foot.
  • Get a solid footing, but be careful not to move the ball when you do. You don't want a penalty shot added to your score.
  • Don't ground your club. Again, if the ball moves because you moved the pine needles, that's a penalty.
  • If you can, determine whether there are any roots or rocks hidden by the straw. You don't want to hurt yourself.
  • Did I mention that you don't want to accidentally move the ball? Be careful!
And remember that not all lies are the same. You may get a lie that lets you really go after the ball, or you may get a "buried lie" where the ball literally looks like an egg in a nest. If you don't have a good lie, don't try to imitate Phil -- just chip it back out and take your medicine.

Wednesday, May 11, 2011

More Thoughts on Keeping Your Hands in Front of You

I want to make the drill simple. In fact, the drill is simple. But it affects many different aspects of your swing and we need to talk about some of those things first, before we ever get to the drill. Therefore, today's post doesn't have the drill per se, although it describes a lot of what goes on during the drill. I'll be describing things for a right-handed golfer since I'm still using Lucas Glover as an example, so you lefties will have to reverse it. Sorry for the inconvenience.

First, this drill should eliminate a lot of excess mechanical swing thoughts. For example, I used Lucas Glover's swing to illustrate the top of swing position in yesterday's post. If you've been obsessing over your swing plane, obsess no more! Your setup position and where your hands are at the top of the swing create your swing plane. That's one less thing to think about!

Let's look at some stills I "borrowed" from that Glover video:

Sequence of Lucas Glover hand positions

The first pic shows Glover at setup. For simplicity's sake we'll assume his hands are located in front of his belt buckle, centered in his stance.

The second pic shows Glover's hands at waist-high. Note that he has used the one-piece takeaway that is almost a religious conviction on my blog, and remember that he got to this position by turning his shoulders early in his backswing, not by keeping his arms stuck out stiff in front of him. (The drill for learning a relaxed one-piece takeaway can be found by clicking this link.) Relaxed arms and shoulders that turn early in the backswing eliminate a lot of potential problems later in the swing.

A one-piece takeaway also keeps your hands in front of you. Note that his hands are still pretty much in front of his belt buckle, even though his wrists have begun to cock. (In case you're having trouble seeing it, the clubhead is just to the left of his elbow.)

And the third pic shows the position I pointed out in yesterday's post. In case you missed it (shame on you!), when your hands are in front of you and the club shaft is parallel to the ground at the top of your backswing, the shaft points over the center of your shoulder. See Lucas's shoulder peeking out between his forearms? As I mentioned yesterday, many teachers tell you to reach behind you for a deeper swing, but this is not a good idea. A large number of both feel-based and mechanically-inclined teachers recommend the position Lucas is using in this picture. (I gave Don Trahan and Martin Hall as respective examples yesterday, but they are not the only ones.)

Now, this little series of pictures demonstrate something most weekend golfers never realize: Your arms and hands don't move very much during a full swing.

Think about it. The hands are in the center of your body (ie., in front of your belt buckle) at setup. When the hands are waist-high, they're still in the center of your body. That means your shoulders have moved and not much else. Then, from the waist-high position, your right elbow bends and your left elbow doesn't, which causes you left shoulder joint to pivot up.

So your hands have only moved from your waist to just above your right shoulder, and most of that movement comes from bending your right elbow. That's not much movement at all!

Now your hands might move a bit higher if you swing high like Bubba, or both elbows might bend a little if you swing like Rocco, but basically your hands aren't moving very much.

This also helps us understand something that else causes debate among teachers and players -- namely, is there a pause at the top of the swing?

The answer is both yes and no. Because your shoulders turn so early in the swing when you keep your hands in front of you, your shoulders finish turning before your hands and club change direction. You got that? Your shoulders stop turning before your hands and club stop moving. That's where the pause comes from -- your shoulders pause, not your arms.

When you start your downswing, you basically reverse the process this way:
  1. Your lower body starts the swing, typically by returning your left knee just past its setup position. I already covered that knee move in this post.
  2. That knee movement pull the hips around to their setup position, which causes your shoulders to start turning.
  3. Your shoulder turn pulls your arms and hands down to a lower position, but your arms don't start "swinging" the club yet. This is where a lot of you are losing your wrist cock. The arms get pulled down a little, but that right arm stays in the same bent position it had at the top of the backswing! The arms are pulled down by the body movements I mentioned in the last few steps, not by straightening your right elbow or pulling with your left arm.
  4. Now, once your lower body feels like it's back in its setup position (or a little past) and your shoulders have started turning back and your arms and hands have dropped to shoulder level or a bit lower (whew, what a chain reaction!), now you can swing as hard as you want! Think of the movement from this point as if you were throwing a Frisbee; that will help you stay level, square up your clubface, and keep your left elbow against your side so you don't "chicken wing" the followthrough or leave the face of the club open. (If you do leave the face open, check your grip at setup. That's probably where the problem is.)
Wow, that's a lot to digest at once, isn't it? I'd better call it a day and end this post. But hopefully you can see how keeping your hands in front of you affects your entire swing from setup to finish.

Wednesday, January 19, 2011

That Nasty Forearm Rotation!

If you've been following Dexter's attempts to improve his golf swing over at his Golf Tips & Quips blog, you probably saw this post about his first attempt in some time to hit driver. It includes some old video footage of his swing before I started trying to help him as well as some new video taken just recently. If you haven't seen them, you're going to be surprised by how well he's swinging now!

But as you will see in his post, Dex still believes he's coming over the top. (As if I haven't mentioned this a hundred times, you can find the links to my "Dexter's Coming Over the Top" series here on the Some Useful Post Series page.) In my comments I tried to show him that he isn't coming OOT anymore, and tried to explain exactly what he is seeing and how to deal with it. I suspect many of you have a similar problem, so I thought I'd cover that info in a post here as well.

As I told Dex, an OTT move happens primarily at your right shoulder. (For you lefties, it's your left shoulder.) A look at Dex's video reveals that his shoulder is now staying level throughout the change of direction at the top of his backswing. He's really made a tremendous amount of progress in a short time!

The slight lift that Dexter thinks he sees -- and that he believes is an OTT move -- is actually where he's rolling his forearms during his backswing. It causes him to lay the club off a little at the top, so he has to twist his hands the other way when he starts his downswing to get the club back on line. He isn't rolling them nearly as much as he used to -- you can compare the two videos and see the difference very clearly -- but it's still enough to cause a problem.

I've made a big deal in many of my posts about forearm rotation. I believe it's the one fault that causes the most problems among golfers... and that includes pros as much as amateurs. If you eliminate it, you tend to gain both accuracy and power simply because you hit the ball more solidly.

Since I had the exact same problem years ago and my teacher Carl gave me a drill that fixed the problem, I passed it on to Dex and now I'm going to do the same for the rest of you. I know for a fact that it works, and you can use it indoors if necessary because you don't always have to make a full swing. In addition, it's easy to incorporate it into the drill I gave you for learning the one-piece takeaway... which, as it happens, also helped Dexter to minimize his wrist-twisting!

I've just copied the following from my comment on Dexter's post. I think it's pretty clear.
Often what we "feel" we're doing isn't what we're actually doing. That's why you hear teachers like Hank Haney or Michael Breed tell their students to exaggerate their movements. In your case, you feel like your wrists and the club shaft are on line when they're actually turned too much. Therefore, we're going to exaggerate so much in the other direction that you feel like you're out of position.

Take a wedge. When you reach waist-high on your backswing -- and you don't have to swing back down, just swing your one-piece takeaway to waist-high THEN STOP -- I want the club shaft to point straight up in the air. When you reach that point, take a good look at it, then set up again and repeat as many times as desired. And then use this as part of your pre-swing routine before you hit shots... at least for a while.

Now pay attention, because this is very important: Don't look at the shaft when you actually make shots! Look at the ball like normal, make your normal one-piece takeaway and swing to the top, but try to feel as if the shaft points straight up at waist-high. Yes, this is an early cock instead of the later cock you're using now, but this change is a necessary evil. In time, you'll be able to make this move with a late cock if you want to. Right now, we're far more concerned with correcting your wrist over-rotation.

I can hear your thoughts now -- "But that's going to make me too steep! I'll start going over the top again!"

No you won't. When you make your regular shot, the momentum of the club head and shaft will force your swing to travel on plane... which means your wrists will be on plane as well. But you'll stop the extra turning your wrists make, which is why you're laying the club off now!

Try this for a while, then tape your swing again. I bet you'll see the change clearly then... but I'm betting you'll see some improved consistency in your shots even sooner.
That's an understandable explanation, isn't it? Although you'll have to practice a little to ingrain this move, it's amazing how quickly it "takes" as part of your swing. You should start seeing more accurate shots -- and probably a little extra length -- before long.

And I don't think Dex will mind if I include this video of his improved swing...


I bet a lot of you wish your swing looked that good!

Wednesday, January 12, 2011

Learn to Turn

Many weekend players have a problem hitting the ball solidly. What do we mean by "hitting it solid"? Simply that we hit the ball in the same spot on the clubface time after time. When we do, the ball travels as far and as accurately as it can, given the swing we put on the ball.

However, several different problems can cause inconsistent contact; excess body tilt is a common one. I've mentioned some ways of dealing with this one before, such as trying to feel as if you start your upper and lower body turning at the same time. But many drills have been created because different people respond better to different approaches. Today we're going to look at a couple of different drills that attack the body tilt problem.

First, Michael Breed has one:


This "ostrich drill" is probably familiar to you, and it's a useful way to learn what "staying steady" over the ball feels like. As you can see, Breed is focusing on keeping the center of your chest steady over the ball. (Not unlike some of the Stack and Tilt drills, eh?) Many of you will find that this centering drill will give you a feeling that you can draw on during your swing.

But what if you can't? What if pivoting on two hip joints totally destroys the feeling you discovered using this one-foot drill? What if you tend to dip your shoulders when you swing from your regular stance, but not when using the ostrich drill? In that case, you need a second drill to help you transfer the feel of the ostrich drill to your regular stance.

I have no video for this one, but I doubt you'll need one. Simply take your normal setup position but lift both arms to shoulder level and point them out to your sides, so they and your shoulders form one straight line. (Remember when you were a child and pretended you were an airplane? Same idea, but your knees and hips are flexed... so you can "take off.") Then, keeping your arms and shoulders in that straight line, coil your shoulders in a backswing move until that line is perpendicular to your setup position, then "swing" through until that line is again perpendicular to your setup except that you're facing the other way.

In other words, you're duplicating your backswing and downswing motion... except that your arms are extended like a propeller. Do this movement very slowly at first; you can pick up the speed as you get used to it. And if you still find it difficult to keep your arms straight, you can hold a broomstick across your shoulders to help.

What does this drill do? For one thing, it helps you visualize turning your shoulders in a plane. You'll find it more difficult to lean your spine sideways with your arms extended this way, plus it will be harder to tilt your shoulders forward on the "downswing." It will help you feel a level coiling and uncoiling motion.

Combining these two drills will help you learn the various feels involved in making a level turn on two legs while staying centered. And those feels will help you hit the ball more solidly with your normal swing.

Tuesday, December 21, 2010

Hogan VS Wright

Since we don't have much going on in the golf world for the next couple of weeks -- after all, this is Christmas week! -- I thought I'd try to focus on some classic instruction and year-end review stuff. Today I found this cool comparison video by PGA certified pro Todd Dugan. Check out the side-by-side views of legends Ben Hogan and Mickey Wright!


Let me point out a few interesting things that you might otherwise miss:
  • Both players are set up to play draws. You can tell because their feet are lined up to the right, and that's not just the camera angle. Their shoulders are lined up straight away from the camera, not parallel to their toe lines.
  • Todd mentions that both players have their arms extended away from their bodies. If you look at my "Basic Principles of the Game" posts, which are in the category of the same name, you'll find that Principle #4 is that the forearms and the club shaft should form a straight line. Doing so eliminates a lot of possible changes in the angle of contact, and that's what Hogan and Wright are doing. (Nancy Lopez lifts her hands to start her backswing. That serves the same purpose.) Please note that they don't have to form a perfectly-straight line; what's important is that you minimize any wrist angles if you can. You'll see why later in this video.
  • Note that Hogan bends his right elbow more on the backswing than Wright. That's because he swings on a flatter plane than she does... and apparently doesn't turn his shoulders as early in the swing as she does. Look at Hogan and Wright's hands at the 2:11 mark -- you can see that Wright's hands are more centered between her shoulders than Hogan's. This is a combination of having his elbow bent more and his shoulders turned less. Sound familiar?
  • Also note that Hogan bends his right elbow backward while she bends it downward. Again, that's a function of their planes. But the interesting comparison of backswing positions is at around 3:06 on the video, when both players' left arms are parallel to the bottom edge of the video -- Hogan's swing may be flatter, but his hands are actually higher above the shaft line than Wright's! He's lifting his hands, which is just what you'd expect when he doesn't turn his shoulders early enough. The reason he doesn't come over the top is because he tucks his elbow into his side so tightly on both his backswing and downswing. Otherwise, he'd come over the top big time! Bobby Jones also had a flat swing... and made a similar move.
  • At about 3:20, ignore Todd's line for Hogan's shaft position at the top of the swing. Look carefully -- you'll see the club head peeking over his left forearm. That's because he's overswung a bit; when he starts down, the club head moves behind his hands, then the shaft reappears and points at the ground about halfway between the ball and his feet -- that's the classic Hogan "laid-off shaft" move. Hogan is above the original shaft line all the way down, while Wright gets back on it at waist high and stays there. The lesson? As long as your swing works, don't get too hung up over perfect positions!
  • Back to the forearm/shaft alignment: Notice at impact that Wright's shaft and right forearm look almost perfectly straight while Hogan's wrists seem to "bump up" a bit so the line from elbow to club head isn't quite straight. (Hogan's position is clearer before Todd draws in the shaft line at 4:51.) That's because of Hogan's weak left hand grip -- he's rotating it hard so the club face doesn't point to the right at contact. Remember, he's set up for a draw.
Like I said, this is a pretty cool video since it shows two greats of the game side-by-side. It also demonstrates how two players with similar swings can be so different technically.

Saturday, December 18, 2010

Working the Ball with the "New Ball Flight Laws"

A lot of you are going to read this post and say, "My gosh, Mike -- why didn't you just say this in the first place?" But most teachers aren't going to be as clear as I'll be in this post, so you'll have to reason out what they mean... and that means you needed all that theory.

Today, we joyfully shout "Screw theory!" and simply learn how these "new ball flight laws" can save us a few shots on the course. (With pictures!) And just so you know, they do it in one of two ways:
  • They help us avoid getting in trouble in the first place.
  • If we do get in trouble, they help us get out of it in fewer shots.
Personally, for all the talk about how these new rules are such a drastic change... I don't see it. There are some important changes but, when you state them simply, it's just a "duh!" moment where you wonder why it wasn't taught this way in the first place.

Let's look at a simple situation where the new rules make a big difference in how you play the shot. We've just mis-hit a shot into the woods. We found the ball, but there's a big tree right between us and the hole. We've all been taught to set up with the face of the club aimed at the hole (and therefore at the tree) and swing on a line around the tree. Here's a diagram showing what happens according to both sets of rules:
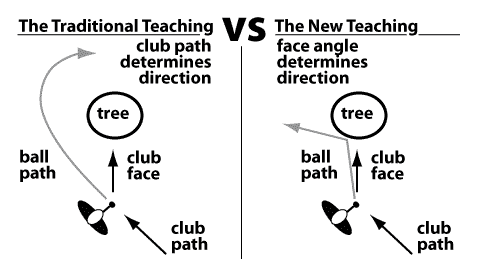
How the rules differ

Two very different outcomes, aren't they? And I suspect most of us have experienced the "new" version's result more often than the "traditional" version's. So why did the traditional view survive unchallenged for so long?

Well, I can think of at least three common examples of the situation that would make it look as if the traditional view was correct:
  • If the tree was fairly thin and your club path was wide enough -- and let's face it, you'd probably aim to be sure you missed the tree if you had room -- the ball path would still miss the tree.
  • If the tree was thicker but you were far enough away from it, you might miss the tree.
  • And there's always the possibility that players closed the club face as they swung, since the ball may have been in thick rough. That would change the club face angle, again allowing them to miss the tree.
I imagine these three situations occur quite frequently -- certainly often enough to convince us that the traditional rule was correct. But because we've seen these happen, we've also hit the ball into the tree way more often than we should have.

If you asked a child how to deal with this, what do you think the child would say? The little angel would probably say, "Why don't you just aim around the tree?" and smile at you like you were an idiot. And guess what? That's exactly what the new rules say we should do!
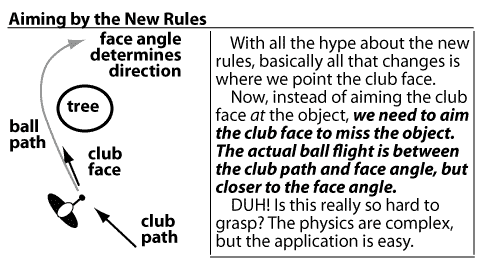
What the new rules tell us to do

Simple, huh? So why are teachers making such a big to-do out with all the talk of "new ball flight laws" and acting like this is a revolution of some kind?

I think it's just shaken their worlds in some profound way -- is it possible they kept hitting trees yet didn't dare question what they'd been taught? -- and now they feel as if they've been freed from prison. If you watched the video I posted a couple of days ago or read this post to which Jonny sent me the link, you've seen Nick Faldo lambasted for repeatedly teaching the incorrect laws. How often do you think Faldo's had to get out from behind a tree? But in the examples shown, he seemed to be far enough back from a thin tree that the traditional method may have worked. Is it possible the pros knew enough to be skeptical of the traditional approach?

To be honest, in all my golf reading, I can't remember anything from a player specifically on how to play around a tree. I have an old copy of Jack Nicklaus' Playing Lessons -- yes, the one done like a comic book -- and I couldn't find a single thing about playing out of trees, although you would think a book aimed at amateurs would include something. The closest I could find was some advice on playing doglegs on page 73. Jack clearly advises playing well clear of the dogleg -- to the left side of the fairway on a dogleg right, for instance -- and calls attempts to cut them close "gambling." I now wonder if this was in part because he didn't trust the traditional approach to playing them enough to pass it on to weekend golfers.

I suspect all of us grasp this to some extent. Ironically, Jonny had posed this question because of the Understanding Your Shot Shape post I did, but in the following day's post I applied the new laws to describe those same shapes... not because I knew they were the new rules or contradicted the traditional rules, but just because it made sense. And nobody questioned it, which means either you guys aren't paying attention or it made sense to you also. (I'm going to assume the latter. Since you follow my blog, it's obvious that you're a truly intelligent bunch.) So it certainly appears that the context has a lot to do with which laws we apply -- I applied the traditional laws when explaining a traditional teaching in the first post, but instinctively followed the new laws when presenting new material. You probably do the same thing.

So let's try to get all our Titleists in one box, shall we? Let's find some practical, simple-to-use advice on how to use the "new ball flight laws" to cut strokes from our game. First, let's make sure we understand what's changed and what hasn't:
  • What hasn't changed is what a shot is and how it's shaped. A shot starts on a certain line -- we'll call it the starting path -- and then curves to one side or the other unless it's a straight shot. We call this a "shot shape" and it's determined by two things --  the swing path and the face angle, which can be open, square, or closed relative to the swing path. All of that stays the same.
  • What has changed? Only one thing: We used to think the swing path had the most influence on the starting path, but research has proven that isn't true. The face angle has the most affect on the starting path, which means the starting path is closer to where the face angle is pointing than where the swing path is headed. That's it -- that's the change.
What makes this single change so complicated is that it also changes our entire frame of reference for thinking and talking about the swing. We used to think about aim in terms of the swing path; now we have to think in terms of the face angle. More fundamentally, we used to think the face angle caused most of the curve, but now we give that job to the swing path. (Most teachers won't say that upfront, but it's implied in all the discussions.) It turns our whole way of thinking on its head... although the practical applications are very simple.

The new rule can be simplified as one simple rule of thumb:
"Aim the face of the club in the direction you want the ball to start flying. Adjust your swing path to make the ball curve -- aim right to curve left, aim straight to fly straight, aim left to curve right. The ball will start out between where the face is pointed and where the swing path is headed... but it will be closer to where the face is pointed."
Just aim the club face where you want the ball to start, not where you want it to end up. The irony is that, properly taught, the traditional view should have given the same results. The traditional view says the ball will land on the line where the club face is aimed at impact... then bounce across it. To get the ball close, you should have aimed the way the new laws say you should, anyway!
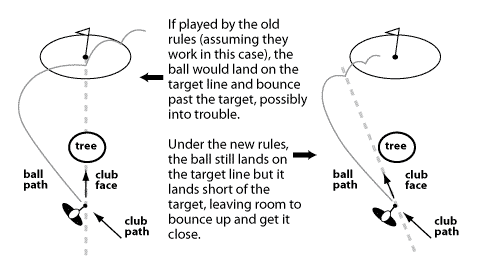
When the ball lands on the target line

So here's how to use the new rules on the course:
  • If there's nothing between you and your target: Aim and play as usual. You might want to aim the club face a little to one side and use the swing path to give the shot a little curve. Remember: If you curve the shot, you need to leave room for the shot to bounce toward the target.
  • If there's something in your way (like a tree): Aim the club face to miss the tree, and aim your club path enough left or right to add some curve. You should miss the tree. (Hooray!)
  • Curving around a dogleg: Unless you're going over the trees or whatever is in the way, make sure the club face is aimed in the fairway. Then aim your club path to give the shot some curve. As long as you take enough club, you should go around the dogleg without any problems.
And that's all there is to it. It's complicated theory, but simple application. And now you not only know how to use it on the course, but you should be able to figure out which theory a teacher is using by how they describe things. As long as you remember that the ball starts out between the swing path and the club face -- but closer to the club face -- you should be able to figure out how almost any shot will actually start off and curve.


Friday, December 17, 2010

How to Use the "New Ball Flight Laws"

Ok, enough with the theory behind the "new ball flight laws." I said that understanding them could save you several shots per round if you understood them. You're probably wondering how.
  • If you're stuck in the woods, knowing them can mean the difference between getting out or hitting that tree you're stuck behind.
  • They could keep you from going into the woods at all!
  • They could help you get around that big dogleg that you've been unable to conquer.
And all of these things could save you shots without any changes in your skill level. All you need to know is how the ball really behaves when you hit it! And you will, by the time you finish these next two posts.

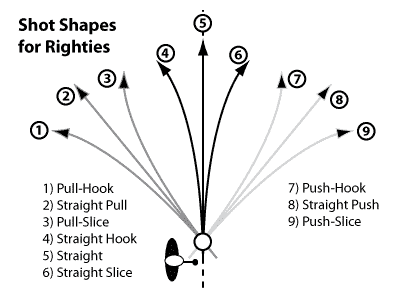
First, let's get clear on how these new laws actually affect our shot shapes. Remember, Jonny originally asked me about these new laws because of this post about shot shapes. Here's one of the diagrams from that post:

Shot shapes for right-hander

(There's also a left-hander's diagram on the original post, but the only difference is the names of the shots. We're only talking shapes here, so this diagram should do fine.)

Here's the big difference between these new laws and the traditional teaching: The bigger the face angle is relative to the swing path, the more effect the face angle has on the starting direction of the ball flight. Wow! That's a mouthful, isn't it? Let's break that down into four smaller groups of shots, based on the diagram, then we'll see how this affects our shotmaking.
  1. The face angle is perpendicular to the swing path, or nearly so. In other words, we hit the ball pretty straight. That would be the paths numbered 2, 5, and 8. These shots are unchanged by the new laws. If you hit the ball straight, it goes straight. (Of course, 2 and 8 aren't likely to be shots you hit on purpose -- straight pulls and straight pushes -- so we won't talk about them anymore, but they still behave just like you've always expected them to.)
  2. The face angle is only a little off from perpendicular to the swing path. You're just trying to hit a little fade or draw. This would be paths 4 and 6. These two shots stay pretty much the same. They don't start going exactly straight, but it's close enough that you shouldn't have any trouble.
  3. The face angle is nowhere near perpendicular to the swing path. This is what you get when you try to hit a big curving shot. These are shots 1 and 9, the pull-hook and the push-slice. These babies are REALLY affected by the new laws, and they're the ones that typically get us in trouble.
  4. And there are two shots that can fit into any of the other three categories, depending on how much we curve them. These are shots 3 and 7, the push-draw/hook and the pull-fade/slice. If we only curve them a little -- the push-draw and pull-fade -- they almost act like shot 5, which I'll explain in a minute. But if we curve them a lot --  the push-hook and pull-slice -- the new laws really affect them and we need to be careful.
First let's talk about the ones that don't change much:
  • Shot 5 is just your standard straight shot. Easy enough, right? Just aim at the target and fire.
  • Shots 4 and 6 are where you line up either left or right of your target and point your club face square at the target. The ball will start ever-so-slightly more left or right that you think -- almost like a super-small pull-draw or push-fade -- but not enough to make a difference in your aim because you're just playing for a small curve. Aim as normal.
  • The "small curve versions" of shots 3 and 7 are actually affected the most among the shots you might say are desirable. Some of you like to play a little push-draw or pull-fade, which is perfectly acceptable -- many Tour players do the same with great results. Generally, you'll have the club face pointed squarely at the target for these "little curvers." You may remember from an earlier post that the face is responsible for 5/6 of the direction; in this case, it means that the ball will start out much closer to straight than you might expect.

    For example, suppose your swing path is a 12° pull. Since the face is responsible for 10° of that angle and it's aimed straight at the target, the ball will start out as only a 2° pull... and it will curve back toward the target! For a weekend golfer, this is great news. It means that you don't have to worry about a slight pull or push swing messing you up as long as you square up the club face. It'll let you relax and swing more freely. Just aim normally and don't be surprised when the ball seems to fly straighter than you expected.
This post is running long, so we'll wait until tomorrow to talk about the "big curvers," since those are the ones most affected by the new laws. We want to make sure we take the time to understand those shots, since they can save us the most shots!

Thursday, December 16, 2010

Video of the "New Ball Flight Laws"

Well, they say a picture is worth a thousand words. I certainly hope so!

I'm sure many of you are just as unconvinced as Court about how accurate these "new ball flight laws" are, so I decided to see if I could find some slo-mo footage actually showing what happens when you hit a golf ball.

Here's what I found -- and no, there's no sound with it, so there's nothing wrong with your computer.

Please note that, if the traditional rules are correct, these balls should travel in the same direction the clubhead is traveling once it hits them. This video shows several hits, with lines clearly showing the direction of the club path and the resulting launch direction of the golf ball.


To make a long story short, the initial direction of a golf ball is not determined by the club path. The face angle has the biggest effect. If this video (and TrackMan's documented research) isn't sufficient to demonstrate that these "new laws" are valid, I don't know how to convince any unbelievers out there. The evidence is there; if you want to ignore it, it's up to you.

Between TrackMan and this video, I don't know what I could add anyway.

Tomorrow we'll look at how these "new laws" actually affect how we play the game.