ATTENTION, READERS in the 28 EUROPEAN VAT COUNTRIES: Because of the new VAT law, you probably can't order books direct from my site now. But that's okay -- just go to my Smashwords author page.
You can order PDFs (as well as all the other ebook formats) from there.
Showing posts with label route 67. Show all posts

Wednesday, June 9, 2010

Elbow Room

Part of the Route 67 series

It's possible that you've tried some of the different versions of the Secret Move from last week... and immediately "got stuck." No matter what you tried, you just couldn't get that club in front of your body, and you ended up swinging out to the right (or left, for you lefties) -- a push, maybe even a push slice.

That's why we're going to interrupt our look at ways to delay the uncocking of your wrists and take a look at what I think is Ben Hogan's greatest contribution to the weekend player's game -- an understanding of how the elbows (particularly the one you bend) work during the swing.

On page 49 of Five Lessons it says, "Keep the elbows and arms as close together as possible throughout the entire swing," and it is accompanied by a drawing of Hogan's forearms bound together from elbows to wrists. It looks like a triangular mummy wrap! Then on page 98-99, where he compares the downswing motion to a baseball infielder's sidearm throw, Hogan says, "As he swings his arm forward, his right elbow is very close to his right hip. The elbow 'leads' the arm -- it is the part of the arm nearest the target as he begins to make the throw. The forearm and hand catch up with the elbow, and the player's arm is extended relatively straight when he releases the ball."

Here's my pathetic attempt to copy an illustration of Hogan's elbow position on the downswing (from page 98 -- that's the drawing on the left below), along with a comparison to the more typical incorrect position that plagues weekend players:
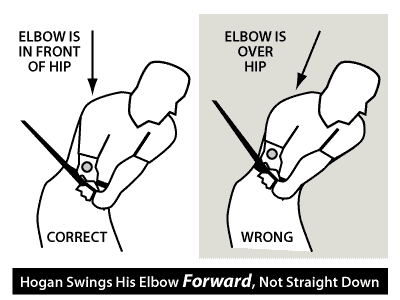
Hogan's elbow vs the incorrect position

Those gray dots represent the position of the elbow in each downswing. And if you compare the descriptions to the arrows, you might think I screwed up the drawing. What you need to understand is that the arrows show where the upper arm is pointed on the downswing, while the words beside them describe where the elbow finally ends up. The words in the black box describe how the motion feels to most people. Most weekend players never recognize there's a difference, and that's why they get frustrated. If you follow instructions that tell you how to move, but perform them by how they feel to you, you may never figure it out!

It is important to remember that your body is not straight up and down during the swing, the way it is when you stand upright. You are leaning slightly forward, and that's the source of the apparent contradiction. Most of us interpret how these motions feel relative to our body, not relative to the ball.

So, to reach the incorrect position, when we feel that the elbow is dropping straight down, what we actually feel is our elbow moving parallel to our spine from around shoulder level down to our hip. Normally when we stand straight that's down, and our minds continue to equate "down" with "parallel to the spine." However, since we're bent forward, the motion we feel as "down" actually means we're moving slightly backwards away from the ball. Can you see how that happens?

By comparison, Hogan has actually dropped his elbow straight down relative to the ball. If you were standing straight up, swinging your elbow this way would actually feel as if you were moving your elbow forward toward the ball.

Do the arrows and words make sense now? To actually drop your elbow straight down toward the ground on the downswing, you have to feel as if you are moving it forward toward the ball. When you get in the correct position, your upper arm is vertical relative to the ground... which means your elbow will swing past your hip and you won't get stuck. (Take a good look at that drawing. See the vertical upper arm?) It's simple once you know what you're looking for.

Now come the big questions: How do we make this move? What does it feel like? How can I check that I'm doing it right?

This is where Hogan's image of the elbows being tied together, along with his "sidearm throw" description, is so helpful. It's an awfully mechanical way to swing, but studying it a bit shows us what the actual move looks like. Once we know how to do it, we can do it slowly and see how it feels, so we can just duplicate the feel when we play.

The elbow "leads" the arm -- it is the part of the arm nearest the target... Relative to the spine, the elbow is certainly out in front of the rest of the hand. But as the Hogan drawing shows, his upper arm is actually vertical once it gets down close to the front of the hip. (The front of the hip, not the side of the hip! This can make as much as much as 6 inches difference in where the elbow is when you reach the hitting area. Do you think that would make a difference in your swing plane?) But, if you are getting into the position at the top of your swing that most teachers say you should -- with your upper arm parallel to your spine -- then your forearm is leaning toward the ball.

In order to get your elbow to the front of your hip -- where you can swing the club freely down the target line -- you're going to have to let your elbow swing forward under your hands as the club comes down. Think of your hands as a tree branch and your elbow as a swing; let the elbow swing under the hands! This isn't a move that takes a lot of effort; in fact, if you try too hard, you'll jerk your elbow too far ahead. If that happens, your forearm will end up tilted backward and you'll actually make it too hard to square the clubface. (Trust me on this one. It took me forever to track down this problem in my swing!) If you have a two-way miss, this problem can cause it: With the elbow too far forward, you'll push-slice, but if you try to fling your hands to overcome it, you'll pull-hook. The correct position isn't a power move; you shouldn't need a lot of effort to reach it.

Now -- and this is important -- once you get to this position, you don't need to fling your arms toward the ball. All you have to do is straighten your arms! Because of your elbow position, straightening your bent elbow will move your hands (and the club) ahead of your elbow. Try it and you'll see. I've been trying to think of something to which I could liken the motion, something that a lot of you would recognize, but I haven't been able to. Some have likened it to hitting a baseball with a bat; I find it reminds me more of swinging an axe.

Frankly, you may find that either one feels a bit too mechanical for you... and that's fine. Don't use them. Here's the key thought: Your bent elbow swings forward as it comes down, so it can swing past your hip, not bump up against it. It swings close to your hip, perhaps even brushes it as it goes past, but there should be NO substantial contact between them. As long as you follow that guideline, you should be able to get a more controllable swing going.

Watch out for that elbow position on the way down. It's a small thing, but it has a major effect on your ability to get the club on the correct path and to square the clubface.

Friday, June 4, 2010

Secret Move #3: The Bowed Wrist

Part of the Route 67 series

The last of the "plane-changing" Secret Move methods was another Ben Hogan invention. Originally intended to work in conjunction with his two-plane tilt move, the bowed wrist has become somewhat popular all on its own. While many teachers call it a flaw, it's also obvious that many good ballstrikers use it. We're not going to deal with the ballstriking aspects of it -- essentially, it's a "trapping" move (that is, it keeps the clubface aimed at the target for a longer time in the hitting area, so it can be more accurate) and it requires strong leg action to make it work properly. Rather, we're going to look at how it helps you delay the uncocking of your wrists.

Gary McCord demonstrates a bowed wristFirst, in case you don't know what a bowed wrist looks like, here's a picture I found of Gary McCord demonstrating an extreme example of it. It's from some material he has posted at Dummies.com (McCord wrote a book called Golf for Dummies). If you click the photo, it'll take you to the site.

Now, you might very well wonder how this bizarre-looking wrist position could possibly keep your wrists from uncocking so soon. If you think about the way Hogan's hands move when they start down from "the slot" (just review the two-plane loop post from yesterday if you need a refresher), you'll realize that bowing your wrist changes the uncocking angle so it's more parallel to the ground than your swing plane. As a result, when your hands start moving down to hit the ball, they don't uncock until you start going directly at the ball.

Here's a diagram showing the bowed wrist position in conjunction with Hogan's two-plane tilt hand movement. I've also added a line showing the "laid off" club shaft... and that's really the key to making this work.


We normally expect the club shaft to be parallel with the line labeled Plane 1 in the diagram, and that's why it looks so awkward. However, the laid off shaft is supposed to be parallel to Plane 2, which is the plane the shaft should be in when the clubhead actually hits the ball. Once you understand that, the bowed wrist doesn't seem like such a strange technique, does it?

Was Tiger working on this with Hank? I don't know, but it doesn't seem likely and I'll tell you why. Tiger's no stranger to the bowed wrist position -- it's the basis of how you hit a stinger. (By clicking here, you can read a Golf.com article by Craig Harmon on how to hit Tiger's stinger.) But the stinger has been conspicuously missing from Tiger's arsenal lately. Because of that, I suspect the bowed wrist was NOT part of The Haney Project: Tiger Woods.

More importantly, should you consider playing with a bowed wrist to take advantage of this approach to the secret move? If you use a lot of leg drive and a very strong grip in your swing (the two seem to fit together naturally), then you might want to consider it. While players with strong grips tend to be very accurate, they also tend to be short hitters because they can't release the club as freely without hitting big hooks. Since the bowed wrist position puts the club in a similar position as a strong grip, it should be a fairly natural fit... and allow you to get a little extra wrist cocking power in the deal. Otherwise, I suspect there are other methods of performing the secret move that will fit you better.

What's that? You say that none of these three methods feel very comfortable to you? Don't worry -- there are other ways to retain wrist cock besides these "plane-shifting" methods. We'll look at some others next week.

Thursday, June 3, 2010

Secret Move #2: The Two-Plane Tilt

Part of the Route 67 series

The two-plane loop is a simple way to accomplish the "secret move" of getting most of the wrist cock at the top of your backswing down close to the ball before you use it. However, it does present a problem or two, as most of these solutions do. (That's why we end up with multiple solutions to any problem. You pick the solution whose problems are easiest for you to live with... in golf or anything else.)

The two-plane loop is primarily an arm movement, which makes it well-suited both for arm-powered swings and for softer-shafted golf clubs. If you aren't a particularly strong player and you use softer graphite shafts, the loop can be an especially good solution. However, the two-plane loop is very much a matter of feel. Planes weren't even a concept with the loop originally, let alone a guarantee of accuracy, which can cause problems for players who are strong and intensely mechanical.

Like Ben Hogan. When the Hawk rebuilt his swing (and I plan to do a post or two sometime about the changes he made) he was looking for a machine that he could set up so he never hit a shot left ever again... unless he wanted to, that is. And the two-plane loop just wouldn't give him that guarantee. Hogan decided to build a leg-powered swing that eliminated all that excess arm movement... which means he had to find some new way to perform the "secret move."

Enter the two-plane tilt. Unlike the flowing curves of the loop, the tilt created a "slot," a sharp turning point at the top of the backswing; put the club into that slot, and you should return the club on the exact same plane time after time after boring time. The following diagram shows the movement of the hands during this move. If you compare it to the two-plane loop, you'll see that the hands cover a lot less ground because they travel in straighter lines, and the up and down planes are very similar. In addition, the "slot" at the top is a bit lower than the top plane; that's because Hogan's elbows stay closer to his body. That flattens his swing considerably.


Of course, that's only part of the picture. Unlike the two-plane loop, where the arms create the path the hands take, Hogan uses his entire body to create this path. His left hip moves a little toward the target and away from the ball -- what some would call a "slide and turn" -- so he ends up with his stomach facing the target. Here's what it looks like from a face-on view:


Yes, Hogan was tilted backwards when he hit the ball. Remember, he had a problem with duck hooks, so he designed a swing that, unless done properly, causes you to get stuck and hit the ball out to the right. He also used a weak grip to prevent him from flipping his hands to "save" the shot. At worst, he intended to aim down the left side of the fairway and, if he made a bad swing, end up on the right side of the fairway. That's why I rarely recommend Hogan's swing; unless you have a hooking problem (which most weekend players don't), you're already hitting the ball to the right.

As I pointed out with the first diagram, Hogan's hands drop down much more steeply than they would in a looped swing. The plane his hands travel coming down is much closer to the plane they took going up... which means this move shouldn't be as effective at preventing his wrists from uncocking early. However, it works for two reasons, the first of which actually goes against the modern teaching of creating the biggest downswing arc possible!

In Hogan's swing, when he pulls his right elbow down against his side, combined with his rapid hip turn, he actually causes the grip end of the club to pull inward toward the body and forward toward the ball, narrowing the downswing arc. In effect, it prevents the clubhead from being thrown outward as it would in a normal downswing by turning the clubhead (rather than the hands) into a pivot point. I've drawn a circle on the 2nd diagram that shows where a looper's hands would most likely be at the same point in the downswing; but what the diagram can't show is that the circle would not be just farther away from him, but actually more behind him. It really is a brilliant solution, and it's responsible for that amazing amount of shaft flex you see in old swing footage of Hogan's drives.

If you use a lot of leg drive in your swing, this move just might work for you. To avoid that "getting stuck" problem that tends to cause chronic slices, you might want to try feeling as if you start your shoulders turning at the same moment you turn your hips. (I wrote a little about that idea here; check the section called "A Simple Fix Worth Trying.") The most important thing you have to remember in order to avoid getting stuck is not to let your hips slide too much toward the target; that'll get you leaning backwards a little too much, and you'll get stuck for sure.

The other reason it works is that Hogan added yet a second "secret move" to his swing to make sure his wrists stayed cocked as long as possible. Although he intended it to work with this move, some teachers now use it on its own. We'll look at that move in the next post.

Wednesday, June 2, 2010

Secret Move #1: The Two-Plane Loop

Part of the Route 67 series

It's easy to forget that all the funky swings we see on the golf course -- especially if that funkiness catches on and becomes part of formalized teaching -- got started because the funkiness either solved a problem or simply gave some players an advantage.

The quest for the secret move has spawned all sorts of strange-looking (and frequently criticized) swing adaptations. Of course, there are only a limited number of ways to cheat the physics of the swing, so sometimes we see more than one way of performing the same method.

The first method that became popular involved changing the plane for a portion of the swing. As you'll recall from the secret move post, if you swing the club on a single plane, your wrists will try to uncock on that plane. Somewhere along the line, a bright player realized that, if you moved the entire plane sideways, there would be no force acting on your wrists to make them uncock.

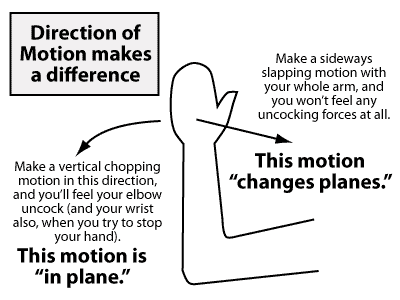
If that doesn't make sense, think of it this way. Hold your hand as if you were going to make a karate chop. If you swing your arm so the edge of your hand would contact its target, you feel "uncocking" forces in your elbow and in your wrist. Now suppose instead that you take the same position but you swing your arm sideways, in the direction of your palm. Now you don't feel those uncocking forces.

The angle of motion makes a difference

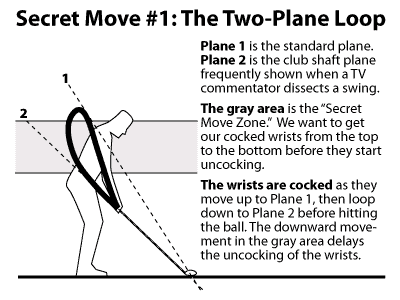
That's the idea behind the two-plane loop: You take the club up and cock your wrists, then loop it downward (usually -- Bobby Jones looped upward) at an angle that doesn't cause your wrists to uncock as quickly, and finally hit the ball from a lower plane. The secret move -- the one that keeps the wrists from uncocking before they reach waist-high -- is accomplished by that loop moving sideways between the two planes.

That loop is shown by the dark line in the diagram below. Please note that the loop shows the path of your hands, NOT the path of the clubhead; that wouldn't help you understand how your hands move during the swing at all! You start with your hands on Plane 2; they move onto or just under Plane 1 when they reach the top of the backswing (unless you have a very upright swing), and return to Plane 2 when you hit the ball. (Which means, ironically, that neither plane represents the actual path your hands travel... and yet these are the planes used to illustrate swing plane. And people wonder why golf instruction gets so complicated!)

A few quick notes about the diagram: I've drawn the top of the gray zone (the top of the backswing) slightly above the shoulders at address; most players' hands do go a bit above their shoulders before starting down. This swing looks slightly upright since I used Ernie Els as my model here. And it may look as if the loop goes way behind your shoulders, but remember that at the top of the swing you would have turned your shoulders so your chest would be facing us.

How the Two-Plane Loop Works

Those of you who have been watching The Haney Project (both versions) on TGC will recognize that this is the basic action Haney is teaching his "projects." If you've been thinking that Haney only teaches the Hogan method, it might surprise you to hear that this is not Hogan's technique. (We'll talk about that tomorrow.) This is an arm-swing technique that is actually much simpler, especially when you're looking to make the rapid changes they look for on the TV show. Despite what you've heard, Haney isn't simply a Hogan clone; he may prefer Hogan's techniques, but he obviously uses what he thinks will work best with a given student.

This is only one version of the secret move, but it's probably the oldest; and while the two-plane swing is taught less often these days, it still works for a lot of people. But it works best if you have an arm-powered swing; that's what it was designed for.

Tuesday, June 1, 2010

The REAL Secret Move in Golf

Part of the Route 67 series

Yes, today we're going to talk about the REAL secret move in golf. It's the move that causes most of the differences between one teacher's technique and another's.

I call it the REAL secret because nobody really talks about it. If a teacher mentions it, they just assume that it's obvious... and yet sometimes I wonder if they really understand how much it shapes the differences between the various swing methods.

If you follow what I'm talking about over the next few posts, you'll be able to quickly figure out if a tip you saw on TV or heard from a pro will really work with your swing, or whether you should look elsewhere for help.

Intrigued? Good. Stick with me for a moment.

We already talked about how easy it is to make a short game swing with no conscious wrist action; that's something anybody can do. We've talked about how having your wrists cocked until you're almost ready to hit the ball is the secret of power in your swing; that was the whole point of the "swoosh move" posts. And hopefully you tried a full swing using that "no conscious wrist action" swing and found you could get a good amount of distance for very little effort. So far, so good.

But I probably left the impression that you'd have trouble making a power swing with this technique. I hope you tried it; if you did, you understand why: Your wrists start uncocking almost from the moment you start your downswing.


That's not a completely bad thing. If you look at the posts in my "Basic Principles of the Game" category, you'll find that this short-game-swing-stretched-long is what I call an approach shot, and I spent 4 posts describing it as "The Deadhanded Approach Shot" (which you can find on the "Some Useful Post Series" page). That gradual uncocking of the wrists gives you a great amount of distance control, which is why it works so well for both the short game and for improving your GIR percentage from the fairways.

But if you want to hit the ball as far as possible, it's a bad thing. To hit the ball as far as possible, you've got to keep your wrists from uncocking until your hands are down near the ball. How can you get your wrists to cock at the top of the backswing, but not uncock until you reach the hitting area during the downswing?

That's what the REAL secret move in the golf swing is: It's the move that keeps your wrists from uncocking before they get close to the ball.

Secret Move Diagram

Now here's the trick: There is no one way to do it, but the way you choose will shape your entire golf swing.

Over the next few posts, I'll be looking at some of the different methods golfers have devised to solve this problem. If you can identify which method is being used by a given teacher, you can decide if that teacher can possibly help your game. This will both save you time and help you avoid a lot of frustration.

I bet you'll recognize the first one immediately, but you probably didn't realize it was meant to solve this problem...

Friday, May 28, 2010

Conscious Hand Action

Part of the Route 67 series

In yesterday's post I included a quote from Ben Hogan that said:
The main thing for the novice or the average golfer is to keep any conscious hand action out of his swing. The correct swing is founded on chain action, and if you use the hands when you shouldn't, you prevent this chain action.
The key word here is conscious, and it's probably one of the least-understood aspects of the golf swing -- not just for the full swing, but all the shots you play during a round of golf. (If you've ever heard Dave Pelz talk about making a "dead hands" swing, it's the same concept.) Now, there are some shots where hand action is desirable -- some examples: In one of his comments Court mentioned Gary Player's description of some sand shots as "striking a match," I mentioned hand use with the "swoosh" move when making a drive, and Phil Mickelson recommends a lot of hand action during flop shots. However, these are exceptions, not the rule.

Most of the time, unconscious hand action is what you want. In fact, most of the basic setup guidelines you hear assume that you won't actively use your hands!

Why do you suppose almost every teacher wants you to use the lightest grip pressure possible? Light grip pressure makes it harder to consciously use your hands. The idea is that the swinging of your arms, which you consciously control, provides the power for your swing; and your hands and wrists act as an unpowered hinge connecting the club to your arms. Some teachers use the image of a whip to describe a golf swing because you can't muscle a whip; it's way too flimsy for that. You use the motion of your arms to get the weight of the whip itself to behave the way you want. It's the same concept with a club.

An easy way to feel this is to take your putter -- which is short, so you won't break anything in the house! -- and hold it with a very light grip. And I do mean light; I want you to feel as if your wrists are limp noodles. No, you couldn't do that if you were trying to hit a ball because you want to keep your wrists moving in a single plane, but that's not a problem for our little exercise here.

Now, using this light grip, I just want you to swing the club back and forth. When you start, if you're holding it lightly enough, your hands will start back before the head of the club does. (You may recall some of the older teaching texts actually advised starting your swing this way. It's because they wanted you to grip the club as lightly as possible.) Let your wrists bend as you swing back and forth; if you were to follow Hogan's technique of keeping your forearms as close together as possible during the swing, this would create a reasonably consistent wrist cock. Are you with me so far?

This will create a fairly rhythmic swing. However, you can change both the rhythm (and therefore the clubhead speed) and the amount of pressure you feel at the change of direction by simply moving your arms more quickly or more slowly, or by changing the direction of your arm movement abruptly. In fact, if you have a smooth rhythm going and make an abrupt change in direction with your arms (remember, your wrists are just limp noodles!), first you'll feel more pressure in your wrists, and then it will feel as if the club speeds up to "catch up" with your arms. That comes from a combination of wrist cock and increased load on the shaft.
  • Shaft loading, if you don't know, is a result of the head trying to continue on its current path while the grip end starts moving in the other direction. Shaft load is visible as a curve in the shaft; the amount of this curve, and how much force it takes to cause this curve, is determined by the shaft's flex rating. Depending on the shaft, that rating may be a number, like 5.0 or 5.5, or a letter like R or S. Just for comparison, a regular shaft is an R or 5.0, and a stiff is an S or 6.0.
Now this is a fairly simple thing to control on short swings up to the length of a pitch shot, which is why most players can learn the short game so much more easily than the full swing. In addition, we generally strive for a slower, more rhythmic swing in the short game; since it's not a power swing, it doesn't require any special timing to get a good stroke. All you need is a light grip -- firm enough to prevent the club from wobbling around in your hands, but not so tight that your wrists and forearms tense up.

With this swing, you can use a mid-iron (like a 4- or 5-iron), make about a half-swing (a backswing with your hands at waist height or just above), and hit a controlled shot up to around 150 yards. (That yardage is based on my experience; I'm between 5'9" and 5'10" tall.) All you need to do is let your wrists get fully cocked on the way back and, when it feels almost as if your hands and arms have coasted to a stop and you feel wrist pressure similar to what you felt with the putter swing earlier, you make a rhythmic swing to your finish and just let your wrists fully uncock. The beauty is that it doesn't require much practice at all to keep this short game shot in shape.

Furthermore, you can make a full swing this way. You'll swing just a little faster, but not enough to throw off your balance. It won't be a powerhouse swing by any stretch of the imagination, but it may very well be a more powerful swing than you have now, especially if your old swing consciously uses wrist action. Based on my personal experience, I'd say you could hit a driver between 230 and 250 yards with this smooth, rhythmic swing. That may seem like a long way for such an relaxed sort of swing, but it will create a decent version of the swoosh move -- that extra wrist cock down near the ball that gives you extra distance. (Check the "Route 67" page for links to those posts.) If you look back at the video I posted of Sun Young Yoo's swing, her practice swing is only a little slower than a full swing using this technique.

But what about bombing it? How do you get a powerful full swing out of this? What if you want to get everything you can out of your drive?

That's what I call the REAL secret move in golf, and it's one reason why there are so many different approaches to swinging a golf club. We'll look at some of them next week.

Thursday, May 27, 2010

Ben Hogan on Leg Drive

Part of the Route 67 series

I quoted Manuel de la Torre as an authority on arm swing; it only makes sense to turn to Ben Hogan for thoughts on leg drive. The following few quotes come from Five Lessons: The Modern Fundamentals of Golf, considered by some to be the bible of modern golf technique. Again, I don't like quoting long passages much in my blog, but it's best to let the experts say it in their own words. I'll keep it short. (For you lefties out there... just remember that Hogan is right-handed.)
The downswing is initiated by turning the hips to the left. The shoulders, arms and hands -- in that order -- then release their power. The great speed developed in this chain reaction carries the golfer all the way around to the finish of his follow-through (p85).
Here we are, with the hips and legs driving the swing.
The main thing for the novice or the average golfer is to keep any conscious hand action out of his swing. The correct swing is founded on chain action, and if you use the hands when you shouldn't, you prevent this chain action.

What do the hands do? The answer is that they do nothing active until after the arms have moved on the downswing to a position just above the level of the hips. The arms don't propel this motion themselves. They are carried down by the movement of the hips. To understand just how the hands and arms get this "free ride," pick up a club, swing it back, and hold your position at the top of the backswing. Now, forgetting about your hands and arms entirely, start to move your hips back to the left, in comparative slow motion. Now look where your hands are. This movement of the hips has automatically carried them down from the top -- quite a good ways down, in fact, so that they are just about at hip level. In this position, tied in as they are with the body's ever-building speed and power, the arms and hands should feel absolutely loaded with power (p93).
That's pretty straightforward, right? This position is easy to duplicate using Hogan's explanation, and it may help you understand some of the reasons Tiger went to Hank Haney. (One quick note: The quiet hands Hogan talks about are also part of de la Torre's teaching -- the difference is how they get the hands down to this position.)
After you have initiated the downswing with the hips, you want to think of only one thing: hitting the ball (p96).
Again, pretty straightforward. Hogan had you do the move slowly to see how it worked, but with this line he's talking about doing it at full speed. It happens so fast that after you drive your legs and hips, you don't have much time to do anything but hit the ball. From this position you aren't going to go across the target line before you hit the ball -- in fact, there's a good chance you'll go across the line after you hit the ball. This is what Hogan was after -- an inside-to-out swing, with the ball headed out to the right. If you have squared up the clubface, the ball is going to draw gently back to your target line.

As with the arm-powered swing, the feel of the swing almost creates the technique.

I hope this helps you understand what makes a leg-powered swing so distinctive. And again, neither swing -- arm-powered nor leg-powered -- is intrinsically better than the other. It's just a matter of which is easiest for you to perform consistently. Both share a lot of the same techniques, but they feel different.

Wednesday, May 26, 2010

Leg-Powered Swings

Part of the Route 67 series

Leg-powered swings, although they've been around for a long time, are still newer than arm-powered swings. Bobby Jones is probably the first player to be widely publicized as using a leg-powered swing, although I'm sure he wasn't the original. For example, over at World Golf Emporium, David Wakeman did a post on J. Douglas Edgar, another golfer who developed a leg-powered swing... and with whom Bobby Jones was quite familiar. (You can read his book, The Gate to Golf, at Google Books.)

Like the term "arm-powered swing," referring to a leg-powered swing can be a bit misleading. It's not that the hands and arms don't contribute to a leg-powered swing, only that you feel the swing primarily through the legs. It feels more like you drive the legs, which pulls the arms around. It works extremely well for athletic players, especially if they're good baseball or hockey players.

In a leg-powered swing, proper hip and leg movement is vital. For all the power you can create, it also increases your chances of getting tilted and out-of-position during the swing. You know all that talk about Tiger and other players "getting stuck" on the downswing? That doesn't with an arm-powered swing -- only with a leg-powered one.

A major teaching for this swing is "starting the downswing with the lower body." Now, just to be clear, it is physiologically impossible to start your downswing any other way, even in an arm-powered swing. "Coming over the top" doesn't mean you start the downswing with your upper body; it just means you straighten your arms and uncock your wrists too early in the swing. Your lower body still starts the swing; if it didn't, your hands and arms would uncock inside the target line, not across it. However, focusing on using your lower body to start the downswing aids in feeling the leg-powered swing properly.

One drill that gets used a lot with this swing is "moving behind the ball," where players are encouraged to let the upper body move away from the target during the backswing. The idea is twofold: First, to promote a weight shift to the right side (left side for lefties), which helps you make a proper weight shift toward the target on the downswing. And second, to help you get a good shoulder turn by getting the left shoulder (right shoulder for lefties) behind the ball.

A common fault for players who use a leg-powered swing? The notorious "reverse weight shift," where the weight doesn't transfer onto the foot nearest the target on the downswing. This causes players to "fire and fall back" -- instead of finishing in a balanced pose, they fall backward, away from the target as they contact the ball.

While different teachers have different preferences, neither leg-powered nor arm-powered swings are better or worse than the other. Some players are better with one than another, either because of mobility issues, relative muscle strength between the upper and lower bodies, or just because one move feels more natural to them. Other players find they can do either one equally well.

Personally, I think it's worth the effort to try it both ways. Although you'll almost certainly discover that one is better for you than the other, each focuses on certain moves. An increased understanding of how both swings work will improve your swing, no matter which one you use. Besides, if your ball ends up in trouble, you may find that knowing both swings increases your options.

Thursday, May 20, 2010

Manuel de la Torre on Arm Swing

Part of the Route 67 series

As I noted in the comments yesterday, one of the major teachers of the arm-powered golf swing is Manuel de la Torre, who works with LPGA golfer Sherri Steinhauer, among others, and has worked with players like legend Carol Mann. His father, Angel de la Torre, was (as I understand it) the first golf professional from Spain as well as a student of Ernest Jones, a teacher who has been commended by players as varied as Bobby Jones and Gary McCord.

Ernest Jones was an English golf professional who lost his right leg in World War I and set about learning how to play well without it. His book Swing the Clubhead is still available and considered a classic of golf teaching.

Manuel de la Torre is the current master when it comes to the Ernest Jones method. I don't like to quote extended passages from any book, but this introductory section from his book Understanding the Golf Swing is a brief explanation of the arm-powered golf swing that's probably better than anything I can do in a single post. Hopefully this will give you a clearer picture of what current arm swing teachers focus on; it's slightly different from the arm swing used by players like Harry Vardon, but only because the guy who developed it was missing a leg. It's from pages 8 and 9 of the book:
The swinging concept maintains that if you produce a swinging motion with the golf club:
  1. The left arm will be extended (not straight) by the centrifugal force produced by the swinging motion. It simply has to be responsive.
  2. The head will remain down sufficiently long through the instinctive human reaction of looking at whatever is going to be struck.
  3. The weight will transfer to the left foot (right foot for left-handed players) after the club strikes the ball by having the body respond to the centrifugal force created by the swinging motion.
  4. The body turn that takes place on the forward swing as the body responds to the club's swinging motion will produce a definite closeness of the body and the right elbow. It is not the elbow that gets close to the body.
  5. By using the arms in the forward swing, the club will start correctly from the beginning of the forward swing without trying to use a pulling action with the left hand (right hand for left-handed players) to start it.
  6. Wrist action will be an involuntary reaction to the coiling action (backswing) and the uncoiling action (forward swing) of the club. It is caused by the circular motion needed to swing the club over the right shoulder (left shoulder for left-handed players). In the forward swing it is caused by the centrifugal force created through the swinging motion.
The problem with trying to do any of these things consciously is that we overdo them, and, furthermore, whatever we try to do will be at the wrong time.

To repeat, the emphasis in our presentation is that, having set the club on a true swinging motion the golfer must then allow the body to respond to the motion of the swing itself.
Obviously, in #4, the right elbow would be the left elbow if you're a leftie, and what it means is that you don't consciously pull the elbow to your side; it just "ends up there" if you swing correctly. And yes, that awkward phrasing in #2 is copied correctly. Read it a few times and it will make sense.

The big difference here between this swing and a leg-powered swing is that the latter requires you to consciously perform actions in a certain order, while the arm-powered swing de la Torre is talking about focuses on swinging the arms and just letting everything else happen as a reaction to the arm swing.

It may sound bizarre when you read his intro here, but it's actually an amazing swing. I can swing both ways -- arm swing and leg swing -- and the two feel distinctly different. I can also tell you for sure that this arm-powered swing takes less energy than a comparable leg-powered swing, but it develops a lot of clubhead speed. It truly is a swing where feel means as much (or more) than technique, because the feel of the swing almost creates the technique.

Anyway, I hope this intro from de la Torre's book helps explain the arm-powered concept a little better. His book is one of the few I've seen that devotes a lot of time to using the swing to create different types of shots.

Wednesday, May 19, 2010

Arm-Powered Swings

Part of the Route 67 series

Finally! We get to discuss power sources in the golf swing. Let me start by reminding you of a foundational truth of the golf swing: Although you're going to get power from both your legs and your arms, you tend to feel that one of the two is the dominant power source. If you don't know which one "feels" right, then you'll have trouble repeating your swing AND you'll find yourself confused by teachings that change your swing feel when you use them.

An arm-powered swing is the "traditional" way of playing the game. It probably developed because hickory shafts are so flexible; most people have weaker upper bodies, so an arm swing put the least stress on the shaft. Plus, in an era where most people were laborers, I suspect people were more used to arm-based tasks -- like swinging an axe -- than more athletic, leg-oriented actions. Teachers like Jim Flick and Manuel de la Torre are good examples of arm-power teachers.

Arm-powered swings focus on the actions of the arms and hands during the swing. (Duh!) The hips and legs are treated as a platform for the movement of the upper body; the legs and hips move and they put power into the swing, but you don't drive them in an effort to move the club faster. Because of this, the legs and hips move laterally much less than in a leg-powered swing; it's much more of a rotary swing.

A popular teaching for this kind of swing is the "bump and turn." In this method of starting the downswing, you first push your hips toward the target, then turn them out of the way to strike the ball. If you see this in a teaching method, it's probably arm-powered. One notable exception is the Hogan swing, which utilized this method with leg-drive to create a "hook-proof" swing. If the swing isn't done properly, the hips get too far ahead and the player leans backward -- the notorious "getting stuck" problem Tiger fights so much. In an arm-powered swing, this generally isn't a problem because the hips and legs don't move that much anyway.

There are a couple of drills that are commonly-used when teaching an arm-powered swing. One involves swinging a weight on the end of a string (I borrowed this to teach distance control in my putting book), and the other is often called "swinging in a barrel." You can see why these became popular -- the string drill from swinging hickory shafts, the barrel drill from the limited lower body movement.

The traditional swing was a backhand (or pulling) swing -- a right-hander controlling the swing with his left hand, or a left-hander controlling the swing with his right hand. Forehand swings have become more popular these days, which changes the teaching methods somewhat. Forehand golf swings resemble forearm tennis strokes in a lot of ways, so tennis players can be really attracted to this way of swinging. I would put Fred Couples in this category of arm-powered swings, since he doesn't drive hard with his legs. Fred demonstrates that this is still a very potent way to play the game!

Who should consider an arm-powered swing? People with strong upper bodies, especially if their lower bodies are less mobile. The idea is to make use of your strengths and minimize your weaknesses, and having a powerful upper body is a good reason to consider an arm-powered swing.

Saturday, May 15, 2010

Forehand Control

Part of the Route 67 series

Yesterday we looked at the characteristics shared by backhand swings; today we look at forehand swings. Remember, a forehand swing is:
  • A swing that a right-hander controls with his or her right hand, or
  • A swing that a left-hander controls with his or her left hand.
Forehand swings are not new to golf -- there's good reason to believe players like Walter Hagen used one. However, it's a fairly new phenomenon in teaching; probably the first "official" teacher of the swing was Jimmy Ballard, back in the 80s. Here is an incomplete list of things that characterize a forehand swing.
  • Stiffer shafts: This is an equipment difference. The forehand swing loads the shaft in a way the backhand swing can’t. If you’re a strong person with strong forearms, you can really blast the ball with this stroke.
  • Pulling the club back: The shoulder of a forehand player is positioned behind the club before it starts the backswing, so the player pulls the club away from the ball. This is a much stronger position, both in terms of muscle power expended and in the wrist position.
  • Weaker grip: Think about this one for a moment. Unlike a backhand stroke, which is not how we normally hit things, the forehand stroke allows you to think in terms of hitting your target with the palm of your hand. As a result, strengthening the grip (turning the hand on the grip in the direction of the backswing) is less desirable. The typical grip would have the “V’s” formed by the thumb and forefinger of each hand pointed toward the support shoulder, but a neutral grip with the “V’s” pointing at the chin (think of praying hands with the fingertips pointed at the ball) is a very popular grip with this kind of swing.
  • Bent lead arm: The “straight left arm” of right-handed golf teaching isn’t really necessary if you use a forehand swing. The backhand at the end of the shaft isn’t controlling the club; it’s merely adding stability. The forehand is both controlling the club and handling most of the club’s weight. In many ways, all the backhand really needs to do is make sure it coordinates with the forehand.
  • Flat swing plane: Another matter of simple mechanics. Bending the elbow on your forehand side is the strongest position you can have at the top of your backswing, and a lower hand position (shoulder height or lower) feels more normal than a more upright position.
  • Starting the downswing by pulling the club around: With a flatter swing plane, the club doesn’t need to go downward as much to keep it inside the target line on the downswing. In fact, the body is squarely in the way because the lower hand position puts it more behind the body. To get the club going, your arm needs to go out and around, not down.
  • Dragging the club around: The bent wrist of your forehand drags the club toward the ball. It may feel like you’re pushing the club past you.
  • Lower lead shoulder at contact: The club is lower at the start of the downswing, and your body is pulling your arm and club around and past it. Again, simple mechanics: Your shoulders are going to remain more level with the ground as your hips and shoulders pull the club around.
  • Belly and spine in a straighter line: Because your shoulders' plane of rotation is more horizontal than vertical, your midsection doesn’t have to “swing” like a pendulum to help get the club around. You rotate around your spine, so your spine remains straighter.
  • Head remains stationary or moves slightly forward: Since your spine remains more vertical, your head doesn’t have to move backward in reaction to your midsection. Some teachers encourage your head (indeed, your entire upper body) to move toward the target, in an effort to get your weight transferred to your target side and prevent a reverse pivot.
  • Straight finish: It should come as no surprise that your head, spine, hips, and target foot all end up in a fairly vertical line at the finish.
While these two lists may convince you that the two strokes are entirely different, that's just not true. In fact, it can be difficult to look at a player and tell exactly which one they're using. These control methods share far more in common than most teachers would lead you to believe, but differences like the ones I've listed cause them to feel very different.

Knowing which way you feel your swing is a big part of both becoming consistent in your play and in knowing which teachers are most likely to help you improve.

Friday, May 14, 2010

Backhand Control

Part of the Route 67 series

Ok, let's start by looking at the characteristics shared by backhand swings. Remember, a backhand swing is:
  • A swing that a right-hander controls with his or her left hand, or
  • A swing that a left-hander controls with his or her right hand.
A backhand swing is the classic way of controlling a golf swing. Most of the older instructional books automatically assume you're swinging this way. Some of the new ones will as well, but it's often not clear. Here is an incomplete list of things that characterize a backhand swing.
  • Softer shafts: This is an equipment difference. Since the backhand swing doesn’t load the shaft the way a forehand swing does, you use shafts that are more flexible. This can actually make you hit the ball farther, even if you aren’t a particularly strong person.
  • Pushing the club back: Obviously, the backswing moves away from the control side of the body, which meant the player had to push the club away from the ball.
  • Stronger grip: This may be a little less obvious, but pushing the club away puts more stress on the wrist of the pushing hand. As a result, strengthening the grip (turning the hand on the grip in the direction of the backswing) made the club feel lighter to the player, and therefore easier to swing. The typical grip would have the “V’s” formed by the thumb and forefinger of each hand pointed toward the support shoulder, but a very strong grip with the back of the hand almost on top of the grip wasn’t unusual.
  • Straight control arm: The “straight left arm” is a standard of right-handed golf teaching that has been argued quite a bit, but it’s a necessity in the backhanded swing. After all, if you’re going to push the club away and try to make as big an arc with it as possible, it only makes sense that you would keep the pushing arm straight. In fact, it’s hard not to keep it straight with a backhand swing.
  • Upright swing plane: Again, this is simple mechanics. You’re pushing the club away from you, you’ve got a strong grip, and the weight of the club is out at the very end of your arm. Your arm is turned so that your elbow points almost straight down toward the ground. The natural thing to do is lift the club; however, you’re turning your body as you do it, so it doesn’t go exactly straight up. However, it’s still going to be a steeper plane.
  • Starting the downswing by pulling the club down: “Tolling the bell” is a phrase I’ve seen used for this move. If your arm is straight and holding the club in a high, upright position, you’re in a perfect position to spin your body and fling that club “over the top” when your hips start to turn. As a result, many backhand teachers teach their students to pull the club down to start the downswing. This also causes the loopy “two-plane” swing that you’ve heard about. There’s nothing wrong with a loopy swing - Jim Furyk plays very well with one - but just recognize that it’s generally the result of a backhand swing, not a forehand one.
  • Pulling the club around: The arm that holds the club is stretched straight out; that’s not exactly a strong position. The most natural way to get that club back down is to pull that club around with your control shoulder.
  • High control shoulder at contact: The club is high in the air, and your control shoulder is pulling your arm around. Again, simple mechanics: That shoulder is going to have to move up as your hips and shoulders pull the club through.
  • Belly moves toward target: Hips are moving toward the target and the shoulder is moving up and even back a little to resist the momentum of the club. Of course the area between is going to flex toward the target!
  • Head moves slightly backward: As the hips and shoulders swing around and the belly arches out, the head moves back a bit to help overcome all the momentum threatening to make you fall toward the target.
  • Reverse-C finish: There are some other things that effect just how much of a “C” you get, but the combination of the last few tendencies mean you’re going to end up with your belly closer to the target than your head and feet.
When you see these things, there's a good chance you're looking at a backhand swing.

Tomorrow I'll give you a similar list on forehand swings, and you'll be able to see some important differences.

Thursday, May 13, 2010

The Mystery of Handedness

Part of the Route 67 series

No, I'm not talking about what side of the ball you play from. In the grand scheme of golf technique, it doesn't really make a difference whether you play from the right side of the ball or the left side.

However, it DOES make a difference which hand controls the club -- and, consequently, your swing. It makes a huge difference in how your swing feels to you, how you decide which teachers to listen to, and even how you choose which swing thoughts to use.

Are you curious yet? This is what I call, for lack of a better term, handedness. And it really doesn't get talked about very much these days, which is part of the reason so many players struggle with their games.

Control in Other Sports
Most of us have played baseball, basketball, tennis, or some other sport growing up. We may not have been very good, but even after several years where we didn't play at all, we can still usually pick up the sport again and swing a bat, catch a ball, shoot a basket, or make a forehand stroke without much difficulty. In fact, after about 5 minutes, most of us can make those moves well enough to have an impromptu game with friends... and enjoy it.

Why is golf so different? It's because, unlike those other sports motions, we don't really understand what we're trying to do in our golf swing. And we compound that by not really knowing how that swing should feel to us. So many of those other sports motions are made with a single hand, or have to be started by moving a single foot, and those actions cause weight shifts and balance changes that require a certain response just to remain upright. Some of the moves can only be made from one position.

Enter golf. Everybody seems to do it differently... but they all look pretty much the same. The differences may be intangible, but they are very real once you try to duplicate the move. How can you even hope to sort those differences out?

Control Hands & Power Sources
Here's where handedness comes in. I've already mentioned that there are two main power sources available to us (yes, we're finally going to talk about them!), and that most pros try to use both at once -- that's why they have so many timing problems. As a weekend player, you want to focus primarily on only one power source. If you do, the other source will automatically work with it and add its power to the mix; it's just that you'll feel all that power coming primarily through only one source.

Handedness is part of that feel; you might think of it as the missing piece of the puzzle. To talk about this with a minimum of confusion -- and without having to write these posts two different ways, one for right-handers and one for left-handers -- I'm going to refer to your "control side" in two different ways.

To refer to the side that controls your swing, I'm going to borrow a couple of tennis terms: forehand and backhand. To make this more clear:
  • If you play golf right-handed, your left hand controls a backhand swing and your right hand controls a forehand swing.
  • If you play golf left-handed, your right hand controls a backhand swing and your left hand controls a forehand swing.
That's simple enough, isn't it?

To refer to the actions of your individual hands, I'll use the terms control and support. Your control hand does most of the work -- it's the hand you feel the swing with -- and your other hand is your support hand. If you have a forehand swing, your control hand is your forehand hand (doesn't that sound weird); if you have a backhand swing, your control hand is your backhand hand.

What it comes down to is this: There are basically FOUR ways to feel your swing, four feels from which teachers and players tend to describe what they're doing. I've listed them here.
  1. The leg-powered forehand swing: You feel your legs providing most of the power, and you feel that your forehand side controls the swing.
  2. The leg-powered backhand swing: You feel your legs providing most of the power, and you feel that your backhand side controls the swing.
  3. The arm-powered forehand swing: You feel your arms providing most of the power, and you feel that your forehand side controls the swing.
  4. The arm-powered backhand swing: You feel your arms providing most of the power, and you feel that your backhand side controls the swing.
Pretty simple, eh? And since all of these are matters of feel, perhaps you can see why so many people struggle with their games.

Let's say you have four swing thoughts in your head. One came from a teacher who teaches the first swing, one comes from a player who uses the second, another came from a teacher who teaches the third, and you read the last one in a magazine article that was based on the fourth. You swing thinking about the first one, but the ball doesn't go where you planned... but the fourth thought seems to address it, so you swing again and use the fourth swing thought. There is no way the swing can feel the same to you, even if you perform your swing thought perfectly, because you keep changing your reference point. No wonder we struggle with the game!

Starting tomorrow, I'll teach you how to recognize which swing is yours and how to recognize which teachings will mesh with your approach.

Friday, April 30, 2010

Fixing Path Problems, Part 2

Part of the Route 67 series

So now we understand why we need to fix our path problems first. The question remains... just how do we do that?

There are two path problems you can have: You swing inside-to-outside (a push), or you swing outside-to-inside (a pull). Here are the most common ways they turn up in a swing.

Pushes
I started this series with a post about getting stuck on the downswing. Let's look a bit more closely at how it messes up your swing path; it's really pretty simple. Here's the deadly chain of events:

Your legs move faster than upper body. As your hips turn toward the target, your weight moves off your back foot onto your front foot... but your upper body stays back, more over your back foot. This makes you lean backward, away from the target; your spine leans and your shoulders tilt. And when your tilted shoulders rotate around your tilted spine, your arms swing from inside-to-outside. (In addition, if you lean back far enough, you "reverse pivot" -- you fall back on your back foot when you swing, because your upper body never "caught up" with your lower body.)

Even if you don't twist your forearms, the clubface will be open when it hits the ball, so your push will likely become a push-slice (aka "banana ball").

Pulls
This one's a bit tricky, because pulls sometimes cause you to "step through" your swing -- a move often recommended by Gary Player. I don't want you to confuse the two; when Gary steps through, he doesn't make the move I've about to describe. Gary doesn't pull the ball.

Here's the flawed move: The upper body moves faster than the upper body, but it can still be caused by the legs. At the top of the backswing, everything generally looks pretty good. Now it's certainly possible that you can jerk your shoulders around while your lower body doesn't move; if this happens, you will almost certainly pull your shot.

BUT there's usually an extra move with this problem -- namely, the back knee straightens as the shoulders start around. This forces the upper body to tilt forward, causing the spine to lean and the shoulders to tilt... it's the same story as the push, but the spine leans toward the target rather than away, so your arms swing from outside-to-inside.

I don't know if it's generally true, but I've heard that runners often have stiff lower bodies, which contributes to this problem. I do know that I've been a runner since high school (it's my preferred exercise) and I've had a lot of trouble with this problem, so it has been true for me. It's something to consider. (I haven't stopped running because of it; it's just something I know to check if I start pulling shots.) I've hit some incredibly long pull-hooks because of it... most of them lost out-of-bounds.

A Simple Fix Worth Trying
Obviously, these problems can be a major hassle to fix. I'm going to suggest a single simple fix that can help both of these problems. For some of you, this may cut into your distance; but with all the technology available at golf stores, it should be a simple matter to test it on an "electronic range" that reads clubhead speed. In my case, it doesn't seem to hurt... plus, it helps my balance. If nothing else, you'll find it's a good way to get control of things in the midst of a round going bad.

Here's the fix: Try to feel as if you're starting your arms and legs together. You've probably had it drummed into your head that your legs have to start the downswing, and this is entirely true. However -- and this isn't stressed very often -- unless you do something that absolutely feels as weird as it looks, it's physiologically impossible NOT to start your downswing with your legs. It's all about friction between your feet and the ground (that's why golf shoes have cleats), inertia, and Newton's Third Law of Motion ("For every action, there is an equal and opposite reaction"). Trust me: If the feet don't start it, you won't move. Some people just try too hard to consciously start the legs first, and they get screwed up.

"Starting everything together" is not a violent jerky move; it should feel pretty smooth. In fact, it may actually slow your swing down slightly. When I do it, I can still feel my lower body moving just slightly ahead of my upper body; what I don't feel is my hips pushing forward or my upper body leaning forward. I feel like my hips and upper body stay in a vertical line above each other all the way through the swing.

What this move does is keep the legs from getting too far ahead of or too far behind the arms. You can't lean backwards and turn your shoulders at the same time, so you're less likely to push; and it's hard to straighten that back leg when you have to turn your hips in time with your shoulders, so you're less likely to pull. Basically, it eliminates the extremes in your timing.

Now you've got some knowledge to help you troubleshoot your swing. Look at your shot patterns (from yesterday's post) and use today's explanations to help you get your clubhead path under control. And remember that it doesn't have to be perfect, just consistent and predictable.

Thursday, April 29, 2010

Fixing Path Problems, Part 1

Part of the Route 67 series

Yesterday we broke down your swing into 9 possible ball flights which were a combination of your swing path and your club face position, the former being controlled by your body and the latter by your wrists. Today I want you to understand what kind of effect this has on your accuracy; tomorrow we'll look at how to fix it.

If you've taken even a cursory look at my lists of basic principles for the various shots in the game (if not, please take a moment to check out the posts in the "Basic Principles of the Game" category), then you know that your club face position is controlled by your wrists and forearms. If you're not squaring up the club face, then you're rotating your forearms. DON'T DO THAT! Once you stop, you'll square the club face up much more consistently.

However, as I said yesterday, it does no good to work on your club face position if your club path is off. Why? Because the big muscles are going to override the little muscles. Here's one of those ironies that plague our game: The club face position has a much bigger effect on where the ball goes than the club path does, but you have to fix the club path first or you'll never get that club face square on a consistent basis. Today's post will explain why.

If you're a Dave Pelz fan (and who isn't?), you know that Dave does all kinds of scientific studies on putting and the short game. He made a discovery about putting that I found very interesting: The face angle of your putter has five times the effect on direction than your stroke path does. (That information is on page 85 of Dave Pelz's Putting Bible, for those of you interested in checking it out yourself. Dave's actual figures are 83% vs. 17%, which is about 5-to-1.) Let me put that in somewhat simpler terms.

Let's say you're facing a 10-foot putt (120 inches). You make a putting stroke that travels on a line that's 6 degrees from inside-to-outside. According to Dave's figures, if you hit the ball with a square face, the ball will travel toward the hole on a line only 1 degree off. It will be 2.1 inches offline when it reaches the hole. (That's simple trigonometry; here's an online calculator if you want to check it yourself.)
A small miss

However, if you manage to get the stroke itself straight toward the hole BUT the club face is NOT square (it's 6 degrees off), the ball will be offline by 5 degrees. At the hole, you'll be 10.5 inches offline.
A small miss

The first putt could possibly die into the hole, even though your stroke was offline and you're several feet away because the hole is 4.25 inches wide, or 2.125 inches from the center. That second putt... it ain't going in, even if you're only three feet away. (You'll be 3.1 inches offline then.) The face angle made a bigger difference than the stroke path. Therefore, all of you putters out there struggling to get your stroke perfectly online... stop worrying so much about it! Make sure your club face is square when it strikes the ball; as long as your stroke path is pretty close to straight, you'll probably be ok.

Now let's take that information and apply it to the full swing. It's really interesting!

Let's hit a 250-yard drive with our club face square but we're coming at the ball from 6 degrees inside-to-outside. Do you know how much offline your shot will be? A mere 4.4 yards! But suppose your swing path is online but your club face is pointing 6 degrees to the right? A whopping 21.9 yards! That would miss a lot of fairways.

But wait! Unlike the ball on the putting green, this ball is going to spin sideways in the air... which means the second shot is going to go even farther to the right. This would be the #6 ball flight pattern in yesterday's charts -- that one would be considered a desirable option by most pros! But it really is desirable if you hit that first shot... because it's going to spin back toward the target line!

So you can see that the face angle has a bigger effect on your accuracy than your swing path. So why not fix the face angle first? Because your wrists and arms, which control the face angle, are connected to your shoulders. If your shoulders get tilted, your wrists and arms get tilted... and there goes your face angle. And if your shoulders tilt differently with each swing... well, you can see where that's going to lead. It's a game you can't win.

So tomorrow I'll show you how to start getting a handle on your swing path. It's really much simpler than it seems.

Wednesday, April 28, 2010

Understanding Your Shot Shape

Part of the Route 67 series

(12/15/2010 UPDATE: Some of the principles I talked about in this article have had to be "tweaked" because of new scientific info. After you read this post, click on this link to learn about the updated "New Ball Flight Laws.")

Another delay. When I started on the power source articles, I realized that I was going to have to repeat a large amount of material if I didn't go ahead and cover it first... so I'm going to cover it first. ;-) We'll get to the power sources soon, I promise.

However, this information is useful even without knowing about your swing's power source. Think of this as a brief troubleshooting guide.

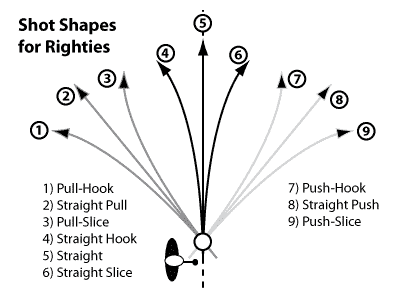
Today's info is probably nothing new for any of you who have taken lessons. These 2 diagrams show the 9 possible shot shapes that you, as a rightie or a leftie, can make. The first chart is for the righties:

The 9 Rightie Shot Shapes

The drawing is pretty straightforward. The little player is lined up with an absolutely humongous ball (he must have seen the Munsters clip from Sunday), and that barely-visible dotted line is an aim line toward the target. The lines sprouting from the ball show all the possible ball flights. Again, I'm pointing out the obvious by saying that the shots are grouped by each of the 3 shot paths the ball can take, and each path can have 3 shot shapes.

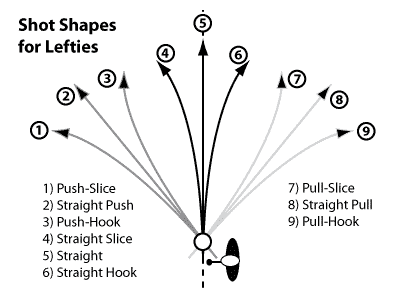
The other chart is for the lefties, and contains the same info:

The 9 Leftie Shot Shapes

Of course, the shapes are the same, just called by different names since one player's hook is another player's slice.

Now, just to be sure we're all on the same page, let me define a couple of the terms I just used:
  • The shot path is determined by (take your choice, they all mean the same thing) your swing plane, the club head's swing path, or the path your arms take when you hit the ball.
  • The shot shape is determined by the direction your club face is pointed relative to that path when it hits the ball.
Here are a few examples, using the numbers on the charts so I can use one example to describe it and both of you (righties and lefties) can follow it:
  • If your swing path is directly toward the target and your club face is pointing left of that path, your ball will travel on ball flight #4.
  • If your swing path is headed left of the target when you hit the ball and the club face is pointed left of that path, your ball will travel on ball flight #1.
  • If your swing path is headed right of the target when you hit the ball and the club face is pointed left of that path, your ball will travel on ball flight #7.
Some path/shape combinations are better than others. Shapes #1 and #9 could be lost or out-of-bounds, while #3 and #7 may end up in the middle of the fairway just like #5.

Likewise, some different path/shape combinations can give you the same results IF you aimed yourself to take advantage of them. As one example, if I aimed my target line down the right side of the fairway and hit the #4 shot shape, I will probably get the same results as if I aimed straight down the center and hit the #7 shape.

Knowing these shot shapes can help you figure out what you're doing during your swing. For example, a rightie who hits that #9 shape is probably pushing their hips too far forward during the swing. I would know that because the ball started out to the right; if I just had the face of the club pointed right, the ball would probably go straight ahead and then turn to the right, which is the #6 shape. If I'm hitting the ball on the #9 path, am I also pointing the club face to the right? Probably... but the swing that starts the path to the right may also be causing the face to open. I'd want to fix the path first, then see if the ball still curves to the right.

Here's the first principle of troubleshooting your swing: Fix the path first, then the shape. Path problems usually mean your body is leaning one way or the other; if your body gets in the wrong position, you may be doing other things correctly but they still send the ball in the wrong direction. Working on the shape first is like trying to level some table legs when the floor isn't flat; until you fix the floor, you run the risk of just ruining the table.

Path problems caused by "throwing the club from the top" are often a combination of an improperly-timed swoosh (we've already talked about that) combined with a power source timing problem. We'll get to that soon; nevertheless, you need to fix the path first.

In an ideal world, that #5 shot would be your normal shot and you'd learn to make other shots from there. It generally doesn't work that way! What I am about to say would be considered heresy by most teachers, but I'm not worried about you mastering some kind of perfect shot. Since you're a weekend player, what you need is a consistent shot that lets you make a decent score. So here's my advice: I'm going to give you enough info that may let you get pretty close to that #5 shot... but if you can hit any of the shots from #3 through #7 consistently, you'll be able to score pretty well. Here's what you want:
  • With the #5 shot, obviously you're golden. You can learn to adjust for just about any shot you need.
  • With the #4 or #6 shots, you just aim a little left or right of target as needed and let the ball curve in. When the pros talk about "eliminating one side of the fairway," these are generally the shots they're talking about, so these are also desirable.
  • You might think it's crazy to settle for a #3 or #7 shot, especially when one of them will be a pull-slice; most teachers act like that's the kiss of death. But it's a matter of degree with these shots. If your path is just a little bit off, so you just have a slight pull or push, and you learn to get that club face pointed right at the target when it contacts the ball, you can literally aim right at the target and have it fade or draw right where you're aiming. This is almost as good a shot as #4 or #6! It will be a rare day when you can't figure out how to score using it. Bruce Lietzke, who has 13 PGA Tour wins, 7 Champions Tour wins (one major, the 2003 U.S. Senior Open), and a Shark Shootout victory made his living with a little pull-fade... and he is notorious for not practicing. (And here is a swing analysis of Lietzke's swing by Jim McLean. There's a short commercial at the beginning, but this is a 17-minute analysis... and the coolest thing is that, when the camera moves behind him, you can actually see the divots going left!)
These charts will give you a leg up on tracking down problems in your swing. Tomorrow we'll look at what kind of moves cause these shots.

Tuesday, April 27, 2010

The Historical Swoosh

Part of the Route 67 series

This article has been edited slightly because I realized my statement under the picture didn't make a lot of sense. Sorry.

One last post about the swoosh before we move on; this one is a quick look at how the swoosh shows up in modern teaching. After some debate, I've decided to focus on two player/teachers -- Ben Hogan and Bobby Jones -- because their references to the move are pretty typical. The page references are for Hogan's book Five Lessons: The Modern Fundamentals of Golf, and for Bobby Jones on Golf, a collection of writings by Jones himself.

But first I'd like to make a quick reference to another series of posts I did (listed on the Some Useful Posts Series page) about Jim McLean's "V-Gap" technique. In that series I pointed out that the V-gap is just a modern version of what used to be called a "late cock," where the club shaft is still basically parallel to the ground when the hands are at the waist-high position on the backswing. Hogan shows this same position on page 72 of his book. The Jones book includes a drawing of him in a similar "late cock" position on page 40.

McLean says that players using the V-gap hit the ball farther, and this is related to the swoosh move. By delaying the wrist cock, the clubhead develops more momentum at the change of direction, which makes it easier to delay that uncocking move until you're ready to swoosh.

That swooshing move is illustrated on pages 82-83, with the caption, "The training exercise is a half-swing back and forth. Back and forth, back and forth, the body swings the arms like the pendulum of a clock. The elbows remain tightly glued to the side." Hogan's exercise is a bit more mechanicial than mine, what with the elbows held tight against the side, but it has the advantage of forcing you to move your wrists properly for the swoosh. This isn't from the book, but it's a short sequence of Hogan doing the swoosh:

Hogan in swoosh position

Notice that his wrists are still cocked when his arms drop below the 9:00 position, and his wrists straighten as he approaches the ball position.

On page 93 Hogan makes a big deal about NOT starting the downswing with the hands. (Remember, I had you gradually lengthen the swoosh in order to try and avoid this.) After restating this in capital letters about how you shouldn't use any conscious hand action during the swing, he says:
What do the hands do? The answer is that they do nothing active until after the arms have moved on the downswing to a position just above the level of the hips.
A little later (on page 96) he writes:
AFTER YOU HAVE INITIATED THE DOWNSWING WITH THE HIPS, YOU WANT TO THINK OF ONLY ONE THING: HITTING THE BALL. On a full drive, I try to hit the ball hard, sometimes as hard as I can. (The caps are Hogan's.)
My favorite Hogan quote is on page 101, where he talks about his left wrist still being a bit arched and he says, "As far as applying power goes, I wish I had three right hands!" Your right hand (left hand for lefties) can apply as much power as you want, as long as your hands have reached the lower part of your swing (as he said a couple of quotes earlier).

Bobby Jones uses some interesting phrases to describe his own performance of the swoosh. After talking about hip turn and such, he says,
"But equally important is the effect of completing the cocking of the wrists.This is accomplished as the wrists give to the pull of the hips in one direction and of the club head moving in the other. As the downstroke begins, one should have the feeling of leaving the club head at the top" (page 46).
That "feeling of leaving the club head at the top" is a great way to describe what I have called "delaying the release" in my earlier posts. Later on the same page Jones talks about the importance of "An ample cocking of the wrists, and the retention of the greater part of this angle for use in the hitting area," which is the goal of swoosh. (I should point out that drawings of Jones will show his wrists with less wrist cock as he enters the swoosh area. This is because hickory shafts flex more than modern steel ones, so they can't handle as much power. We'll talk about this some in a later post, but for now you should be aware that softer graphite shafts require less wrist cock to develop power... but you also have to swing more slowly to keep your accuracy. Walter Hagen's notoriously wild drives were caused by a fairly modern swing that overpowered his hickory shafts.)

Regardless of how "hard" you try to swoosh, the principles of delaying the uncocking of the wrists until you're in the last part of the swing, close to the ball, is a longstanding teaching. It doesn't matter whether you look at older teachings from the time of hickory shafts or the most modern teachers; and it doesn't matter what swing method you use to hit the ball. Power comes from a swoosh at the bottom of the swing, and it's not so hard to learn. Take your favorite teaching book and look for some of the descriptions I've pointed out in both Jones and Hogan's books; I bet you'll find something very similar.

Friday, April 23, 2010

The Swoosh at the Bottom, Part 3

Part of the Route 67 series

Today we're going to tack our swoosh onto the end of a full swing, so we can put the hammer down on that little white ball!

The other swing component that gives us control of the swoosh in a full swing is something you've already had a little experience with it. It's feeling the change of direction, which is another part of "feeling the clubhead." By controlling when we feel the change, we control when the swoosh begins.

The actual technique, which you've heard me mention before but never explain in as much detail as I will today, is called "delaying the change of direction" or "delaying the release." Some teachers call it "delaying the wrist cock," but this is technically wrong since we're delaying the wrist uncock.

How do you delay the change of direction?

First let's clear up a possible misconception. Technically, there are TWO different changes of direction in the swing, which I have referred to by different names to avoid confusion. Until now it wasn't important to differentiate between the two; now it is.
  • The first change of direction is when the hands and arms reach the top of the backswing and start coming down, but the momentum of the clubhead keeps going back. (This is what I have been calling "loading the shaft.")
  • The second change of direction is when the momentum of the clubhead stops going in the same direction as the backswing and starts moving in the same direction as the downswing. (This is what I have been calling "feeling the change of direction" or "feeling the clubhead.")
Do you understand the difference? When the hands and arms start down, the clubhead is still going back; the tension loads the shaft, and you feel it as the pressure of the shaft making your wrists cock because your hands and arms have changed direction. Then, when the clubhead momentum is spent and the shaft stops pushing against your wrists, the pressure on your wrists eases off because the clubhead has also changed direction.

Our goal is to delay that feeling of the clubhead changing direction. Why? Because that's when our wrists begin to uncock without our help and the swoosh begins. It's the momentum of the clubhead going back while our hands start down that "holds" the wrist cock. All those gizmos you've seen on TV that are supposed to teach you how to "hold" wrist cock? You don't need them. Wrists stay cocked because of physics, not muscles. Our goal is to move in such a way that the club shaft stays loaded as long as possible, so we can consciously decide when to uncock our wrists.

We do this all the time. If you know how to use a hammer, a flyswatter, or a rolled-up newspaper, you can do this. If you need a specific explanation of how the above items work, just check out this post from the "How to Use a Single-Plane Loop" series. Obviously, we hold a club with two hands rather than one, but the principle is the same. If you look at the fifth and final picture in that post (which shows all the positions from the previous pics at once), you'll see that the hands are all pretty much on a line except for the fourth one -- the one at the change of direction is lower than the others. You get the same effect letting the right elbow (left elbow for a lefty) flex a bit more when your hands start down. You don't have to try and consciously bend the elbow; the loaded shaft will put enough force on your elbow that it will flex on its own unless you tense up your muscles... which generally means you're getting ready to muscle the club at the top, not swoosh it at the bottom.

The best way to learn this is by slowly lengthening your backswing. Start with the aimed swoosh we practiced in the last post, then gradually lengthen the backswing. Let your arms go to 9:00 and make some swings until your cocked wrists kind of "slide" their way down to the 8:00 position and you can perform your aimed swoosh. Then move it up to 9:30 or 10:00, and try again. When you can do it there, move it up to 10:30 or 11:00. Your swoosh may move up a bit higher as your swing gets longer; as long as it doesn't move up past 8:30, you should be ok.

If you have trouble, adjust the speed of your backswing; swinging faster creates a stronger loading effect, but many people find that it hurts! (For an example of this, just watch Nick Price. You'll also note that fast swings tend to be shorter.) However, if you have trouble with uncocking too soon, I'd try slowing down my backswing first. Too much speed during a long backswing can put too much load on the shaft and cause a "springing" effect, where it literally kicks your wrists out of their cocked position. (Now you know why power hitters claim they want a slow backswing.)

If you still have trouble, remember that your hands start down before the clubshaft momentum starts pressing against your wrists -- in other words, you change direction with your hands before your wrists are finished cocking. That's what happens in the flyswatter swing, so making a few "swats" with one may help you understand how this feels. Bear in mind that you'll need more forearm and wrist strength when you use this technique, because the force against your wrists will increase. This may require you to slow your backswing even more at first, until you get used to it.

But whatever you have to do to get the swoosh at the proper position is ok. The primary cause of clubhead speed is the swoosh, so performing it properly is your primary concern; make whatever adjustment to your swing speed is necessary.

Quite frankly, on the backswing your arms may never need to go past the 11:00 position during the backswing. Fred Couples -- in fact, a lot of the longest hitters with slow swings -- don't go any further than that. (That's what some teachers call a "three-quarter backswing.") It's definitely easier to make an accurate swing if it's shorter. Again, as long as the start of your swoosh doesn't move up past 8:30 or 9:00, you should be pretty darn long of the tee.

When you incorporate the swoosh into your full swing, your shot direction may be a little off at first. I suspect most of you will swing slightly inside-to-out, which would result in a push shot. Of course, the rest of you will pull shots slightly. (If you get way off line, your swoosh is happening too early in the downswing.) This is because you're used to making extra moves to make up for the swoosh you didn't have before! Don't worry, we'll fix that as we learn how the power sources work in their respective swings. The fixes are minor timing fixes and they aren't difficult, but you need to understand how your swing works in order to make them.

Finally, each of the power sources we're going to talk about does the exact same thing -- provide swoosh power -- but the swoosh feels a little different, depending on which source you use. The upper body power source feels as if the arms are pushing while the hands straighten; the lower body power source feels as if the legs and hips are pushing while the hands straighten. This distinction will become clearer as we discuss the power sources themselves.

Tomorrow I'll try to tie up some loose ends and put this move in historical perspective -- that is, point out some ways teachers and players have mentioned this move when describing their own swings.