This is a Golf Monthly video hosted by the guys from the MeandMyGolf YouTube channel. It's a drill to help you keep the face of your driver square at impact.
This is a very simple drill. Just grip down on the club until your trailing hand is almost touching the shaft, then make sure the butt of the grip is pointed at your trail hip as your hands pass your hip on the way back. That will help you keep from twisting your forearms on the way back, and that means you won't have to try and twist them forward the same amount on the way down.
Less excess motion means less inconsistency.
I hope you're starting to notice how many instructors are beginning to stress "stable clubfaces" -- that is, that you don't open the clubface on the way back. If you do, the more clubhead speed you create, the less time you have to compensate on the way down... and the more often your ball ends up in the woods. The only time you should even consider twisting your forearms during your swing is when you're playing FROM the woods and have to hit a duck hook around a tree. Please, please, PLEASE stop twisting your forearms on the way back!
You'll thank me for it.
Really, you will.

Showing posts with label drills. Show all posts
Showing posts with label drills. Show all posts
Saturday, August 18, 2018

Sunday, July 29, 2018
A New Use for an Old Drill (Video)
Martin Hall originally did this Extra Credit video to teach how Nick Faldo hit a draw that would hold its flight against a stiff wind on the links. I'm going to use it to help those of you struggling to control your clubface.
At around the 1:20 mark Martin demonstrates the drill. He uses his trailing hand to hold his lead elbow against the side of his chest at impact and during the finish. I've written about this "flying lead elbow" problem before. If your lead elbow moves away from your body at impact, you can get a chicken wing move... and that's bad for clubface control. It's why a number of you can't draw the ball.
Obviously, Martin's drill will help you develop a draw if you don't have one now.
But it may be less obvious why this 'chicken wing' can also interfere with any effort to hit a fade, especially if you've seen Jordan Spieth using just such a move to create a fade. Those of you paying attention may have also noticed, however, that Spieth has a tendency to hit out-of-control banana balls as well... and that also comes from that chicken wing maneuver.
Here's why: When your lead elbow starts moving away from your side, it doesn't always move the same amount. That's a problem, people. For example, if it moves toward the ball a bit more than usual, you'll get more of an in-to-out swing than you expect... and if you're hitting a fade, you'll end up with a push-fade that can head out-of-bounds. It can also cause you to leave the clubface more open than you planned, which can create the same result.
By the same token, if your lead elbow doesn't move out as much, you might get too much forearm rotation and VOILA! instant duck-hook. If you were expecting your little fade, you get the classic double-cross. Neither of these is good for your score.
If, however, you keep your lead elbow close to your side all the way through your downswing, you create a more consistent rotation that happens in the big muscles of your lead shoulder. Unlike the smaller muscles in your wrist and forearm, you get far less variation with your shoulder movement, and that minimizes the range of variation in your clubface position.
Martin's drill can help you, regardless of whether you struggle with a hook or a slice. Give it a try and you'll see what I mean.
At around the 1:20 mark Martin demonstrates the drill. He uses his trailing hand to hold his lead elbow against the side of his chest at impact and during the finish. I've written about this "flying lead elbow" problem before. If your lead elbow moves away from your body at impact, you can get a chicken wing move... and that's bad for clubface control. It's why a number of you can't draw the ball.
Obviously, Martin's drill will help you develop a draw if you don't have one now.
But it may be less obvious why this 'chicken wing' can also interfere with any effort to hit a fade, especially if you've seen Jordan Spieth using just such a move to create a fade. Those of you paying attention may have also noticed, however, that Spieth has a tendency to hit out-of-control banana balls as well... and that also comes from that chicken wing maneuver.
Here's why: When your lead elbow starts moving away from your side, it doesn't always move the same amount. That's a problem, people. For example, if it moves toward the ball a bit more than usual, you'll get more of an in-to-out swing than you expect... and if you're hitting a fade, you'll end up with a push-fade that can head out-of-bounds. It can also cause you to leave the clubface more open than you planned, which can create the same result.
By the same token, if your lead elbow doesn't move out as much, you might get too much forearm rotation and VOILA! instant duck-hook. If you were expecting your little fade, you get the classic double-cross. Neither of these is good for your score.
If, however, you keep your lead elbow close to your side all the way through your downswing, you create a more consistent rotation that happens in the big muscles of your lead shoulder. Unlike the smaller muscles in your wrist and forearm, you get far less variation with your shoulder movement, and that minimizes the range of variation in your clubface position.
Martin's drill can help you, regardless of whether you struggle with a hook or a slice. Give it a try and you'll see what I mean.
Friday, July 27, 2018
Kenny Nairn on the "Bump and Scrape" (Video)
This is one of the wildest drills I've seen in a while, but it teaches an equally weird shot. GCA coach Kenny Nairn's bizarre chipping drill is something to use in links play and perhaps on really tight, fast lies.
The drill is simple. Pull a hybrid from your bag and take your putting grip, then let go with your lead hand and just use your trailing hand to drag the clubhead back along the ground. Then, stroke your 'putt' without letting the clubhead leave the ground!
I tried this and it feels really weird. If you're like me, the clubhead is going to make a loop on the ground -- it will go back fairly straight but it will try to move closer to you on the forward stroke, creating a teardrop-shaped swing. After a little practice, I managed to create more of an arc with it -- but it does take some practice.
Of course, it gets even weirder when you try to make this shot with both hands. It doesn't get any easier with two hands -- at least, it didn't for me.
And to be honest, I can't tell you how it works because I don't have anywhere nearby where I could actually test this putting technique. This is definitely a links technique, not something you would use on a putting green.
So why am I showing you this? Well, even if you don't currently have a use for this shot, I think it might be useful to help you develop a lighter touch with your putter. The idea is to hold the club as lightly as you can while still maintaining control of the motion. To gain better control of the clubhead without gripping it too tightly, you'll have to turn your shoulders a bit more. That will also help your rhythm when you try swinging an actual putter.
The lighter you can hold your putter while maintaining control, the easier it will be to make a consistent stroke. This odd drill may be just the ticket for some of you, so give it a try and see.
The drill is simple. Pull a hybrid from your bag and take your putting grip, then let go with your lead hand and just use your trailing hand to drag the clubhead back along the ground. Then, stroke your 'putt' without letting the clubhead leave the ground!
I tried this and it feels really weird. If you're like me, the clubhead is going to make a loop on the ground -- it will go back fairly straight but it will try to move closer to you on the forward stroke, creating a teardrop-shaped swing. After a little practice, I managed to create more of an arc with it -- but it does take some practice.
Of course, it gets even weirder when you try to make this shot with both hands. It doesn't get any easier with two hands -- at least, it didn't for me.
And to be honest, I can't tell you how it works because I don't have anywhere nearby where I could actually test this putting technique. This is definitely a links technique, not something you would use on a putting green.
So why am I showing you this? Well, even if you don't currently have a use for this shot, I think it might be useful to help you develop a lighter touch with your putter. The idea is to hold the club as lightly as you can while still maintaining control of the motion. To gain better control of the clubhead without gripping it too tightly, you'll have to turn your shoulders a bit more. That will also help your rhythm when you try swinging an actual putter.
The lighter you can hold your putter while maintaining control, the easier it will be to make a consistent stroke. This odd drill may be just the ticket for some of you, so give it a try and see.
Tuesday, July 24, 2018
Denis Pugh on More Consistent Ballstriking (Video)
Francesco Molinari just won the Open, so of course I have a video from his coach Denis Pugh. In this video Pugh is trying to help a player hit the ball more consistently.
Pugh wants -- as I do -- for you to learn how to turn without sliding. When you slide too much toward the target, you do all kinds of crazy things like change your spine angle, change your body position relative to your ball position, and throw your balance off. If you want more consistency, you need to stop that!
As you can see from the video, what Pugh tries to get this student to do is open his legs as he turns through the ball. (That's why he sticks the club shaft between his legs and holds it against the inside of his trailing thigh.) However, you can't hit balls with someone holding a club between your legs, but you can learn this move by using a drill.
Fortunately I have one for you. It's been on my blog for over seven years, and here's a link to it. It's called the Basketball Drill, and it's very simple. You hold a basketball between your knees, and you try to drop the ball during your downswing by moving your lead knee forward -- that gives you the hip opening move that you try to create when you slide -- while your trailing knee doesn't move so much. It minimizes lateral movement toward the target while still letting you unwind your hips as quickly as you can.
I think you'll find this drill actually lets you create more hip speed than the slide does because you don't waste energy pushing your body forward. But -- and this is important -- it DOES allow you to create a weight shift, which moves you toward the target a little but not enough to change your body's position relative to the ball. As a result, you get more consistent contact.
A simple but very effective drill. It may not turn you into Francesco Molinari (that's a matter of practice) but it will teach you the basics of a solid move into the ball.
Pugh wants -- as I do -- for you to learn how to turn without sliding. When you slide too much toward the target, you do all kinds of crazy things like change your spine angle, change your body position relative to your ball position, and throw your balance off. If you want more consistency, you need to stop that!
As you can see from the video, what Pugh tries to get this student to do is open his legs as he turns through the ball. (That's why he sticks the club shaft between his legs and holds it against the inside of his trailing thigh.) However, you can't hit balls with someone holding a club between your legs, but you can learn this move by using a drill.
Fortunately I have one for you. It's been on my blog for over seven years, and here's a link to it. It's called the Basketball Drill, and it's very simple. You hold a basketball between your knees, and you try to drop the ball during your downswing by moving your lead knee forward -- that gives you the hip opening move that you try to create when you slide -- while your trailing knee doesn't move so much. It minimizes lateral movement toward the target while still letting you unwind your hips as quickly as you can.
I think you'll find this drill actually lets you create more hip speed than the slide does because you don't waste energy pushing your body forward. But -- and this is important -- it DOES allow you to create a weight shift, which moves you toward the target a little but not enough to change your body's position relative to the ball. As a result, you get more consistent contact.
A simple but very effective drill. It may not turn you into Francesco Molinari (that's a matter of practice) but it will teach you the basics of a solid move into the ball.
Friday, July 13, 2018
Alex Nicolson on Making a Target-Oriented Swing (Video)
While Bryson DeChambeau's shoulder is the big news from Thursday, we don't have any real details on the severity of his injury yet. So I decided to post another teaching video instead. This is an older Golf Monthly video featuring teaching pro Alex Nicolson, who demonstrates a couple of drills to help you smooth out your swing by being more target-oriented.
The second drill is simply a club-throwing drill. I'll leave that one to your imagination, if you need help throwing clubs! Instead, we'll focus on the first drill, which is quite interesting.
In order to make your actual swing more closely match your practice swing, Nicolson recommends hitting shots with your eyes closed!
Yeah, that was my reaction as well. But if you can find a place on the range where you aren't afraid you'll hit someone, there's a lot of value to this suggested drill.
If you focus on a mental picture of your target, you'll be forced to think more about hitting to the target and less about actual ball contact. (Sort of like putting with your eyes closed.) And if you can't see when you're about to strike the ball, you're less likely to tense up and ruin the rhythm and sequence of your swing.
I would advise teeing the ball up so you don't worry about hitting the ground so much, and also starting with a half-swing or even less, to build your confidence that you can actually hit the ball with your eyes closed.
While it is a bit odd-sounding, this drill might actually help smooth out your swing. Anything that helps you gain confidence in your ability to hit the ball solidly should do that, because tension can usually be traced to the fear that you won't. If you struggle with a belief in your swing, it's worth a try.
The second drill is simply a club-throwing drill. I'll leave that one to your imagination, if you need help throwing clubs! Instead, we'll focus on the first drill, which is quite interesting.
In order to make your actual swing more closely match your practice swing, Nicolson recommends hitting shots with your eyes closed!
Yeah, that was my reaction as well. But if you can find a place on the range where you aren't afraid you'll hit someone, there's a lot of value to this suggested drill.
If you focus on a mental picture of your target, you'll be forced to think more about hitting to the target and less about actual ball contact. (Sort of like putting with your eyes closed.) And if you can't see when you're about to strike the ball, you're less likely to tense up and ruin the rhythm and sequence of your swing.
I would advise teeing the ball up so you don't worry about hitting the ground so much, and also starting with a half-swing or even less, to build your confidence that you can actually hit the ball with your eyes closed.
While it is a bit odd-sounding, this drill might actually help smooth out your swing. Anything that helps you gain confidence in your ability to hit the ball solidly should do that, because tension can usually be traced to the fear that you won't. If you struggle with a belief in your swing, it's worth a try.
Thursday, July 5, 2018
Why You Shouldn't Always Copy the Pros (Video)
In this short video from Wednesday's Morning Drive, GOLFTEC instructor Patrick Nuber shows the difference between the ways pros and amateurs use their wrists during their swing. It might convince you that the L-to-L drill isn't something you should use... but you'd be wrong. I want to show you why copying the pros isn't always a good thing, and how "the numbers" don't always tell the whole story.
The L-to-L drill gives you the same result during the backswing that his video diagrams show. There's no conflict there.
At around the 2:20 mark Nuber shows the difference between how pros and amateurs' wrists behave as they move up to the finish. His numbers show that the amateurs bend their wrists upward much more at the halfway up point. That's the position you'll get if you use the L-to-L drill. Nuber says the pros keep their wrists much straighter at the halfway point, and that this creates more clubhead speed.
There's a lot that he doesn't say here. Let me explain some of it to you.
This is one of the great problems with our reliance on numbers. Numbers may not lie, but numbers mean nothing until they are interpreted... and interpretations lie all the time. Don't try to duplicate numbers. Focus instead on learning to play golf, and in time the numbers will take care of themselves.
The L-to-L drill gives you the same result during the backswing that his video diagrams show. There's no conflict there.
At around the 2:20 mark Nuber shows the difference between how pros and amateurs' wrists behave as they move up to the finish. His numbers show that the amateurs bend their wrists upward much more at the halfway up point. That's the position you'll get if you use the L-to-L drill. Nuber says the pros keep their wrists much straighter at the halfway point, and that this creates more clubhead speed.
There's a lot that he doesn't say here. Let me explain some of it to you.
- First off, bear in mind that Nuber's diagrams are taken from a full swing, not the half swing that you use in the L-to-L drill. I don't care how strong they are, no pro will make a full-speed half swing and stop with the shaft at the angle in his diagram.
- Here's something important that you can see in the diagrams. If you look closely at the two figures -- not at the wrists, but at the upper bodies of the figures -- you'll see that the pro figure has turned his chest toward the target far more than the amateur figure. If the upper body position isn't clear to you, just look at the legs and hips -- it's VERY noticeable there. That means that the amateur figure has stopped turning, so the arms have slowed down and the wrists HAVE to bend upward. THAT'S the cause, the reason the amateur loses clubhead speed, not the wrist bend. The extra wrist bend is merely the result of his body slowing down too early.
- Here's a corollary to the last point: If you keep turning your body as you swing into the finish, your wrists won't bend upward until much later in the followthrough. In other words, the pro arm position Nuber shows will happen automatically if you turn properly.
- Did you notice that Nuber says the lesser wrist bend causes the ball to fly lower? Most amateurs are struggling to hit the ball higher and get more spin on wedge shots. The last thing they need is to consciously try and hit the ball lower. They should focus on creating as much clubhead speed as possible before they start trying to hit the ball lower.
- Finally, think about your short game. When you want to hit the ball lower AND SHORTER, you cut off the finish -- exactly what his "point the shaft" drill teaches you. If you want to increase your distance, this isn't the way to do it.
This is one of the great problems with our reliance on numbers. Numbers may not lie, but numbers mean nothing until they are interpreted... and interpretations lie all the time. Don't try to duplicate numbers. Focus instead on learning to play golf, and in time the numbers will take care of themselves.
Sunday, July 1, 2018
Jim Flick on Execution VS Understanding (Plus a Video)
This post is about more than golf. That's why it's so long. But if you stick with me till the end, you might be surprised at what sort of new "tools" are at your command.
The late Jim Flick worked with a lot of amateur players as well as pros. In fact, he and Jack Nicklaus ran golf schools together. So why was he so successful as a teacher?
This short section comes from his book On Golf, and it sums up why so many people struggle to get better at the game.
Pick one basic skill. Find a drill or two that will help you get better at that skill. And then work on that skill. You'll get better.
When you go out to play a round of golf, use that skill as much as you can. Did your ball end up in a very tight lie but you can't hit the ball well enough yet to go at the green? Then don't try. Use your putter to advance the ball into a lie you can hit from, even if that's just ten feet away. Or don't try to hit it at all -- pick it up, carry to a spot you CAN hit from, and hit the ball from there.
Don't worry about your score. Just get better at that skill.
Or, to put it in Flick's language example, if you're learning basic words, you don't worry about creating syntactically correct sentences. You just focus on making your limited vocabulary understood. You use gestures -- like pointing at signs or acting things out -- to get your point across, and you don't worry about what you don't know.
THAT'S a good way to approach your golf game. And realize that the sooner you get this one skill down, the sooner you can start working on the next one and the quicker your game will get better.
In other words, folks, be patient with yourselves.
Unlike other posts I do with videos, this one doesn't have a golf instruction video. Rather, it's a video about how to learn new skills. I think it might be eye-opening for you.
I know you've heard people say you have to do a thing for 10,000 hours -- roughly five years of 40-hour workweeks -- to become an expert at it. BUT HERE'S THE TRICK: You don't have to become an expert at something to be very good at it, and you don't need 10,000 hours to become skilled. This video from Josh Kaufman shows why it only takes 20 hours to start developing a sound skill base in a new area. The key is to focus on the important skills at the start.
This video really opened my eyes when I saw it -- primarily because I realized that I had picked up a large number of skills in my life by doing exactly what he says!
So try approaching your golf -- and anything else you want to learn -- using Kaufman's mindset. And since I've been harping on it all week, let me suggest you begin this approach using the L-to-L swing drill as a starting place. It's easy to grasp and it builds basic skills you use in pretty much every part of your game.
And if you try to learn other things by using this mental approach, you might do more than just improve your golf. It might lead you in all kinds of exciting directions!
The late Jim Flick worked with a lot of amateur players as well as pros. In fact, he and Jack Nicklaus ran golf schools together. So why was he so successful as a teacher?
This short section comes from his book On Golf, and it sums up why so many people struggle to get better at the game.
You don't have to learn everything about golf all at once. You don't have to learn to hit the ball both long and straight at the same time. You don't have to learn to hit both fades and draws all at once. You don't have to learn to hit both high and low shots right from the start.DON'T CONFUSE THE INABILITY TO EXECUTE
Every now and then, someone in a school session will say, "Well, I don't understand that."
WITH THE INABILITY TO UNDERSTAND
My usual answer, unless I'm having a bad day and realize I'm being particularly obtuse, is what Peter Kostis, an old colleague of the Golf Digest schools, used to say: "Don't confuse the inability to execute with the inability to understand."
And I go on: "You understand the material very well. Right now you haven't done it often enough that you can execute it. So don't try to get more material. Spend more time on execution."
I'm not trying to be harsh. I'm trying to be realistic. You learn golf the way you learn everything else: step by step. Get too much all at once and you break down from information overload.
Let's say you're a grown-up and you decide to study French. Do you go to school for a semester and then one day wake up speaking the language perfectly? No! You practice, you absorb, you learn in stages. Golf is exactly like learning a language: there's a huge gap between intellectual understanding and physical feel. You bridge that gap with repeated execution. In other words, practice. [p44]
Pick one basic skill. Find a drill or two that will help you get better at that skill. And then work on that skill. You'll get better.
When you go out to play a round of golf, use that skill as much as you can. Did your ball end up in a very tight lie but you can't hit the ball well enough yet to go at the green? Then don't try. Use your putter to advance the ball into a lie you can hit from, even if that's just ten feet away. Or don't try to hit it at all -- pick it up, carry to a spot you CAN hit from, and hit the ball from there.
Don't worry about your score. Just get better at that skill.
Or, to put it in Flick's language example, if you're learning basic words, you don't worry about creating syntactically correct sentences. You just focus on making your limited vocabulary understood. You use gestures -- like pointing at signs or acting things out -- to get your point across, and you don't worry about what you don't know.
THAT'S a good way to approach your golf game. And realize that the sooner you get this one skill down, the sooner you can start working on the next one and the quicker your game will get better.
In other words, folks, be patient with yourselves.
Unlike other posts I do with videos, this one doesn't have a golf instruction video. Rather, it's a video about how to learn new skills. I think it might be eye-opening for you.
I know you've heard people say you have to do a thing for 10,000 hours -- roughly five years of 40-hour workweeks -- to become an expert at it. BUT HERE'S THE TRICK: You don't have to become an expert at something to be very good at it, and you don't need 10,000 hours to become skilled. This video from Josh Kaufman shows why it only takes 20 hours to start developing a sound skill base in a new area. The key is to focus on the important skills at the start.
This video really opened my eyes when I saw it -- primarily because I realized that I had picked up a large number of skills in my life by doing exactly what he says!
So try approaching your golf -- and anything else you want to learn -- using Kaufman's mindset. And since I've been harping on it all week, let me suggest you begin this approach using the L-to-L swing drill as a starting place. It's easy to grasp and it builds basic skills you use in pretty much every part of your game.
And if you try to learn other things by using this mental approach, you might do more than just improve your golf. It might lead you in all kinds of exciting directions!
Saturday, June 30, 2018
Tyrrell Hatton on Pitch Shots (Video)
Tyrrell Hatton will likely be on the European Ryder Cup team later this year, so it's appropriate to take a look at how he plays pitch shots. Note that Tyrrell is playing only a 55-yard shot here. That's tricky for many players.
While Tyrrell says he swings "shoulder to shoulder" with this swing, you can see in the video that his hands actually never get to shoulder height on his backswing. Rather, his lead arm is parallel to the ground, which is quite normal for most players hitting a pitch shot.
He positions the ball in the middle of his stance for this shot, which creates a downward strike that gives him a reasonable amount of spin, but not enough to get the ball zipping backward once it hits the green. You don't want a lot of spin on this shot; ideally, you'd like it to hop once or twice and stop. Clean contact is the important thing here.
Ironically, as I watched Tyrrell's swing, I had the same reaction I did with Andrew Rice's video lesson in yesterday's post. Tyrrell is making a move that's almost identical to the L-to-L drill I keep mentioning. (This link goes to a post with the simplest version of that drill.)
I know I say it a lot, but the L-to-L drill is a fundamental move in the golf swing. The more you work on it, the better your impact will be, which means you'll get more distance with more accuracy than you would otherwise. And you get those advantages simply by choosing how you want to focus your practice -- in today's case, it would be short game work -- and then using the same basic drill with that goal in mind.
Since you'll be using the same drill each time, you'll continue to help your overall swing at the same time, which should cut the amount of practice time you need to keep your swing in shape.
It's a win-win situation.
While Tyrrell says he swings "shoulder to shoulder" with this swing, you can see in the video that his hands actually never get to shoulder height on his backswing. Rather, his lead arm is parallel to the ground, which is quite normal for most players hitting a pitch shot.
He positions the ball in the middle of his stance for this shot, which creates a downward strike that gives him a reasonable amount of spin, but not enough to get the ball zipping backward once it hits the green. You don't want a lot of spin on this shot; ideally, you'd like it to hop once or twice and stop. Clean contact is the important thing here.
Ironically, as I watched Tyrrell's swing, I had the same reaction I did with Andrew Rice's video lesson in yesterday's post. Tyrrell is making a move that's almost identical to the L-to-L drill I keep mentioning. (This link goes to a post with the simplest version of that drill.)
I know I say it a lot, but the L-to-L drill is a fundamental move in the golf swing. The more you work on it, the better your impact will be, which means you'll get more distance with more accuracy than you would otherwise. And you get those advantages simply by choosing how you want to focus your practice -- in today's case, it would be short game work -- and then using the same basic drill with that goal in mind.
Since you'll be using the same drill each time, you'll continue to help your overall swing at the same time, which should cut the amount of practice time you need to keep your swing in shape.
It's a win-win situation.
Friday, June 29, 2018
Andrew Rice on Clubface Control (Video)
This is one of the short Revolution Golf videos that GC is putting up at their website, and this one was posted Thursday. It focuses on keeping control of your clubface at impact, which can help you if you're working with the swing thoughts from the Bubba post earlier this week.
Rice says that you want to make sure you keep your spine angle at impact. That doesn't mean that you have to "keep your head down"; rather, it means that you don't want to "stand up" when you swing down. How is this different from "using the ground"? When "using the ground" only your lead knee straightens at impact, while when you "stand up" BOTH KNEES straighten at impact. Simple, right?
If you "stay down" as Rice suggests, you'll be forced to turn your shoulders and hips into your followthrough, which will help you square the clubface at impact.
Now, you may not realize it, but what Rice is teaching here isn't something new to you. In fact, if you've been following this blog for a while, you will probably recognize his drill as yet another version of the multipurpose L-to-L drill which I frequently recommend. Here's a link to my most recent post on a specialized version of the L-to-L drill, and that post has a link to another post with more basic versions of the drill.
Rice's version will teach you how to use the L-to-L drill with another swing thought. And the more things you can learn from a single drill, the simpler your practice becomes and the more likely you are to develop a simple, easily repeated swing.
Rice says that you want to make sure you keep your spine angle at impact. That doesn't mean that you have to "keep your head down"; rather, it means that you don't want to "stand up" when you swing down. How is this different from "using the ground"? When "using the ground" only your lead knee straightens at impact, while when you "stand up" BOTH KNEES straighten at impact. Simple, right?
If you "stay down" as Rice suggests, you'll be forced to turn your shoulders and hips into your followthrough, which will help you square the clubface at impact.
Now, you may not realize it, but what Rice is teaching here isn't something new to you. In fact, if you've been following this blog for a while, you will probably recognize his drill as yet another version of the multipurpose L-to-L drill which I frequently recommend. Here's a link to my most recent post on a specialized version of the L-to-L drill, and that post has a link to another post with more basic versions of the drill.
Rice's version will teach you how to use the L-to-L drill with another swing thought. And the more things you can learn from a single drill, the simpler your practice becomes and the more likely you are to develop a simple, easily repeated swing.
Tuesday, June 26, 2018
Bubba Watson on Swing Thoughts (Video)
Golfing World did this video a couple of years back, with Bubba passing on some of his thoughts on how he approaches the game. As usual, I'll be focusing on one specific thought from the video.
Starting around the 1:40 mark, Bubba talks about how he practices. No long practice sessions; he likes short sessions, 15 minutes or so, and he works on what needs working on. His example? Suppose his ball isn't cutting the way he wants. He goes out for maybe ten minutes and figures out why it isn't. Then he tries to overcome the problem.
Let me suggest a way to try Bubba's approach. The vast majority of weekend golfers have trouble hitting a draw, so let's use that as an example. (If you're problem is a fade, just use the same methodology but adjust accordingly.)
Let's ignore setup fundamentals and such for the time being. To make the ball draw, you have to hit the ball from slightly inside -- that means you have a slight in-to-out swing path -- and you want the clubface either square to your target or slightly closed (the latter will create a bigger curve). As long as you make an in-to-out swing and have the clubface square or closed, the ball is gonna draw.
Now, go out on the range and try to make an in-to-out swing that hits the ball with a closed clubface. I don't care whether you swing along your footline or not; I don't care if your stance is open, square or closed; I don't care how your swing looks. Forget what your instructor told you about the 'proper' way to swing. All I want you to do is find a way -- ANY WAY -- to make that ball draw. Start with a half- or three-quarter swing if you want, then stretch it out to a full swing. Find out how YOU can make the ball draw, learn how that swing feels, and then work till you can repeat that swing.
As Bubba says in the video, all that matters is how you score. Don't worry about how your swing looks; just get the results. This is what it means to "own your swing." And over time, as you keep using it and getting better with it, you'll gain more distance and control as it becomes second nature to you.
In a lot of ways, THAT is Bubba's secret that no one understands. It's not about having people applaud your swing; it's about learning to control the golf ball. Let them laugh, if that's what they want to do.
Trust me: They won't laugh for long after you start kicking their asses on the course.
Starting around the 1:40 mark, Bubba talks about how he practices. No long practice sessions; he likes short sessions, 15 minutes or so, and he works on what needs working on. His example? Suppose his ball isn't cutting the way he wants. He goes out for maybe ten minutes and figures out why it isn't. Then he tries to overcome the problem.
Let me suggest a way to try Bubba's approach. The vast majority of weekend golfers have trouble hitting a draw, so let's use that as an example. (If you're problem is a fade, just use the same methodology but adjust accordingly.)
Let's ignore setup fundamentals and such for the time being. To make the ball draw, you have to hit the ball from slightly inside -- that means you have a slight in-to-out swing path -- and you want the clubface either square to your target or slightly closed (the latter will create a bigger curve). As long as you make an in-to-out swing and have the clubface square or closed, the ball is gonna draw.
Now, go out on the range and try to make an in-to-out swing that hits the ball with a closed clubface. I don't care whether you swing along your footline or not; I don't care if your stance is open, square or closed; I don't care how your swing looks. Forget what your instructor told you about the 'proper' way to swing. All I want you to do is find a way -- ANY WAY -- to make that ball draw. Start with a half- or three-quarter swing if you want, then stretch it out to a full swing. Find out how YOU can make the ball draw, learn how that swing feels, and then work till you can repeat that swing.
As Bubba says in the video, all that matters is how you score. Don't worry about how your swing looks; just get the results. This is what it means to "own your swing." And over time, as you keep using it and getting better with it, you'll gain more distance and control as it becomes second nature to you.
In a lot of ways, THAT is Bubba's secret that no one understands. It's not about having people applaud your swing; it's about learning to control the golf ball. Let them laugh, if that's what they want to do.
Trust me: They won't laugh for long after you start kicking their asses on the course.
Wednesday, June 20, 2018
Jeff Flagg on Launching One 400 Yards (Video)
Almost three years ago I did a post about how 2014 long driving champ Jeff Flagg hits the long ball. Check that post out, by all means, but here's a video where Jeff demonstrates how to do it.
Jeff's three keys are:
Come on, give Jeff's advice a try. What have you got to lose... besides that short little dinky drive you hate?
Jeff's three keys are:
- Let your arms dictate club speed. He demonstrates this by throwing a rock sidearm.
- Open up your trail shoulder and remove all tension from your lead arm. You do this by letting your trailing elbow 'fly' -- that is, move away from your side during your backswing. This increases your swing arc, btw.
- Use the Flamingo Drill. Put all your weight on your lead foot, stand on the toe of your trail foot, and use your upper body to do most of the swing work -- just like throwing a rock sidearm. Please note that, although he's not trying to, he can't help but straighten his lead knee to "use the ground." This happens without conscious effort -- that's what Jeff wants you to understand.
Come on, give Jeff's advice a try. What have you got to lose... besides that short little dinky drive you hate?
Wednesday, June 6, 2018
Martin Hall on Daniel Berger's Warm-Up Drill (Video)
The School of Golf Extra Credit clip this week is a warm-up drill that Martin says Daniel Berger does before every round... but I'm calling it to your attention for a different reason than Martin does. Here's the drill:
Let's be blunt, folks: This is a difficult drill. You'll have to grip tightly with your lead hand, and swinging with any speed while keeping your trail palm consistently against your lead thumb -- without any of your trailing fingers touching the grip, by the way -- will take some concentration. So why do I want you to try it?
Martin says, almost as an afterthought, that this drill will increase your rotation. That is part of what I want you to get from this drill. But in order to make solid contact with the ball, you'll be almost forced to keep your upper lead arm and elbow against your side as you turn through contact. This move will help you square the clubface more easily.
In addition, the effort of keeping your trailing palm against your lead thumb -- combined with that upper-arm-against-your-side move -- will teach you how it feels when your trailing hand is squaring the clubface.
So this drill is a "two-fer," folks! It will teach you how to use your upper body and both hands to square the clubface. And the effort involved will reinforce your ability to recognize what "square" feels like, so you'll find that it takes less effort to create that feel when you swing normally. That's what I call a useful drill!
Let's be blunt, folks: This is a difficult drill. You'll have to grip tightly with your lead hand, and swinging with any speed while keeping your trail palm consistently against your lead thumb -- without any of your trailing fingers touching the grip, by the way -- will take some concentration. So why do I want you to try it?
Martin says, almost as an afterthought, that this drill will increase your rotation. That is part of what I want you to get from this drill. But in order to make solid contact with the ball, you'll be almost forced to keep your upper lead arm and elbow against your side as you turn through contact. This move will help you square the clubface more easily.
In addition, the effort of keeping your trailing palm against your lead thumb -- combined with that upper-arm-against-your-side move -- will teach you how it feels when your trailing hand is squaring the clubface.
So this drill is a "two-fer," folks! It will teach you how to use your upper body and both hands to square the clubface. And the effort involved will reinforce your ability to recognize what "square" feels like, so you'll find that it takes less effort to create that feel when you swing normally. That's what I call a useful drill!
Wednesday, May 30, 2018
Mike Malaska's Split Grip L-to-L Drill (Video)
With the Stanley Cup playoffs underway here in America, I thought it might be neat to give you a hockey-style drill. And since one of my favorite drills is the L-to-L drill (here's just one of the posts I've done on it, with two versions of the drill from Mike Malaska) and I also found a hockey-style L-to-L drill from Mike Malaska himself...
One thing I want you to note here is that Malaska says you can actually hit balls with this drill! That's unusual for hockey-style drills because of the split grip. While you wouldn't want to do this on the course, it's a great way to really feel how the wrists should work in order to uncock late in the downswing. After all, that's how you create clubhead speed.
Pay close attention to Malaska's hands when using the split grip. You'll note that his hands get very close to his thighs during impact, which will help you create the correct wrist motion with a split grip. Even with a split grip, you want to keep your wrists and forearms as relaxed as practical; that also helps you create clubhead speed.
Also notice that you have to get a good shoulder turn into your finish in order to keep your wrists from rolling over at impact. This is important if you want to create a lot of clubhead speed with a regular grip as well.
I love the fact that Malaska gives you so many views of how this drill looks from the viewpoint of the finish. You can use a mirror to help you get the correct plane -- that is, no forearm roll at the finish -- if you're having trouble.
I realize that, for many of you, this drill will have limited use. But if you're really having trouble getting the correct feel in the L-to-L drill, this may be the ticket for you.
One thing I want you to note here is that Malaska says you can actually hit balls with this drill! That's unusual for hockey-style drills because of the split grip. While you wouldn't want to do this on the course, it's a great way to really feel how the wrists should work in order to uncock late in the downswing. After all, that's how you create clubhead speed.
Pay close attention to Malaska's hands when using the split grip. You'll note that his hands get very close to his thighs during impact, which will help you create the correct wrist motion with a split grip. Even with a split grip, you want to keep your wrists and forearms as relaxed as practical; that also helps you create clubhead speed.
Also notice that you have to get a good shoulder turn into your finish in order to keep your wrists from rolling over at impact. This is important if you want to create a lot of clubhead speed with a regular grip as well.
I love the fact that Malaska gives you so many views of how this drill looks from the viewpoint of the finish. You can use a mirror to help you get the correct plane -- that is, no forearm roll at the finish -- if you're having trouble.
I realize that, for many of you, this drill will have limited use. But if you're really having trouble getting the correct feel in the L-to-L drill, this may be the ticket for you.
Friday, May 25, 2018
Martin Hall's "Buckle Before Buttons" Drill (Video)
This is one of Martin Hall's Home School videos, and it is a deceptively simple way to learn what a proper weight shift feels like.
Martin doesn't say this, but you can see it if you watch closely. When you set up next to the wall, you want your lead foot only an inch or two from it -- and when I tested it, I think just an inch worked best.
And note this little tip which you can see but Martin doesn't mention: When you touch your belt buckle to the wall and keep your chest from touching the wall, your spine is pretty much vertical. (There's a very slight arch but that is caused by clasping your hands behind your back, which pulls your shoulders back slightly. That's a naturally balanced position, similar to a soldier standing "at ease.") This drill teaches you to make a straight finish that takes pressure off your back.
Beyond that, it's all pretty simple. In order to (a) touch your belt buckle to the wall while (b) keeping your chest from touching the wall, you have to shift your weight onto your lead foot during your "downswing." If you hang back on your trailing foot, you will not be able to do this drill!
What this drill does is give you a "visual" feel for your finish -- and by visuaI I mean that you can actually see and measure what the desired finish position is like, if you want or need to. You can feel your buckle touching the wall, you can see that your chest doesn't touch, and you can use a mirror to see how close to vertical your back is when you do those two things. That way, you can guarantee that you get in the same position each time you do this drill, and that means you'll get the desired result much more easily and learn to repeat it more quickly. That's what makes a great drill!
Martin doesn't say this, but you can see it if you watch closely. When you set up next to the wall, you want your lead foot only an inch or two from it -- and when I tested it, I think just an inch worked best.
And note this little tip which you can see but Martin doesn't mention: When you touch your belt buckle to the wall and keep your chest from touching the wall, your spine is pretty much vertical. (There's a very slight arch but that is caused by clasping your hands behind your back, which pulls your shoulders back slightly. That's a naturally balanced position, similar to a soldier standing "at ease.") This drill teaches you to make a straight finish that takes pressure off your back.
Beyond that, it's all pretty simple. In order to (a) touch your belt buckle to the wall while (b) keeping your chest from touching the wall, you have to shift your weight onto your lead foot during your "downswing." If you hang back on your trailing foot, you will not be able to do this drill!
What this drill does is give you a "visual" feel for your finish -- and by visuaI I mean that you can actually see and measure what the desired finish position is like, if you want or need to. You can feel your buckle touching the wall, you can see that your chest doesn't touch, and you can use a mirror to see how close to vertical your back is when you do those two things. That way, you can guarantee that you get in the same position each time you do this drill, and that means you'll get the desired result much more easily and learn to repeat it more quickly. That's what makes a great drill!
Wednesday, May 23, 2018
Kristin Sunderhaft on Ball Position (Video)
Kristin Sunderhaft, an LPGA teaching pro in Las Vegas, did this video some time back on ball position. It's helpful because you can actually see how she's positioning the ball, so have a look:
Kristin teaches three ball positions for your full swing, depending on what club you're using. That may sound different from what I teach -- I position the ball under my hands -- but bear in mind that, as the clubs get longer, my arms have to reach out a bit and that straightens my trailing elbow. And as that happens, my hands move a bit more toward the target as the clubs get longer.
So Kristen's method isn't really that much different from mine, but many of you may find it easier to understand what's happening when you see her in the video. So here are the three ball positions:
One last thought: You may think this setup with the two clubs is a reasonably recent invention, perhaps since Hogan really started focusing on mechanics. But here's a photo I posted in a past post about Harry Vardon's method for playing a draw. See anything familiar?

That line drawing in the upper right-hand corner -- and the chalk lines drawn on the ground -- are doing the exact same thing as Kristin's clubs. This is a time-honored method of visualizing ball position, and you should make use of it too.
Kristin teaches three ball positions for your full swing, depending on what club you're using. That may sound different from what I teach -- I position the ball under my hands -- but bear in mind that, as the clubs get longer, my arms have to reach out a bit and that straightens my trailing elbow. And as that happens, my hands move a bit more toward the target as the clubs get longer.
So Kristen's method isn't really that much different from mine, but many of you may find it easier to understand what's happening when you see her in the video. So here are the three ball positions:
- Wedges: Ball in the center of your stance.
- Driver: Ball just off your lead heel or lead instep.
- All other clubs: Ball is slightly left of the center position.
One last thought: You may think this setup with the two clubs is a reasonably recent invention, perhaps since Hogan really started focusing on mechanics. But here's a photo I posted in a past post about Harry Vardon's method for playing a draw. See anything familiar?
That line drawing in the upper right-hand corner -- and the chalk lines drawn on the ground -- are doing the exact same thing as Kristin's clubs. This is a time-honored method of visualizing ball position, and you should make use of it too.
Friday, May 4, 2018
Martin Hall's Downswing Drill (Video)
This short Home School video is actually pretty sweet. It's an equipment-free, do-it-in-your-living-room drill to help you learn an in-to-out swing path. And all you need is a magazine and a convenient wall.
Just a few simple steps.
Still, you might want to try it a time or two, just to get a feel for starting your downswing in a more downward manner. After all, if you don't 'drop the club' a bit as you start down, you'll really have trouble learning to draw the ball. But in that case, I would only try to keep the magazine tip against the wall for perhaps half as long as Martin shows in the video -- that is, halfway between your shoulders and waist. That way, it will help improve your footwork if you tend to drive your legs too hard to start your downswing.
Just a few simple steps.
- Roll up the magazine and hold it like a club. Martin says a golf magazine; that's because it will give you a 'club' that's roughly a foot long.
- Stand with your back to the wall and make a 3/4 backswing. That's means your hands are shoulder high.
- At the top of your 3/4 backswing, the tip of the magazine should touch the wall. And it should stay in touch with the wall during your downswing until your hands are waist high.
- Then return your hands to their impact position.
Still, you might want to try it a time or two, just to get a feel for starting your downswing in a more downward manner. After all, if you don't 'drop the club' a bit as you start down, you'll really have trouble learning to draw the ball. But in that case, I would only try to keep the magazine tip against the wall for perhaps half as long as Martin shows in the video -- that is, halfway between your shoulders and waist. That way, it will help improve your footwork if you tend to drive your legs too hard to start your downswing.
Saturday, April 28, 2018
Kyle Morris on the "Go-To" Shot (Video)
GCA coach Kyle Morris posted this video on how to develop a "go-to" shot, which he defines as a shot that starts one way, curves back and never over-curves. If you draw a line toward your target, a go-to shot will start to one side and curve back toward that line but never cross it.
The drill is simple. You set up an obstacle of some sort -- he uses an alignment stick -- about eight paces ahead of you. Then you try to start the ball to one side and get it to curve back WITHOUT crossing to the other side of the stick.
This is a great drill because it helps you think less about mechanics and more about the shot shape, to think less about how your swing the club and more about hitting the ball where you're looking.
Learning to feel how the shot should move can take your game to a different level. And this drill is about getting results when your popcorn is all burnt. That's when you need it most!
The drill is simple. You set up an obstacle of some sort -- he uses an alignment stick -- about eight paces ahead of you. Then you try to start the ball to one side and get it to curve back WITHOUT crossing to the other side of the stick.
This is a great drill because it helps you think less about mechanics and more about the shot shape, to think less about how your swing the club and more about hitting the ball where you're looking.
Learning to feel how the shot should move can take your game to a different level. And this drill is about getting results when your popcorn is all burnt. That's when you need it most!
Friday, April 20, 2018
David Ogrin's "Chain Club" Drill (Video)
GCA coach David Ogrin gave a tip on Morning Drive Thursday that used an interesting piece of equipment made from a shaft, a golf ball and a length of chain. Here, take a look:
It's an interesting way to teach clubhead speed -- specifically, how to use your hands and arms to create it. It's yet another approach that uses clubs in different ways to teach you when to uncock your wrists. Hear that swish at the end of Ogrin's swing?
Yeah, you've heard that before. You understand how this drill works now, don't you?
Of course you do.
The problem comes when you try to get hold of a club shaft with a golf ball and a chain instead of a club head. Fret not, my friends. There are other ways to get the same benefits.
Let me refer you to two of my past posts with no less than three -- yes, THREE! -- videos featuring Mike Malaska. Ironically, I posted them within a week of each other.
It's an interesting way to teach clubhead speed -- specifically, how to use your hands and arms to create it. It's yet another approach that uses clubs in different ways to teach you when to uncock your wrists. Hear that swish at the end of Ogrin's swing?
Yeah, you've heard that before. You understand how this drill works now, don't you?
Of course you do.
The problem comes when you try to get hold of a club shaft with a golf ball and a chain instead of a club head. Fret not, my friends. There are other ways to get the same benefits.
Let me refer you to two of my past posts with no less than three -- yes, THREE! -- videos featuring Mike Malaska. Ironically, I posted them within a week of each other.
- The first is called Jim Flick on the TWO Pendulums in Your Swing and it has two videos with different versions of the L-to-L drill, which I think is one of the greatest drills for creating swing speed ever created. There's a "standard" version to teach how your hands create clubhead speed, and an "advanced" version that uses the drill to teach shot shaping.
- The other post is Mike Malaska on Controlling the Clubface, and it works well with the L-to-L drill. It teaches you how to use your hands to control the clubface, which is part of what that "advanced" L-to-L drill from the other post teaches you.
Thursday, April 19, 2018
Countering a Push-Slice
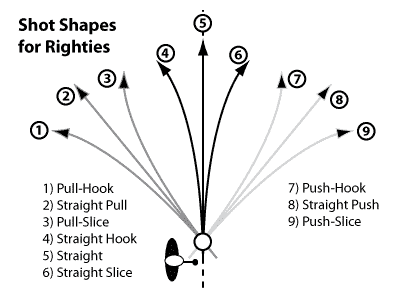
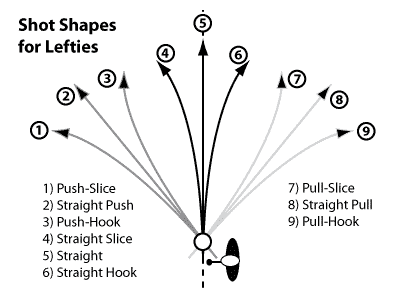
Last week I did a post about Patrick Reed's driver swings. One of those swings was something Patrick calls a "slinger hook," which is just another name for a push-hook. That's when the ball starts on an in-to-out path -- that is, the clubhead swings out across your aimline -- and the ball then curves back across the aimline. It's a like a giant half-circle that swings around your body. If you aim correctly, the ball curves back toward the target.
In the comments I promised Phil I'd do a post about push-slices, those nasty shots that start out on an in-to-out path BUT continue to curve AWAY from you, rather than around you. The result is that no matter what you do, that ball ain't never gonna land near the target! For a righthander the ball ends up in the weeds on the right side of the course; for lefties, it's deep in the left rough.
The image below this paragraph shows the nine potential shot shapes you can hit if you're a rightie. Number 7 is Patrick's slinger hook, number 9 is the push-slice.
And the image below this paragraph shows the nine potential shot shapes you can hit if you're a leftie. In this case, number 3 is the slinger hook, number 1 is the push-slice.
Now, the difference between the slinger hook which Patrick uses to great effect, and the push-slice which nobody gets any good out of, is the clubface angle.
The most obvious fix would be to take a stronger grip at address, and if you're doing everything else correctly during your swing, that would likely fix it. Too many players have other problems to say that for sure, though.
In the comments I promised Phil I'd do a post about push-slices, those nasty shots that start out on an in-to-out path BUT continue to curve AWAY from you, rather than around you. The result is that no matter what you do, that ball ain't never gonna land near the target! For a righthander the ball ends up in the weeds on the right side of the course; for lefties, it's deep in the left rough.
The image below this paragraph shows the nine potential shot shapes you can hit if you're a rightie. Number 7 is Patrick's slinger hook, number 9 is the push-slice.
And the image below this paragraph shows the nine potential shot shapes you can hit if you're a leftie. In this case, number 3 is the slinger hook, number 1 is the push-slice.
Now, the difference between the slinger hook which Patrick uses to great effect, and the push-slice which nobody gets any good out of, is the clubface angle.
- In the slinger hook, the face is CLOSED relative to the path.
- In the push-slice, the face is OPEN relative to the path.
The most obvious fix would be to take a stronger grip at address, and if you're doing everything else correctly during your swing, that would likely fix it. Too many players have other problems to say that for sure, though.
- Believe it or not, something as simple as standing too far from the ball can cause you to push-slice. It creates an overly dramatic in-to-out swing that delays your clubface from closing on time.
- Likewise, you can have your ball teed up too far back in your stance. You won't have enough time to square the clubface before it reaches the ball.
- Some players slide their hips too far forward (toward the target) during their downswing, causing them to lean backwards at impact. That square clubface you had at address is now open because you tilted your shoulders back and opened them. But players with overactive hands sometimes flip the club and create a HUGE slinger hook that goes deep into the opposite trees. this is sometimes called "getting stuck."
- You have no doubt heard that good players reroute the club on the way down and flatten their swing plane. That does happen for many players. But one problem instructors sometimes overlook is that you can flatten your club plane too much -- called "laying it off" -- and open the clubface on the way down. If you make a strong hip drive on the way down, you can end up lifting your trailing elbow while your hands drop down. I know about this problem firsthand; it took me months to track it down, and during that time I hit the ball both ways -- push-slices and pull-hooks. It's a nasty problem!
- And you can simply swing your arms out too far from your body during your downswing. Specifically, your lead arm gets farther from your body than it was at address.
- If you're standing too far from the ball, just stand a little closer.
- If the ball is too far back in your stance, move it a little more forward.
- If you slide too far forward, think "down" instead of "slide" to start your downswing. The basketball drill is a great way to work on this. I periodically remind folks of this drill. You can find the basketball drill in this post.
- If you flatten your swing too much as you start down, the basketball drill is also good for this one. Since it eliminates some of the forward slide, it also redirects your leg drive more "into the ground."
- And if you're swinging too much in-to-out, you can use the old "glove under lead arm" drill. There are a number of similar drills, all of them concerned with connection. Some use a glove or towel held under your lead arm during your swing. And here's a post with a video of Ben Hogan's connection drill, which teaches connection with both arms.
Sunday, April 15, 2018
Martin Hall on Getting More Distance (Video)
Hall did this video last week to help older players get more distance, but not understanding how to use your hands and arms keeps a lot of players from hitting it out there. This video is a very simple explanation of how it works.
Okay, there are two parts to this, and if you're too fixated on swinging around your body you'll never get the hang of it.
And yes, I have more videos to help you. I've posted them in past posts, so here are the links.
The first post teaches you how that upward cocking motion creates your "top of backswing" position. It's called Using Your Hands in the Takeaway and it features K.J. Choi's instructor Steven Bann. As I said, it will help you understand how that upward cocking action creates the so-called "textbook" position at the top.
And the other post is called Jim Flick on the TWO Pendulums in Your Swing, which I also referenced in the Nick Faldo post from yesterday. That "L-to-L" drill is a great way to learn that lead wrist upcock motion that Martin Hall is talking about.
Yes, I know I recommend a lot of drills over and over, but that's because they are proven drills that teach a number of skills and they work for almost everybody. Work with them and you'll find out for yourself.
And in this case, you'll pick up some extra distance, even if you aren't particularly old. Yet.
Okay, there are two parts to this, and if you're too fixated on swinging around your body you'll never get the hang of it.
- First, you cock your trailing elbow up and down.
- Second, you cock your lead wrist up and down.
And yes, I have more videos to help you. I've posted them in past posts, so here are the links.
The first post teaches you how that upward cocking motion creates your "top of backswing" position. It's called Using Your Hands in the Takeaway and it features K.J. Choi's instructor Steven Bann. As I said, it will help you understand how that upward cocking action creates the so-called "textbook" position at the top.
And the other post is called Jim Flick on the TWO Pendulums in Your Swing, which I also referenced in the Nick Faldo post from yesterday. That "L-to-L" drill is a great way to learn that lead wrist upcock motion that Martin Hall is talking about.
Yes, I know I recommend a lot of drills over and over, but that's because they are proven drills that teach a number of skills and they work for almost everybody. Work with them and you'll find out for yourself.
And in this case, you'll pick up some extra distance, even if you aren't particularly old. Yet.
Subscribe to:
Posts (Atom)