GCA coach Craig Renshaw showed this little drill to help you improve your uphill and downhill putting... but I'm going to alter it and create a greens-reading drill.
Craig's drill is simple: Just place tees at various distances on a slope and putt from either end, trying to get your distance correct. This is a great drill that you can use anywhere on the practice green; you don't even need a hole.
NOW let's turn it into a greens-reading drill!
Here's what I want you to do: Find a slope on the green, just as Craig suggests. But I want you to place the tees ACROSS the slope, not up and down along it! If you do this, you can practice several putting distances with the same amount of sideslope. This will help you learn how distance affects the force you need to hit the ball to different holes on the same slope.
Might make an interesting competitive drill during a boring practice session as well.

Showing posts with label green-reading. Show all posts
Showing posts with label green-reading. Show all posts
Thursday, February 22, 2018

Friday, May 5, 2017
Bernhard Langer on Reading Greens (Video)
I know I do a lot of similar posts on reading greens, but it's something we all have to learn. I do a lot of posts, in hopes that at least one of them will "click" with you and make it easier for you to remember the key points.
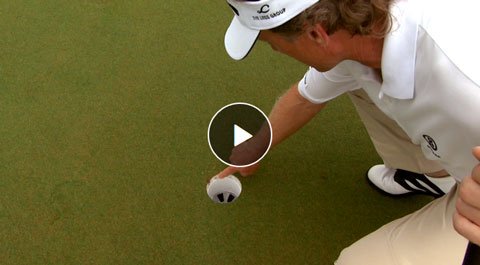
This video is from GC's PGA Tour Champions Learning Center on Wednesday. Bernhard Langer gives you the basics of reading greens. The site won't let me embed the video, so you can use the link in the previous sentence or click the photo below to go to the GC page.
A quick summary of what Bernhard says:
Yes, those are the basics. Not complicated, but we still tend to get confused when we try to read greens. Hopefully this video will help you keep the basics clear in your mind.
This video is from GC's PGA Tour Champions Learning Center on Wednesday. Bernhard Langer gives you the basics of reading greens. The site won't let me embed the video, so you can use the link in the previous sentence or click the photo below to go to the GC page.
A quick summary of what Bernhard says:
- shiny grass = grass growing away from you = putting downgrain
- dull grass = grass growing toward you = putting against the grain
- rough edge of the hole = grass growing away from hole (Bernhard is showing the rough edge in the photo above)
- smooth edge of hole = grass growing toward hole
Yes, those are the basics. Not complicated, but we still tend to get confused when we try to read greens. Hopefully this video will help you keep the basics clear in your mind.
Sunday, March 5, 2017
One Simple Tip to Improve Your Greens Reading
Jacob Spott is a PGA professional in Abingdon, Virginia and this post from his blog has a lot of information about reading Bermuda greens. I want to focus on this specific tip because I think it will help a lot of you.
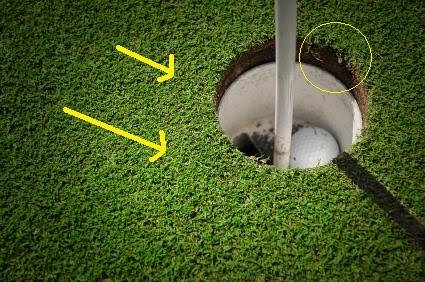
See that jagged, chewed-up edge of the hole? That's your tip-off to the direction in which the grain is growing. Here's what he says:
.
Jake's post has a lot of good info about reading graining Bermuda greens, so make sure you take a few moments to read it.
See that jagged, chewed-up edge of the hole? That's your tip-off to the direction in which the grain is growing. Here's what he says:
Two things to remember around the hole:The jagged edge of the hole is jagged because the roots of the grass were growing from inside the hole and they got chopped off when the hole was cut. As you're looking at the photo, the jagged bit runs from around 1 o'clock to 4 o'clock, so the grain is headed to the right of the photo.
It is important to pay attention to the grain around the hole because, let's say, you are putting from the lower left corner of the picture, your putt (even though it might look straight) will break to the right. If you are putting from the upper left corner, it should be very fast down grain with little break.
- Sharp edge of cup = high side of the hole or fast side
- Jagged edge of cup = low side of the hole or slow side
.
Jake's post has a lot of good info about reading graining Bermuda greens, so make sure you take a few moments to read it.
Thursday, May 14, 2015
Golf Magazine on Reading Greens... and AimPoint
The May issue of Golf Magazine has a huge spread covering 7 different techniques to help you read greens better. And the best thing about it is -- and I admit, it surprised me -- is that most of the material from that article is available online at this link.
For example, one of those techniques is a tip from teacher Todd Somes on whether to read your putt from behind the ball or behind the hole.

Somes gives this simple guideline:
But here's the REAL gem you'll want to see...
The article also includes an explanation of the simplified AimPoint Express technique that so many pros are using, INCLUDING A VIDEO that demonstrates how to use it. Yes, you read that correctly -- Mark Sweeney, the AimPoint guy himself, actually tells you how to do the simple version in the article, both in the magazine and online. In the online article, the video is on page 1 and the written description is on page 3.
Now that's worth taking the time to visit the website, isn't it?
For example, one of those techniques is a tip from teacher Todd Somes on whether to read your putt from behind the ball or behind the hole.
Somes gives this simple guideline:
- If your putt is downhill, read it from behind the hole.
- If your putt is uphill, read it from behind the ball.
But here's the REAL gem you'll want to see...
The article also includes an explanation of the simplified AimPoint Express technique that so many pros are using, INCLUDING A VIDEO that demonstrates how to use it. Yes, you read that correctly -- Mark Sweeney, the AimPoint guy himself, actually tells you how to do the simple version in the article, both in the magazine and online. In the online article, the video is on page 1 and the written description is on page 3.
Now that's worth taking the time to visit the website, isn't it?
Sunday, November 16, 2014
A Very Useful Green Reading Tip from Dave Pelz
This is a really cool green reading tip from a golf.com article by Dave Pelz that can help you learn to read greens by seeing the actual amount of break for a given slope.
The article has a step-by-step procedure, but here are the photos that accompany the article. Note that in the top picture, the yellow ball is right behind the hole. In the second picture, the yellow ball is where you're aiming while the hole is where the ball is finishing. (Yes, Dave has moved the yellow ball to his new aim point in the second picture.)
This is a really neat way to actually see how much a putt will break on a given amount of slope. The best part of it all is that you can see how much the putt breaks at the speed you like to putt! You can try hitting the ball so it dies in the hole, and so it runs 18 inches past the hole, and whatever other speed you want to try... and then you can pick the way that lets you make the most putts.
With a little practice, this routine could really help your confidence when you stand over a putt. I think it's definitely one of the best drills Dave Pelz has ever recommended.
The article has a step-by-step procedure, but here are the photos that accompany the article. Note that in the top picture, the yellow ball is right behind the hole. In the second picture, the yellow ball is where you're aiming while the hole is where the ball is finishing. (Yes, Dave has moved the yellow ball to his new aim point in the second picture.)
This is a really neat way to actually see how much a putt will break on a given amount of slope. The best part of it all is that you can see how much the putt breaks at the speed you like to putt! You can try hitting the ball so it dies in the hole, and so it runs 18 inches past the hole, and whatever other speed you want to try... and then you can pick the way that lets you make the most putts.
With a little practice, this routine could really help your confidence when you stand over a putt. I think it's definitely one of the best drills Dave Pelz has ever recommended.
Tuesday, August 19, 2014
The Basics of Green-Reading, AimPoint Express Style
Here's a link to a golf.com article that explains the basics of AimPoint Express, the simplified green-reading system being used by Adam Scott, Stacy Lewis, and other players.
Here's a general tip I found in the article that should help you make better putts even without using the AimPoint Express system (I added the emphasis in the second paragraph):
Here's a general tip I found in the article that should help you make better putts even without using the AimPoint Express system (I added the emphasis in the second paragraph):
Here's a test of your green-reading savvy: Imagine a clock face on a typical back-to-front-sloping green, with the hole at the center, and the 12 o'clock position representing a straight downhill putt. Which putt will break the most: A sidehiller from the three o'clock position? A downhill, sidehill putt from two o'clock? Or an uphill sidehill putt from four o'clock? (Assume that each putt is hit with excellent speed, so that it would roll 1.5 feet beyond the hole if it missed.) If you said that the sidehill putt (three o'clock) would break the most, you're in the majority—but you're wrong. The downhill putt from two o'clock will break the most and the uphill putt from four o'clock the least.
Why? A putt breaks because it is falling due to gravity. Since the putt from two o'clock is slightly downhill, it's hit more softly than the three o'clock putt, so it takes more time to reach the hole. Since gravity has a longer time to act, the ball breaks more.Even if you don't try the AimPoint Express technique, that tip alone should save you some strokes.
Subscribe to:
Posts (Atom)